- Intro
- Software requirements
- Pre-installation Actions
- NVIDIA machine learning
- NVIDIA GPU driver
- CUDA ToolKit and cuDNN
- Miniconda
- Virtual environment
- Install TensorFlow
- Install JupyterLab and matplotlib
- Run TensorFlow in JupyterLab
- Install VSCode
- Run TensorFlow in VSCode
- Summary
- Further reading
- Reference
Intro
- Ubuntu 18.04.5 LTS
- GTX 1050ti
- TensorFlow 2.6.0
- NVIDIA® GPU drivers 470.57.02
- CUDA 11.4
- cuDNN 8.2.4.15
Software requirements
- NVIDIA® GPU drivers —
CUDA® 11.2requires450.80.02or higher. - CUDA® Toolkit —TensorFlow supports
CUDA® 11.2(TensorFlow >= 2.5.0) - cuDNN SDK 8.1.0 cuDNN versions.
- Miniconda — Create a virtual environment.
Pre-installation Actions
GCC
1
2
3
4
5
6
7
8
9
$ gcc --version
Command 'gcc' not found, but can be installed with:
sudo apt install gcc
$ sudo apt install gcc
$ gcc --version
gcc (Ubuntu 7.5.0-3ubuntu1~18.04) 7.5.0
Copyright (C) 2017 Free Software Foundation, Inc.
This is free software; see the source for copying conditions.  There is NO
warranty; not even for MERCHANTABILITY or FITNESS FOR A PARTICULAR PURPOSE.
NVIDIA package repositories
1
2
3
4
5
$ wget https://developer.download.nvidia.com/compute/cuda/repos/ubuntu1804/x86_64/cuda-ubuntu1804.pin
$ sudo mv cuda-ubuntu1804.pin /etc/apt/preferences.d/cuda-repository-pin-600
$ sudo apt-key adv --fetch-keys https://developer.download.nvidia.com/compute/cuda/repos/ubuntu1804/x86_64/7fa2af80.pub
$ sudo add-apt-repository "deb https://developer.download.nvidia.com/compute/cuda/repos/ubuntu1804/x86_64/ /"
$ sudo apt-get update
NVIDIA machine learning
1
2
3
4
$ wget http://developer.download.nvidia.com/compute/machine-learning/repos/ubuntu1804/x86_64/nvidia-machine-learning-repo-ubuntu1804_1.0.0-1_amd64.deb

$ sudo apt install ./nvidia-machine-learning-repo-ubuntu1804_1.0.0-1_amd64.deb
$ sudo apt-get update
NVIDIA GPU driver
1
$ sudo apt-get install --no-install-recommends nvidia-driver-470
Note: You need to use version
470here. The official website of TensorFlow writes450.80.02. The actual test fails.
Reboot and check that GPUs are visible using the following command.
1
2
3
4
5
6
7
8
9
10
11
12
13
14
15
16
17
18
19
20
21
22
23
24
25
26
$ nvidia-smi
Fri Sep 24 20:57:50 2021
+-----------------------------------------------------------------------------+
| NVIDIA-SMI 470.57.02    Driver Version: 470.57.02    CUDA Version: 11.4     |
|-------------------------------+----------------------+----------------------+
| GPU  Name        Persistence-M| Bus-Id        Disp.A | Volatile Uncorr. ECC |
| Fan  Temp  Perf  Pwr:Usage/Cap|         Memory-Usage | GPU-Util  Compute M. |
|                               |                      |               MIG M. |
|===============================+======================+======================|
|   0  NVIDIA GeForce ...  On   | 00000000:01:00.0  On |                  N/A |
| 30%   39C    P5    N/A /  75W |    458MiB /  4036MiB |     22%      Default |
|                               |                      |                  N/A |
+-------------------------------+----------------------+----------------------+

+-----------------------------------------------------------------------------+
| Processes:                                                                  |
|  GPU   GI   CI        PID   Type   Process name                  GPU Memory |
|        ID   ID                                                   Usage      |
|=============================================================================|
|    0   N/A  N/A      1084      G   /usr/lib/xorg/Xorg                 20MiB |
|    0   N/A  N/A      1140      G   /usr/bin/gnome-shell               69MiB |
|    0   N/A  N/A      8342      G   /usr/lib/xorg/Xorg                165MiB |
|    0   N/A  N/A      8445      G   /usr/bin/gnome-shell              128MiB |
|    0   N/A  N/A      8900      G   ...AAAAAAAAA= --shared-files       26MiB |
|    0   N/A  N/A      9133      G   ...AAAAAAAAA= --shared-files       42MiB |
+-----------------------------------------------------------------------------+
CUDA ToolKit and cuDNN
1
2
3
4
5
6
7
8
$ wget https://developer.download.nvidia.com/compute/cuda/11.4.2/local_installers/cuda-repo-ubuntu1804-11-4-local_11.4.2-470.57.02-1_amd64.deb
$ sudo dpkg -i cuda-repo-ubuntu1804-11-4-local_11.4.2-470.57.02-1_amd64.deb
$ sudo apt-key add /var/cuda-repo-ubuntu1804-11-4-local/7fa2af80.pub
$ sudo apt-get update
$ sudo apt-get -y install cuda

$ sudo apt-get install libcudnn8=8.2.4.15-1+cuda11.4
$ sudo apt-get install libcudnn8-dev=8.2.4.15-1+cuda11.4
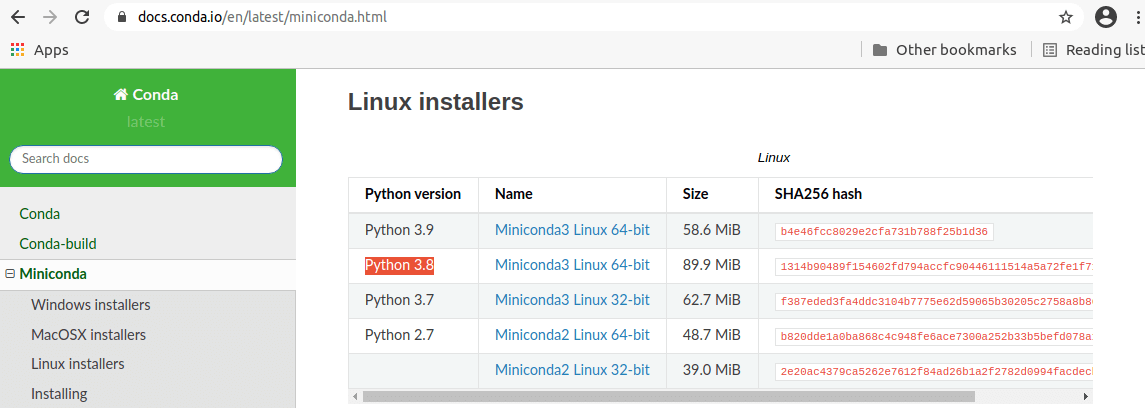
Miniconda
Download Python 3.8 installation script from https://docs.conda.io/en/latest/miniconda.html.
Make the installation script executable
1
$ chmod +x Miniconda3-latest-Linux-x86_64.sh
Run the installation script
1
$ ./Miniconda3-latest-Linux-x86_64.sh
Restart the terminal and make conda activate.
Virtual environment
Create and activate a virtual environment.
1
2
$ conda create -n tensorflow python=3.8.5
$ conda activate tensorflow
Install TensorFlow
1
$ pip install tensorflow==2.6.0
Verify the install
1
2
3
4
5
$ python -c "import tensorflow as tf;print('Num GPUs Available: ', len(tf.config.list_physical_devices('GPU')))"
2021-09-24 22:58:29.079068: I tensorflow/stream_executor/cuda/cuda_gpu_executor.cc:937] successful NUMA node read from SysFS had negative value (-1), but there must be at least one NUMA node, so returning NUMA node zero
2021-09-24 22:58:29.121607: I tensorflow/stream_executor/cuda/cuda_gpu_executor.cc:937] successful NUMA node read from SysFS had negative value (-1), but there must be at least one NUMA node, so returning NUMA node zero
2021-09-24 22:58:29.122535: I tensorflow/stream_executor/cuda/cuda_gpu_executor.cc:937] successful NUMA node read from SysFS had negative value (-1), but there must be at least one NUMA node, so returning NUMA node zero
Num GPUs Available:  1
Install JupyterLab and matplotlib
1
$ pip install jupyterlab matplotlib
Run TensorFlow in JupyterLab
1
$ jupyter lab
JupyterLab will be automatically opened in a browser.
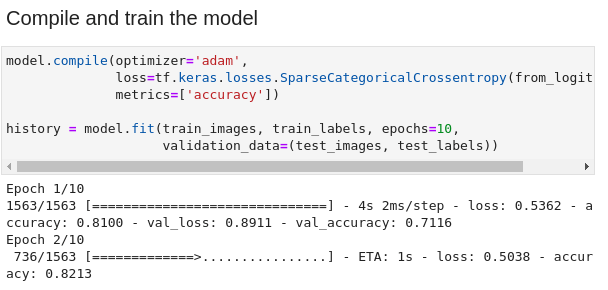
Download and import CNN notebook from https://www.tensorflow.org/tutorials/images/cnn.

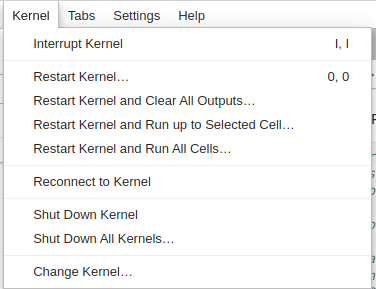
Restart Kernel and Run All Cells
When the train is running, check GPU processes, you can see ...nvs/tensorflow/bin/python, which means that the GPU is being used to train the model.
1
2
3
4
5
6
7
8
9
10
11
12
13
14
15
16
17
18
19
20
21
22
23
24
25
26
27
$ nvidia-smi
Fri Sep 24 23:01:38 2021
+-----------------------------------------------------------------------------+
| NVIDIA-SMI 470.57.02    Driver Version: 470.57.02    CUDA Version: 11.4     |
|-------------------------------+----------------------+----------------------+
| GPU  Name        Persistence-M| Bus-Id        Disp.A | Volatile Uncorr. ECC |
| Fan  Temp  Perf  Pwr:Usage/Cap|         Memory-Usage | GPU-Util  Compute M. |
|                               |                      |               MIG M. |
|===============================+======================+======================|
|   0  NVIDIA GeForce ...  On   | 00000000:01:00.0  On |                  N/A |
| 30%   48C    P0    N/A /  75W |   3842MiB /  4036MiB |     66%      Default |
|                               |                      |                  N/A |
+-------------------------------+----------------------+----------------------+

+-----------------------------------------------------------------------------+
| Processes:                                                                  |
|  GPU   GI   CI        PID   Type   Process name                  GPU Memory |
|        ID   ID                                                   Usage      |
|=============================================================================|
|    0   N/A  N/A      1052      G   /usr/lib/xorg/Xorg                 20MiB |
|    0   N/A  N/A      1125      G   /usr/bin/gnome-shell               72MiB |
|    0   N/A  N/A      1409      G   /usr/lib/xorg/Xorg                153MiB |
|    0   N/A  N/A      1532      G   /usr/bin/gnome-shell              107MiB |
|    0   N/A  N/A      2066      G   ...AAAAAAAAA= --shared-files       30MiB |
|    0   N/A  N/A      2735      G   ...AAAAAAAAA= --shared-files       55MiB |
|    0   N/A  N/A      3294      C   ...nvs/tensorflow/bin/python     3395MiB |
+-----------------------------------------------------------------------------+
Install VSCode
Go to Official Website to download and install VSCode.
Open VSCode and install Python support.
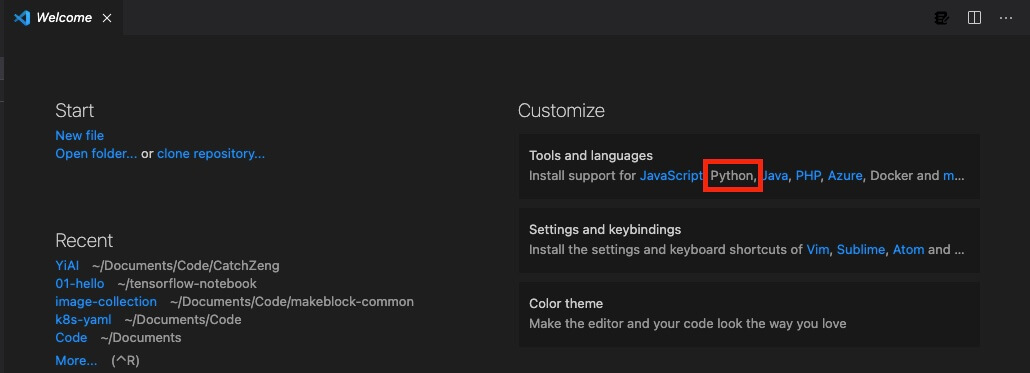
Open the created ~/tensorflow-notebook/01-hello/hello.ipynb, and select Python as the created virtual environment.

Run TensorFlow in VSCode

Summary
At this point, the deep learning environment has been set up. You can choose to use the command line, JupyterLab or VSCode for development according to your own habits.
Further reading
- Deep Learning (TensorFlow, JupyterLab, VSCode) on Mac
- Deep Learning (TensorFlow, JupyterLab, VSCode) on Apple Silicon M1 Mac
- Installing TensorFlow GPU on Win10
- Apple Silicon Mac M1/M2 natively supports TensorFlow 2.10 GPU acceleration (tensorflow-metal PluggableDevice)
 AI - Ubuntu 机器学习环境 (TensorFlow GPU, JupyterLab, VSCode)