- 介绍
- 所需软件
- 安装前
- NVIDIA machine learning
- NVIDIA GPU driver
- CUDA ToolKit and cuDNN
- Miniconda
- 虚拟环境
- 安装 TensorFlow
- 安装 JupyterLab 和 matplotlib
- 在 JupyterLab 中运行 TensorFlow
- 安装 VSCode
- VSCode 运行 TensorFlow
- 小结
- 延伸阅读
- 参考链接
介绍
- Ubuntu 18.04.5 LTS
- GTX 1050ti
- TensorFlow 2.6.0
- NVIDIA® GPU drivers 470.57.02
- CUDA 11.4
- cuDNN 8.2.4.15
所需软件
- NVIDIA® GPU drivers —
CUDA® 11.2需要450.80.02或者更高版本。 - CUDA® Toolkit — TensorFlow 所需
CUDA® 11.2(TensorFlow >= 2.5.0) - cuDNN SDK 8.1.0 cuDNN versions。
- Miniconda — 创建虚拟环境。
安装前
GCC
1
2
3
4
5
6
7
8
9
$ gcc --version
Command 'gcc' not found, but can be installed with:
sudo apt install gcc
$ sudo apt install gcc
$ gcc --version
gcc (Ubuntu 7.5.0-3ubuntu1~18.04) 7.5.0
Copyright (C) 2017 Free Software Foundation, Inc.
This is free software; see the source for copying conditions.  There is NO
warranty; not even for MERCHANTABILITY or FITNESS FOR A PARTICULAR PURPOSE.
NVIDIA package repositories
1
2
3
4
5
$ wget https://developer.download.nvidia.com/compute/cuda/repos/ubuntu1804/x86_64/cuda-ubuntu1804.pin
$ sudo mv cuda-ubuntu1804.pin /etc/apt/preferences.d/cuda-repository-pin-600
$ sudo apt-key adv --fetch-keys https://developer.download.nvidia.com/compute/cuda/repos/ubuntu1804/x86_64/7fa2af80.pub
$ sudo add-apt-repository "deb https://developer.download.nvidia.com/compute/cuda/repos/ubuntu1804/x86_64/ /"
$ sudo apt-get update
NVIDIA machine learning
1
2
3
4
$ wget http://developer.download.nvidia.com/compute/machine-learning/repos/ubuntu1804/x86_64/nvidia-machine-learning-repo-ubuntu1804_1.0.0-1_amd64.deb

$ sudo apt install ./nvidia-machine-learning-repo-ubuntu1804_1.0.0-1_amd64.deb
$ sudo apt-get update
NVIDIA GPU driver
1
$ sudo apt-get install --no-install-recommends nvidia-driver-470
注:这里需要使用 ``470
版本,TensorFlow 官网写的是450.80.02以上,实测失败。 这里可以使用apt-cache search nvidia-driver` 来查找可用的最新版本。
重启并使用以下命令检查 GPU 是否可见。
1
2
3
4
5
6
7
8
9
10
11
12
13
14
15
16
17
18
19
20
21
22
23
24
25
26
$ nvidia-smi
Fri Sep 24 20:57:50 2021
+-----------------------------------------------------------------------------+
| NVIDIA-SMI 470.57.02    Driver Version: 470.57.02    CUDA Version: 11.4     |
|-------------------------------+----------------------+----------------------+
| GPU  Name        Persistence-M| Bus-Id        Disp.A | Volatile Uncorr. ECC |
| Fan  Temp  Perf  Pwr:Usage/Cap|         Memory-Usage | GPU-Util  Compute M. |
|                               |                      |               MIG M. |
|===============================+======================+======================|
|   0  NVIDIA GeForce ...  On   | 00000000:01:00.0  On |                  N/A |
| 30%   39C    P5    N/A /  75W |    458MiB /  4036MiB |     22%      Default |
|                               |                      |                  N/A |
+-------------------------------+----------------------+----------------------+

+-----------------------------------------------------------------------------+
| Processes:                                                                  |
|  GPU   GI   CI        PID   Type   Process name                  GPU Memory |
|        ID   ID                                                   Usage      |
|=============================================================================|
|    0   N/A  N/A      1084      G   /usr/lib/xorg/Xorg                 20MiB |
|    0   N/A  N/A      1140      G   /usr/bin/gnome-shell               69MiB |
|    0   N/A  N/A      8342      G   /usr/lib/xorg/Xorg                165MiB |
|    0   N/A  N/A      8445      G   /usr/bin/gnome-shell              128MiB |
|    0   N/A  N/A      8900      G   ...AAAAAAAAA= --shared-files       26MiB |
|    0   N/A  N/A      9133      G   ...AAAAAAAAA= --shared-files       42MiB |
+-----------------------------------------------------------------------------+
CUDA ToolKit and cuDNN
1
2
3
4
5
6
7
8
$ wget https://developer.download.nvidia.com/compute/cuda/11.4.2/local_installers/cuda-repo-ubuntu1804-11-4-local_11.4.2-470.57.02-1_amd64.deb
$ sudo dpkg -i cuda-repo-ubuntu1804-11-4-local_11.4.2-470.57.02-1_amd64.deb
$ sudo apt-key add /var/cuda-repo-ubuntu1804-11-4-local/7fa2af80.pub
$ sudo apt-get update
$ sudo apt-get -y install cuda

$ sudo apt-get install libcudnn8=8.2.4.15-1+cuda11.4
$ sudo apt-get install libcudnn8-dev=8.2.4.15-1+cuda11.4
Miniconda
从 https://docs.conda.io/en/latest/miniconda.html 下载 Python 3.8 安装脚本。
![]()
增加可执行权限
1
$ chmod +x Miniconda3-latest-Linux-x86_64.sh
执行安装脚本
1
$ ./Miniconda3-latest-Linux-x86_64.sh
重启终端,激活 conda。
虚拟环境
创建一个名称为 tensorflow 的虚拟环境。
1
2
$ conda create -n tensorflow python=3.8.5
$ conda activate tensorflow
安装 TensorFlow
1
$ pip install tensorflow==2.6.0
验证安装
1
2
3
4
5
$ python -c "import tensorflow as tf;print('Num GPUs Available: ', len(tf.config.list_physical_devices('GPU')))"
2021-09-24 22:58:29.079068: I tensorflow/stream_executor/cuda/cuda_gpu_executor.cc:937] successful NUMA node read from SysFS had negative value (-1), but there must be at least one NUMA node, so returning NUMA node zero
2021-09-24 22:58:29.121607: I tensorflow/stream_executor/cuda/cuda_gpu_executor.cc:937] successful NUMA node read from SysFS had negative value (-1), but there must be at least one NUMA node, so returning NUMA node zero
2021-09-24 22:58:29.122535: I tensorflow/stream_executor/cuda/cuda_gpu_executor.cc:937] successful NUMA node read from SysFS had negative value (-1), but there must be at least one NUMA node, so returning NUMA node zero
Num GPUs Available:  1
安装 JupyterLab 和 matplotlib
1
$ pip install jupyterlab matplotlib
在 JupyterLab 中运行 TensorFlow
1
$ jupyter lab
JupyterLab 将自动在浏览器打开。
从 https://www.tensorflow.org/tutorials/images/cnn 下载并导入 CNN notebook。

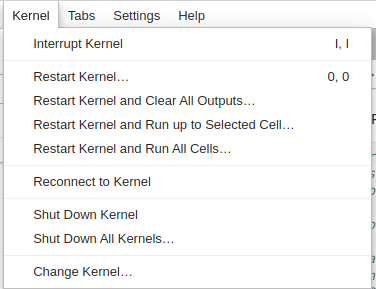
执行 Restart Kernel and Run All Cells。

当训练开始, 检查 GPU 进程,可以看到 ...nvs/tensorflow/bin/python 表示正在使用 GPU 训练模型。

1
2
3
4
5
6
7
8
9
10
11
12
13
14
15
16
17
18
19
20
21
22
23
24
25
26
27
$ nvidia-smi
Fri Sep 24 23:01:38 2021
+-----------------------------------------------------------------------------+
| NVIDIA-SMI 470.57.02    Driver Version: 470.57.02    CUDA Version: 11.4     |
|-------------------------------+----------------------+----------------------+
| GPU  Name        Persistence-M| Bus-Id        Disp.A | Volatile Uncorr. ECC |
| Fan  Temp  Perf  Pwr:Usage/Cap|         Memory-Usage | GPU-Util  Compute M. |
|                               |                      |               MIG M. |
|===============================+======================+======================|
|   0  NVIDIA GeForce ...  On   | 00000000:01:00.0  On |                  N/A |
| 30%   48C    P0    N/A /  75W |   3842MiB /  4036MiB |     66%      Default |
|                               |                      |                  N/A |
+-------------------------------+----------------------+----------------------+

+-----------------------------------------------------------------------------+
| Processes:                                                                  |
|  GPU   GI   CI        PID   Type   Process name                  GPU Memory |
|        ID   ID                                                   Usage      |
|=============================================================================|
|    0   N/A  N/A      1052      G   /usr/lib/xorg/Xorg                 20MiB |
|    0   N/A  N/A      1125      G   /usr/bin/gnome-shell               72MiB |
|    0   N/A  N/A      1409      G   /usr/lib/xorg/Xorg                153MiB |
|    0   N/A  N/A      1532      G   /usr/bin/gnome-shell              107MiB |
|    0   N/A  N/A      2066      G   ...AAAAAAAAA= --shared-files       30MiB |
|    0   N/A  N/A      2735      G   ...AAAAAAAAA= --shared-files       55MiB |
|    0   N/A  N/A      3294      C   ...nvs/tensorflow/bin/python     3395MiB |
+-----------------------------------------------------------------------------+
安装 VSCode
前往官网下载并安装 VSCode。
打开 VSCode 并安装 Python 支持。

选择某个文件夹(这里以 ~/tensorflow-notebook/01-hello 为例),新建文件 hello.ipynb。
1
2
3
import tensorflow as tf
hello = tf.constant('Hello, TensorFlow!')
hello.numpy()
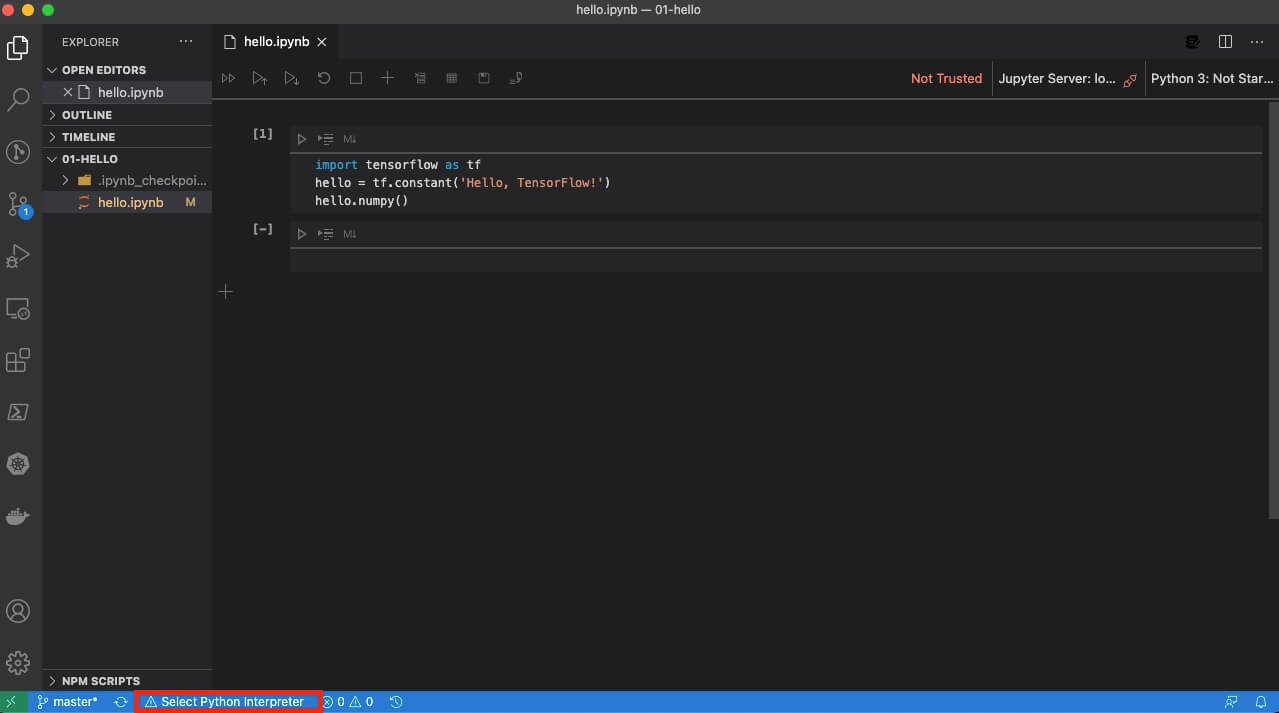
使用 VSCode 打开刚才创建的 ~/tensorflow-notebook/01-hello/hello.ipynb,并选择 Python 为创建的虚拟环境。

VSCode 运行 TensorFlow

小结
至此,开发环境已经搭建完毕。大家可以根据自己的习惯,选择使用命令行、JupyterLab 或者 VSCode 进行开发。
延伸阅读
- Mac 机器学习环境 (TensorFlow, JupyterLab, VSCode)
- Apple Silicon Mac M1/M2 机器学习环境 (TensorFlow, JupyterLab, VSCode)
- Win10 机器学习环境 (TensorFlow GPU, JupyterLab, VSCode)
- Apple Silicon Mac M1/M2 原生支持 TensorFlow 2.10 GPU 加速(tensorflow-metal PluggableDevice)

 Service Mesh - Build Kubernetes & Istio environment with kubeadm and MetalLB