
- Foreword
- TensorFlow Serving
- Image segmentation Serving Docker image
- Flask
- Image segmentation ingress service
- Summary
- Further reading
- Reference
Foreword
The Previous article introduced how to train and export an image segmentation model. After getting the model, I will use it. The following will show how to deploy an image segmentation model service using TensorFlow Serving and Flask.
TensorFlow Serving
TensorFlow Serving is a flexible, high-performance serving system for machine learning models, designed for production environments. It deals with the inference aspect of machine learning, taking models after training and managing their lifetimes, providing clients with versioned access via a high-performance, reference-counted lookup table. TensorFlow Serving provides out-of-the-box integration with TensorFlow models but can be easily extended to serve other types of models and data.
Features
- Can serve multiple models, or multiple versions of the same model simultaneously
- Exposes both gRPC as well as HTTP inference endpoints
- Allows deployment of new model versions without changing any client code
- Supports canarying new versions and A/B testing experimental models
- Adds minimal latency to inference time due to efficient, low-overhead implementation
- Features a scheduler that groups individual inference requests into batches for joint execution on GPU, with configurable latency controls
- Supports many servables: Tensorflow models, embeddings, vocabularies, feature transformations, and even non-Tensorflow-based machine learning models
Usage
It is recommended that you use TensorFlow Serving based on Docker.
Quick Start
1
2
3
4
5
6
7
8
9
10
11
12
13
14
15
16
17
18
19
20
21
# Download the TensorFlow Serving Docker image and repo
docker pull tensorflow/serving

git clone https://github.com/tensorflow/serving
# Location of demo models
TESTDATA="$(pwd)/serving/tensorflow_serving/servables/tensorflow/testdata"

# Start TensorFlow Serving container and open the REST API port
docker run -t --rm -p 8501:8501 \
    -v "$TESTDATA/saved_model_half_plus_two_cpu:/models/half_plus_two" \
    -e MODEL_NAME=half_plus_two \
    tensorflow/serving &

# Query the model using the predict API
curl -d '{"instances": [1.0, 2.0, 5.0]}' \
    -X POST http://localhost:8501/v1/models/half_plus_two:predict

# Returns => { "predictions": [2.5, 3.0, 4.5] }

# Clean
$ docker rm -f serving-test
Note:
gRPCpublic port8500REST APIpublic port8501- Optional environment variable
MODEL_NAME(default ismodel)- Optional environment variable
MODEL_BASE_PATH(default is/models)
Create an image
Create your own model image based on tensorflow/serving.
1
2
3
4
5
6
$ docker run -d --name serving_base tensorflow/serving
# Copy the model to the serving_base container
$ docker cp $TESTDATA/saved_model_half_plus_two_cpu serving_base:/models/half_plus_two
# Set the model name environment variable, and submit the container after modifying the serving_base as half_plus_two
$ docker commit --change "ENV MODEL_NAME half_plus_two" serving_base half_plus_two
$ docker rm -f serving_base
Run the image
1
2
3
4
5
6
7
8
9
$ docker run --name=half_plus_two -d -p 8501:8501 half_plus_two

# Request model predict API
$ curl -d '{"instances": [1.0, 2.0, 5.0]}' \
    -X POST http://localhost:8501/v1/models/half_plus_two:predict
# Returns => { "predictions": [2.5, 3.0, 4.5] }

# Clean
$ docker rm -f half_plus_two
Image segmentation Serving Docker image
After introducing the basic usage of TensorFlow Serving, here is how to build a Serving Docker image.
Create an image
After the model is exported, the following model files can be obtained.
1
2
3
4
5
6
7
8
9
10
11
12
test-mask
├── exported-models
│   └── mask_rcnn_inception_resnet_v2_1024x1024_coco17_gpu-8
│       ├── checkpoint
│       │   ├── checkpoint
│       │   ├── ckpt-0.data-00000-of-00001
│       │   └── ckpt-0.index
│       ├── pipeline.config
│       └── saved_model
│           ├── assets
│           ├── saved_model.pb
│           └── variables
If it is not convenient for you to train the model, you can go to https://github.com/CatchZeng/object-detection-api/releases/tag/exported-models to download the model of
test-maskand proceed to the next steps.
Execute the following command to create a Serving Docker image.
1
2
3
4
5
6
7
8
9
10
11
12
13
14
15
16
17
18
19
20
$ make serving
docker pull tensorflow/serving
Using default tag: latest
latest: Pulling from tensorflow/serving
Digest: sha256:6651f4839e1124dbde75ee531825112af0a6b8ef082c88ab14ca53eb69a2e4bb
Status: Image is up to date for tensorflow/serving:latest
docker.io/tensorflow/serving:latest
docker run -d --name serving_base tensorflow/serving
7239e7a1b83ba7b5c4244973f2b327ba703d19fcdfc451e52221179772a9e61b
# https://stackoverflow.com/a/45552938/14785930
docker exec -it serving_base mkdir -p /models/test-mask/1
docker cp exported-models/mask_rcnn_inception_resnet_v2_1024x1024_coco17_gpu-8/saved_model/. serving_base:/models/test-mask/1
docker commit --change "ENV MODEL_NAME test-mask" serving_base test-mask
sha256:20a3d099a6ce03dad70003752c70b68aeda706c1e6d5434e6b9d945098ab692c
docker rm -f serving_base
serving_base

$ docker images
REPOSITORY                 TAG                  IMAGE ID       CREATED             SIZE
test-mask                  latest               20a3d099a6ce   10 seconds ago      663MB
Local debugging
Start Serving
1
$ docker run -d --name test-mask --rm -p 8500:8500 -p 8501:8501 test-mask
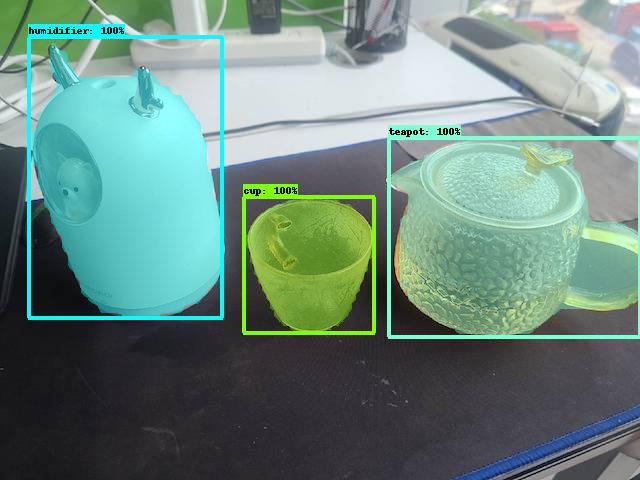
Copy a test picture to images/test and name it test.jpg, then execute the following command to test Serving.
1
2
3
4
5
6
$ make serving-test
python deployments/serving/client.py
start request
duration: 17.50s
......
annotated image is saved to /Users/catchzeng/Documents/Code/CatchZeng/object-detection-api/workspace/test-mask/images/test/test_annotated.jpg
Flask
After creating the model image, an ingress service is needed to do external API design and input data preprocessing, usually Flask.
Flask is a lightweight customizable web application framework written in Python language, which is more flexible, lighter, and safer than other similar frameworks And easy to get started.
Installation
1
2
$ conda activate od
$ pip install Flask
Usage
Create app.py
1
2
3
4
5
6
7
8
9
# app.py
from flask import Flask

app = Flask(__name__)


@app.route("/")
def hello_world():
    return "It works!"
Run
1
2
3
4
5
6
$ python -m flask run
 * Environment: production
   WARNING: This is a development server. Do not use it in a production deployment.
   Use a production WSGI server instead.
 * Debug mode: off
 * Running on http://127.0.0.1:5000/ (Press CTRL+C to quit)
Request
1
2
❯ curl http://127.0.0.1:5000
It works!
For more examples of getting started, please see https://flask.palletsprojects.com/en/2.0.x/quickstart/.
Image segmentation ingress service
Create an image
Execute the following command to build the Flask image segmentation ingress service image.
1
2
3
4
5
6
7
8
9
10
11
12
13
14
15
16
17
18
19
20
21
22
23
24
25
26
$ make flask
cp annotations/label_map.pbtxt deployments/flask
cd deployments/flask && make build
DOCKER_BUILDKIT=0 docker build --tag test-mask-flask .
Sending build context to Docker daemon  66.05kB
Step 1/6 : FROM python:3.8-slim-buster
 ---> 09c82f264230
Step 2/6 : WORKDIR /app
 ---> Using cache
 ---> 38fe51c7abd9
Step 3/6 : RUN pip3 install --no-cache-dir Flask pillow tensorflow==2.6.0
 ---> Using cache
 ---> 7d5da785bd60
Step 4/6 : COPY . .
 ---> Using cache
 ---> f65126d49639
Step 5/6 : RUN rm -rf .vscode README.md Dockerfile Makefile
 ---> Using cache
 ---> eb6dc93afc91
Step 6/6 : CMD [ "python3", "-m" , "flask", "run", "--host=0.0.0.0"]
 ---> Using cache
 ---> 3991ff08b36f
Successfully built 3991ff08b36f
Successfully tagged test-mask-flask:latest

Use 'docker scan' to run Snyk tests against images to find vulnerabilities and learn how to fix them
!!!
workspace/test-mask/deployments/flask/object_detectionis part of the code extracted from TensorFlow Object Detection API. Benefits When create a Docker image, you don’t need to install the TensorFlow Object Detection API, which can reduce the size of the generated image (about 2G).
Start service
Start the ingress service
1
2
3
4
5
6
$ docker run -d --name test-mask-flask --rm -p 5000:5000 --link test-mask:test-mask -e SERVER_URL="http://test-mask:8501/v1/models/test-mask:predict" test-mask-flask

$ docker ps
CONTAINER ID   IMAGE             COMMAND                  CREATED         STATUS         PORTS                              NAMES
1c78f0e1f31e   test-mask-flask   "python3 -m flask ru…"   2 seconds ago   Up 2 seconds   0.0.0.0:5000->5000/tcp             test-mask-flask
c48d559ab6c5   test-mask         "/usr/bin/tf_serving…"   3 minutes ago   Up 3 minutes   0.0.0.0:8500-8501->8500-8501/tcp   test-mask
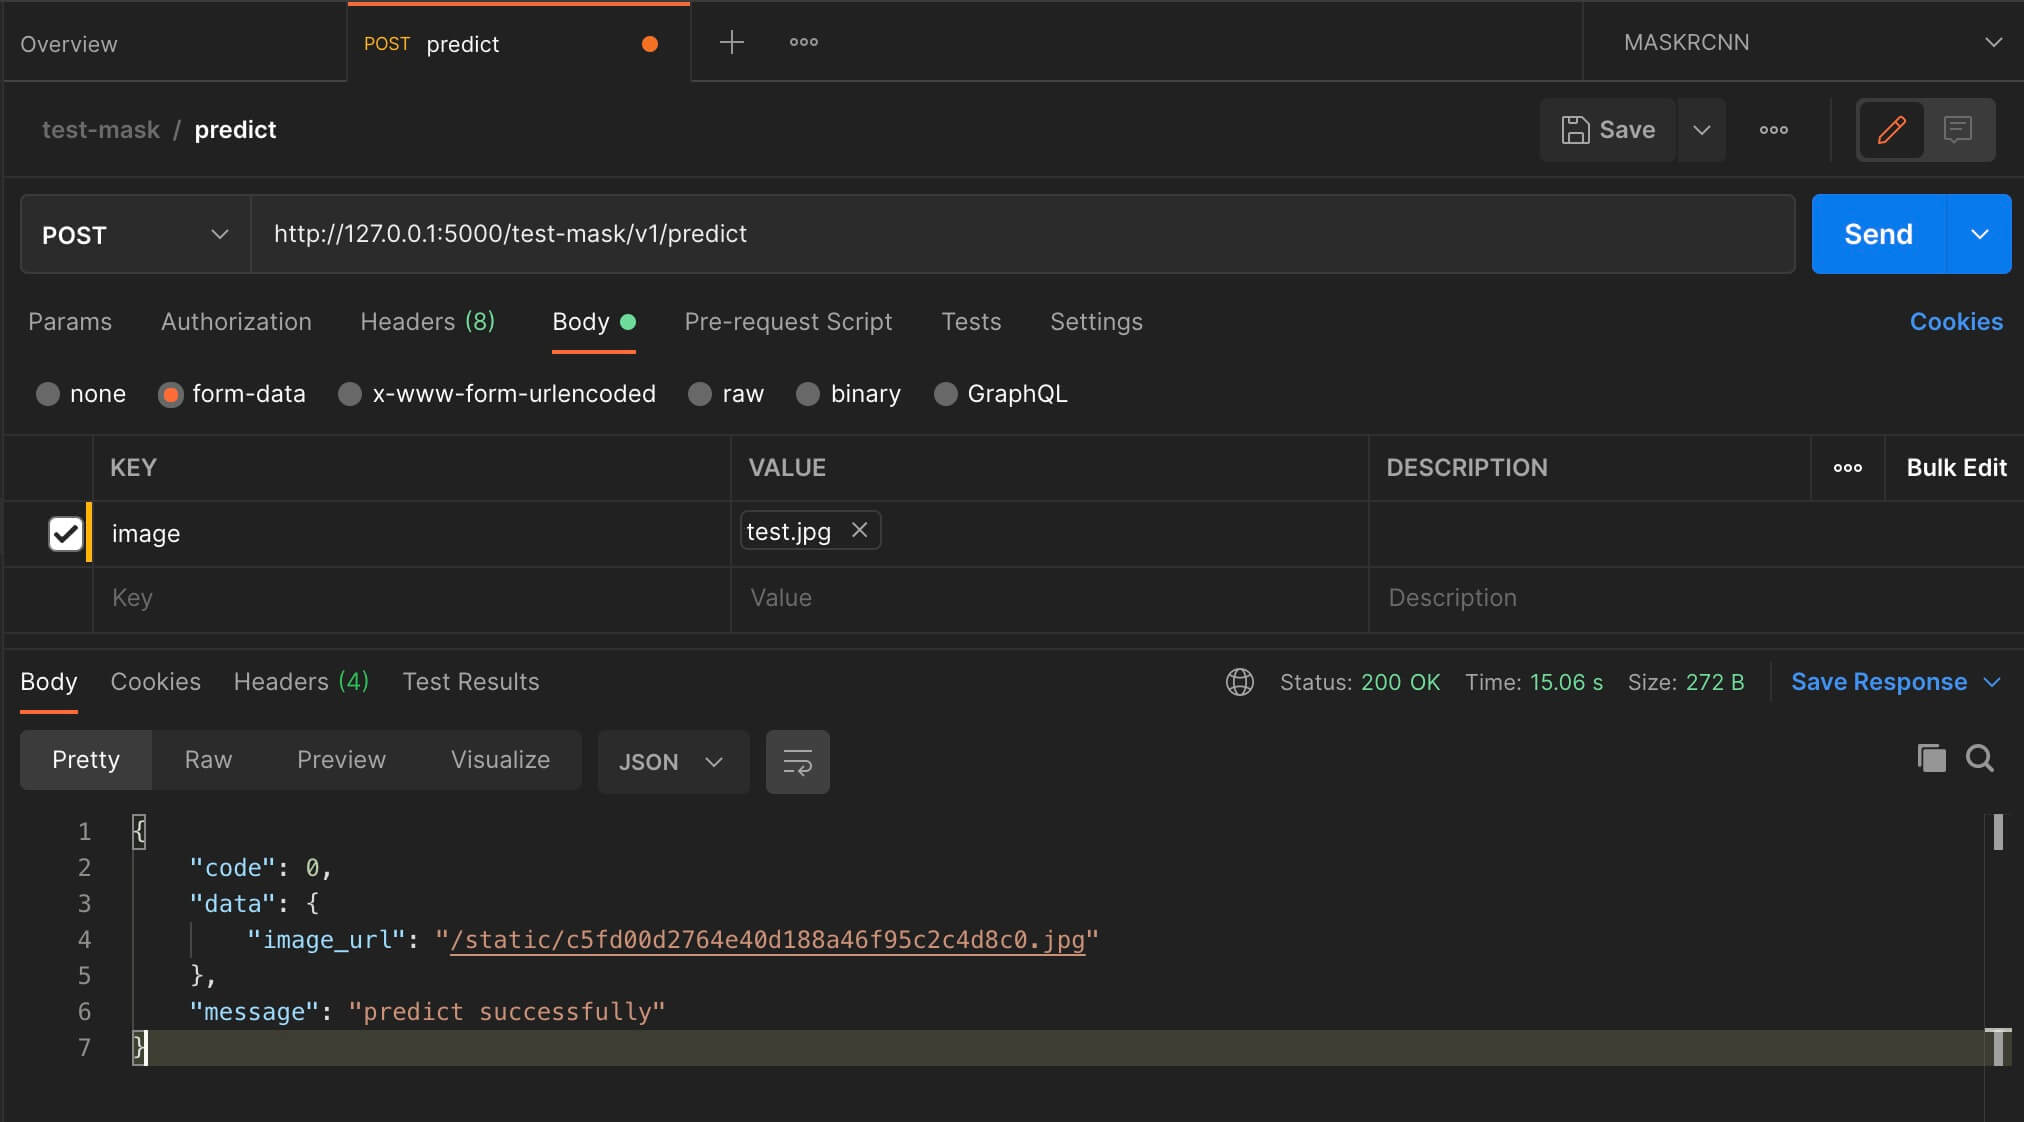
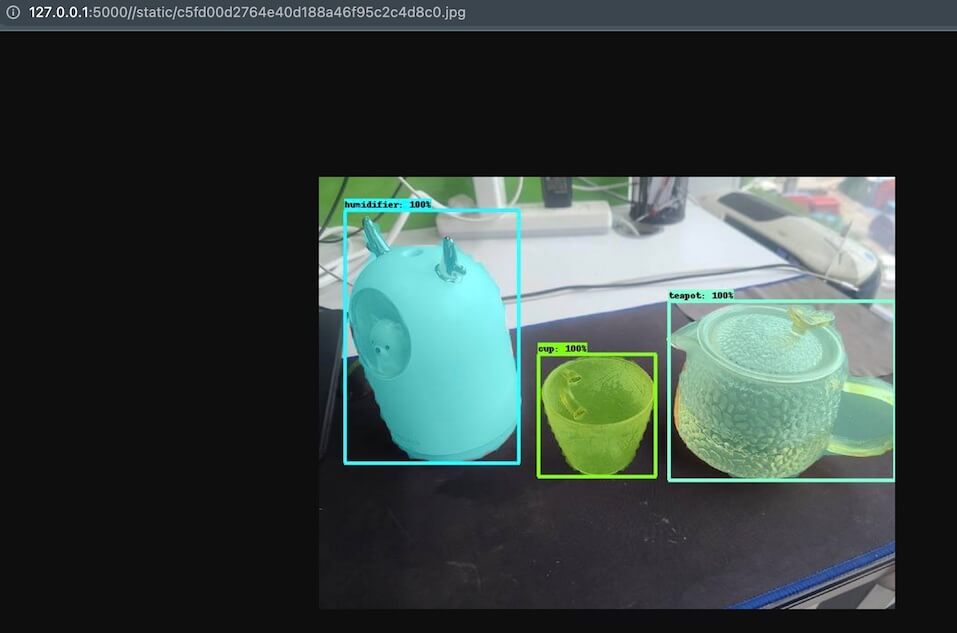
Initiate a request
Deploy
If you use Nginx to deploy, you can refer to https://github.com/CatchZeng/object-detection-api/blob/master/scripts/workspace/mask/files/deployments/flask/nginx.conf.
1
2
3
4
5
6
7
8
9
10
11
12
13
14
server {
    listen 80;
    listen 443 ssl;
    server_name api.makeoptim.com;
    ssl_certificate      /etc/nginx/keys/api.makeoptim.com.pem;
    ssl_certificate_key  /etc/nginx/keys/api.makeoptim.com.key;

    location / {
            proxy_set_header Host $host;
            proxy_set_header X-Real-IP $remote_addr;
            proxy_set_header X-Forwarded-For $proxy_add_x_forwarded_for;
            proxy_pass http://127.0.0.1:5000/;
    }
}
Summary
This article describes how to deploy an image segmentation model service using TensorFlow Serving and Flask, here One step, the model is the real delivery, I hope it can help you apply the trained model to actual projects. That’s it for this article, see you next.
Further reading
- The easiest way to Train a Custom Image Segmentation Model Using TensorFlow Object Detection API Mask R-CNN
- The easiest way to Train a Custom Object Detection Model Using TensorFlow Object Detection API
- How to deploy an image segmentation model service
- The easiest way to train a U-NET Image Segmentation model using TensorFlow and labelme
 易 AI - 使用 TensorFlow Serving & Flask 部署图像分割(Mask R-CNN)模型服务