
前言
上一篇介绍了目标检测(Object Detection),本文将介绍图像分割(Image Segmentation)的概念,并通过案例讲解如何使用 TensorFlow Object Detection API 来训练自定义的图像分割模型,包括:数据集采集和制作、TensorFlow Object Detection API 安装以及模型的训练。
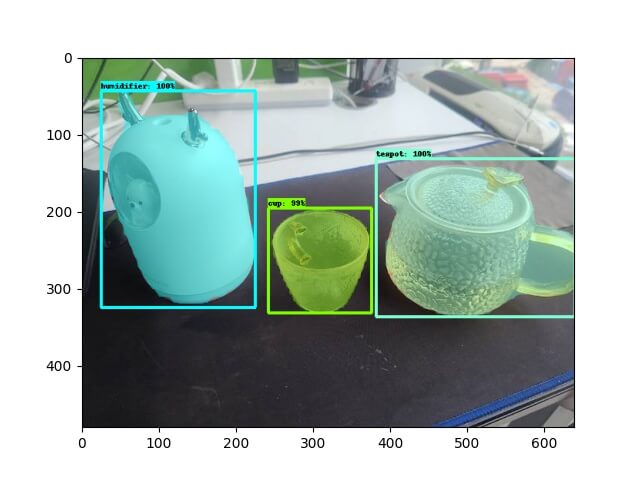
案例效果如下图所示:
图像分割

如上图所示,目标检测识别图像中存在的内容和检测其位置,而图像分割分为以下三种类型:
- 语义分割(semantic segmentation):对图像中的每个像素打上类别标签,如上图,把图像分为人(红色)、树木(深绿)、草地(浅绿)、天空(蓝色)标签。
- 实例分割(instance segmentation):目标检测和语义分割的结合,在图像中将目标检测出来(目标检测),然后对每个像素打上标签(语义分割)。如上图,以人为目标,语义分割不区分属于相同类别的不同实例(所有人都标为红色),实例分割区分同类的不同实例(使用不同颜色区分不同的人)。
- 全景分割(panoptic segmentation):语义分割和实例分割的结合,即要对所有目标都检测出来,又要区分出同个类别中的不同实例。如上图,实例分割只对图像中的目标(如上图中的人)进行检测和按像素分割,区分不同实例(使用不同颜色),而全景分割是对图中的所有物体包括背景都要进行检测和分割,区分不同实例(使用不同颜色)。
本文要使用的 Mask R-CNN 正是一个实例分割模型。
TensorFlow Object Detection API
TensorFlow Object Detection API 的安装与目标检测一致,参考上一篇 即可,这里不再赘述。
工程创建
注:!!! 从这里开始,请确保在
conda od的环境下执行。
到 oda 仓库目录下,执行以下命令,创建工程目录结构。
注:
SAVE_DIR为保存项目的目录,NAME为项目的名称。
1
$ make workspace-mask SAVE_DIR=workspace NAME=test-mask
1
2
3
4
5
6
7
8
9
10
11
12
13
14
15
16
17
18
19
20
└── workspace
    └── test-mask
        ├── COCO_Image_Viewer.ipynb:用于验证是否成功转换到 COCO format
        ├── Makefile
        ├── annotations:存放标注好的数据集数据(val.record、train.record、label_map.pbtxt)
        ├── create_coco_tf_record.py:将 COCO format 文件转换为 TFRecord
        ├── deployments:部署相关
        │   ├── flask:Flask 入口服务
        │   └── serving: Tensorflow Serving
        ├── exported-models:存放训练完之后导出的模型
        ├── exporter_main_v2.py:导出模型脚本
        ├── images:数据集图片和 json 标注
        │   ├── test:手动验证图片
        │   ├── train:训练集图片和 json 标注
        │   └── val:验证集图片和 json 标注
        ├── labelme2coco.py:将 labelme json 文件转换为 COCO format
        ├── model_main_tf2.py:训练模型脚本
        ├── models:自定义模型
        ├── pre-trained-models:[TensorFlow Model Zoo](https://github.com/tensorflow/models/blob/master/research/object_detection/g3doc/tf2_detection_zoo.md) 提供的预训练模型
        └── test_images.py:手动验证图片脚本
数据集
图片
这里还是使用茶杯(cup)、茶壶(teapot)、加湿器(humidifier) 来做案例。
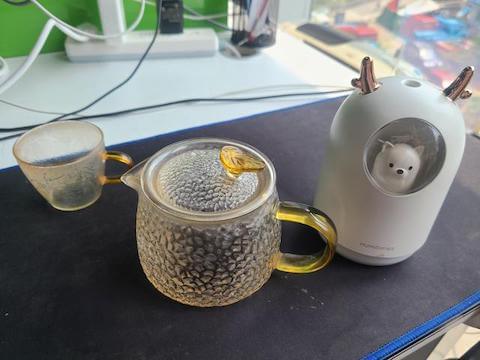
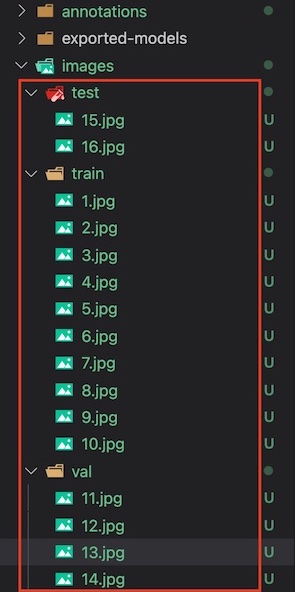
将收集的图片,放入工程目录的 images 的三个子目录下。
注:本案例只是为了验证如何训练目标识别模型,因此数据集采集得比较少,实际项目中记得尽量采集多点数据集。
标注
收集完图片后,需要对训练和验证集图片进行标注。标注工具,选用较为常用的 labelme。
根据 installation 的说明安装好 labelme,然后执行 labelme 选择 train 和 val 文件夹进行标注。
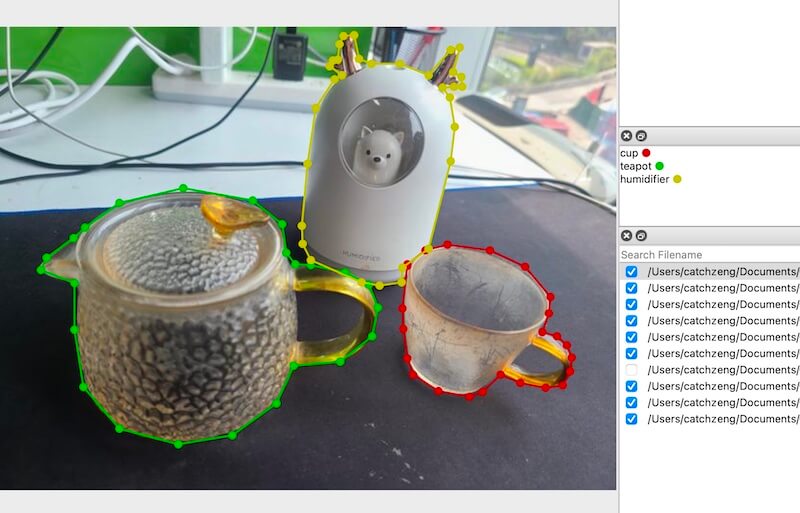
标注完成后,会生成图片对应的 json 标注文件,如下所示:
1
2
3
4
5
6
7
8
9
10
11
12
13
14
15
16
17
18
19
20
21
22
23
24
25
26
27
28
29
30
31
32
33
34
workspace/test-mask/images
├── test
│   ├── 15.jpg
│   └── 16.jpg
├── train
│   ├── 1.jpg
│   ├── 1.json
│   ├── 10.jpg
│   ├── 10.json
│   ├── 2.jpg
│   ├── 2.json
│   ├── 3.jpg
│   ├── 3.json
│   ├── 4.jpg
│   ├── 4.json
│   ├── 5.jpg
│   ├── 5.json
│   ├── 6.jpg
│   ├── 6.json
│   ├── 7.jpg
│   ├── 7.json
│   ├── 8.jpg
│   ├── 8.json
│   ├── 9.jpg
│   └── 9.json
└── val
    ├── 11.jpg
    ├── 11.json
    ├── 12.jpg
    ├── 12.json
    ├── 13.jpg
    ├── 13.json
    ├── 14.jpg
    └── 14.json
生成 TFRecord 和 label_map
TensorFlow Object Detection API 只支持 TFRecord 格式的数据集,因此,需要把标注好的数据集进行转换。
先 cd 到工程目录(cd workspace/test-mask),然后执行 make gen-tfrecord,将在 annotations 文件夹下生成 TFRecord 格式的数据集和 label_map.pbtxt。
1
2
3
4
5
6
7
8
9
10
11
12
13
14
15
16
17
18
19
20
21
22
23
24
25
26
27
28
29
30
$ make gen-tfrecord
python labelme2coco.py images/train --output images/train.json
save coco json
images/train.json
python labelme2coco.py images/val --output images/val.json
save coco json
images/val.json
python create_coco_tf_record.py --logtostderr \
        --train_image_dir=images/train \
        --val_image_dir=images/val \
        --train_annotations_file=images/train.json \
        --val_annotations_file=images/val.json \
        --include_masks=True \
        --output_dir=./annotations
......
python gen_label_map.py
item {
  id: 1
  name: 'cup'
}

item {
  id: 2
  name: 'humidifier'
}

item {
  id: 3
  name: 'teapot'
}
1
2
3
4
annotations
├── label_map.pbtxt
├── train.record
└── val.record
注:如果想验证是否将 labelme json 成功转换到 COCO format,可以运行
COCO_Image_Viewer.ipynb查看结果。
模型训练
注:!!! 从这里开始,请确保已经
cd到工程目录(cd workspace/test-mask)。
下载预训练模型
从 Model Zoo 中选择合适的模型下载解压并放到 workspace/test-mask/pre-trained-models 中。
这里默认选择的是 mask_rcnn_inception_resnet_v2_1024x1024_coco17_gpu-8 可以执行如下命令,自动下载并解压
1
$ make dl-model
目录结构如下:
1
2
3
4
5
6
└── test-mask
    └── pre-trained-models
        └── mask_rcnn_inception_resnet_v2_1024x1024_coco17_gpu-8
            ├── checkpoint
            ├── pipeline.config
            └── saved_model
配置训练 Pipeline
在 models 目录创建对应的模型文件夹,比如:mask_rcnn_inception_resnet_v2_1024x1024_coco17_gpu-8,并拷贝 pre-trained-models/mask_rcnn_inception_resnet_v2_1024x1024_coco17_gpu-8/pipeline.config。
1
2
3
4
5
└── test-mask
    ├── models
    │   └── mask_rcnn_inception_resnet_v2_1024x1024_coco17_gpu-8
    │       └── pipeline.config
    └── pre-trained-models
其中,pipeline.config 如下几处需要根据项目修改
1
2
3
4
5
6
7
8
9
10
11
12
13
14
15
16
17
18
19
20
21
22
23
24
25
26
27
28
29
30
31
32
33
34
35
36
37
38
39
40
41
42
43
44
45
46
47
48
49
50
51
52
53
54
55
56
57
58
59
60
61
62
63
64
65
66
67
68
69
model {
  faster_rcnn {
    num_classes: 3 # 修改为需要识别的目标个数,示例项目为 3 种
    ......
    first_stage_max_proposals: 100 # Faster R-CNN具有两个网络,第一个提议可以找到对象的区域,第二个尝试检测其中的对象。 由于第二网络必须在更多的潜在区域中进行搜索,因此第一个网络增加的投标数量会提高准确性,但意味着要进行更多的计算工作。
    ......
    second_stage_post_processing {
      batch_non_max_suppression {
        score_threshold: 0.0
        iou_threshold: 0.6
        max_detections_per_class: 2 # 每一个类别最多返回多少个检测,可以根据自己的情况做调整
        max_total_detections: 6 # 总共最多返回多少个检测,可以根据自己的情况做调整
      }
      score_converter: SOFTMAX
    }
    ......
}
train_config {
  batch_size: 8 # 这里需要根据自己的配置,调整大小,这里设置为 8
  num_steps: 10000 # 修改为想要训练的总步数
  optimizer {
    momentum_optimizer {
      learning_rate {
        cosine_decay_learning_rate {
          learning_rate_base: 0.008
          total_steps: 10000 # 修改为想要训练的总步数
          warmup_learning_rate: 0.0
          warmup_steps: 50
        }
      }
      momentum_optimizer_value: 0.8999999761581421
    }
    use_moving_average: false
  }
  gradient_clipping_by_norm: 10.0
  fine_tune_checkpoint_version: V2 # 增加此项,并指定为 V2 版本
  fine_tune_checkpoint: "pre-trained-models/mask_rcnn_inception_resnet_v2_1024x1024_coco17_gpu-8/checkpoint/ckpt-0" # 修改为预制模型的路径
  fine_tune_checkpoint_type: "detection" # 增加此项并设置为 detection,因为我们是做目标检测
  data_augmentation_options {
    random_horizontal_flip {
    }
  }
}
train_input_reader {
  label_map_path: "annotations/label_map.pbtxt" # 增加此项
  tf_record_input_reader {
    input_path: "annotations/train.record" # 修改为训练集的路径
  }
  load_instance_masks: true
  mask_type: PNG_MASKS
}
eval_config {
  metrics_set: "coco_detection_metrics"
  metrics_set: "coco_mask_metrics"
  eval_instance_masks: true
  use_moving_averages: false
  batch_size: 1
  include_metrics_per_category: true
}
eval_input_reader {
  label_map_path: "annotations/label_map.pbtxt" # 修改为标注的路径
  shuffle: false
  num_epochs: 1
  tf_record_input_reader {
    input_path: "annotations/val.record" # 修改为验证集的路径
  }
  load_instance_masks: true
  mask_type: PNG_MASKS
}
训练模型
1
$ make train
注:如遇以下问题
问题 1
ValueError: numpy.ndarray size changed, may indicate binary incompatibility. Expected 88 from C header, got 80 from PyObject
执行以下命令解决
pip uninstall numpy pip install numpy问题 2
ImportError: cannot import name '_registerMatType' from 'cv2.cv2'执行以下命令解决
模型导出
1
$ make export
测试模型
执行 make export 导出模型后,将测试图片放到 images/test 文件夹下,然后执行 python test_images.py 即可输出标记好目标的图片到 images/test_annotated。
小结
本文通过案例将图像分割的整个流程都过了一遍,希望能帮助大家快速掌握训练自定义图像分割模型的能力。
案例的代码和数据集都已经放在了 https://github.com/CatchZeng/object-detection-api,有需要的同学可以自行获取。
后面的文章将会为大家带来:
- 如何部署图像分割模型服务
- 图像分割的原理
- 常用的网络
本篇就到这了,咱们下一篇见。
延伸阅读
- 使用 TensorFlow Object Detection API 训练自定义目标检测模型
- 使用 TensorFlow Object Detection API Mask R-CNN 训练自定义图像分割模型
- 使用 TensorFlow Serving & Flask 部署图像分割(Mask R-CNN)模型服务
- 使用 TensorFlow 和 Labelme 训练自定义 U-NET 图像分割模型
参考链接
- https://github.com/tensorflow/models/tree/master/research/object_detection
- https://tensorflow-object-detection-api-tutorial.readthedocs.io/en/latest/index.html
- https://github.com/eric-erki/How-To-Train-an-Object-Detection-Classifier-for-Multiple-Objects-Using-TensorFlow-GPU-on-Windows-1
- https://my.oschina.net/u/876354/blog/3055850
- https://stackoverflow.com/questions/53382383/makefile-cant-use-conda-activate
- https://stackoverflow.com/questions/66060487/valueerror-numpy-ndarray-size-changed-may-indicate-binary-incompatibility-exp
 The easiest way to Train a Custom Object Detection Model Using TensorFlow Object Detection API