前言
先前笔者在使用 TensorFlow Object Detection API Mask R-CNN 训练自定义图像分割模型介绍了如何使用 Mask R-CNN 实现图像分割。不过 Mask R-CNN 网络较为复杂,性能消耗较高,在实际的运用中,如果不是很复杂的分割任务,还有一个较为合适的选择,那就是本文要讲解的 U-NET 。
介绍 U-NET 的文章很多,不过从自定义数据集到模型定义、训练、预测的文章却寥寥无几。因此,本文旨在通过 一个 Demo 来覆盖各个步骤,让大家快速掌握 U-NET 。

环境搭建
下载源代码 https://github.com/CatchZeng/tensorflow-unet-labelme 到本地,并进入该目录下。
如果你使用的是 macOS, 你需要在安装前先执行以下命令。
1
❯ brew install pyqt
执行以下命令,安装虚拟环境 unet。
1
❯ conda create -n unet -y python=3.9 && conda activate unet && pip install -r requirements.txt
数据集
文本还是以使用 TensorFlow Object Detection API Mask R-CNN 训练自定义图像分割模型 中的茶杯(cup)、茶壶(teapot)、加湿器(humidifier) 来做案例。
数据标注
数据标注已在使用 TensorFlow Object Detection API Mask R-CNN 训练自定义图像分割模型 阐述,这里就不再赘述。
生成 VOC 数据集
U-NET 的数据集包含原始图像(jpg) 和标签(mask)图像(png),通常使用 VOC 格式来整理数据集。
将标注好的数据存放到 tensorflow-unet-labelme 的 datasets/train 下,并新建 datasets/labels.txt,内容为分类名称,详见 https://github.com/wkentaro/labelme/tree/main/examples/semantic_segmentation。
1
2
3
4
5
6
7
8
9
10
11
12
13
14
15
16
17
❯ tree -L 3
.
├── Makefile
├── README.md
├── datasets
│   ├── README.md
│   ├── labels.txt
│   ├── train
│   │   ├── 1.jpg
│   │   ├── 1.json
......
│   │   ├── 9.jpg
│   │   └── 9.json
├── labelme2voc.py
├── train.gif
├── unet.ipynb
└── voc_annotation.py
注:可以参考 https://github.com/CatchZeng/tensorflow-unet-labelme/tree/master/datasets。
执行以下命令,生成 VOC 格式数据集。
1
❯ make voc
1
2
3
4
5
6
7
8
9
10
11
12
13
14
15
16
17
18
19
20
21
22
23
24
25
26
27
28
29
30
31
32
33
34
35
36
37
38
39
40
41
42
43
❯ tree -L 5
.
├── Makefile
├── README.md
├── datasets
│   ├── README.md
│   ├── labels.txt
│   ├── test
│   │   └── 1.jpg
│   ├── train
│   │   ├── 1.jpg
│   │   ├── 1.json
......
│   │   ├── 9.jpg
│   │   └── 9.json
│   └── train_voc
│       ├── ImageSets
│       │   └── Segmentation
│       │       ├── test.txt
│       │       ├── train.txt   # 训练集图像名称列表
│       │       ├── trainval.txt
│       │       └── val.txt  # 验证集图像名称列表
│       ├── JPEGImages # 原图
│       │   ├── 1.jpg
......
│       │   └── 9.jpg
│       ├── SegmentationClass
│       │   ├── 1.npy
......
│       │   └── 9.npy
│       ├── SegmentationClassPNG # 标签(mask)图
│       │   ├── 1.png
......
│       │   └── 9.png
│       ├── SegmentationClassVisualization
│       │   ├── 1.jpg
......
│       │   └── 9.jpg
│       └── class_names.txt
├── labelme2voc.py
├── train.gif
├── unet.ipynb
└── voc_annotation.py
生成的 datasets/train_voc 便是训练用到的数据集。
训练
打开 unet.ipynb,并选择 Python 解释器为 unet,即可开始训练。
代码详解
数据集分为训练集和验证集,分别从 ImageSets/Segmentation/train.txt 和 ImageSets/Segmentation/val.txt 读取文件。然后,通过 UnetDataset 类构建成为 tf.keras.utils.Sequence 对象,方便后面通过 model.fit 直接训练。
1
2
3
4
5
6
7
8
9
10
11
12
13
14
15
16
17
18
19
20
dataset_path = 'datasets/train_voc'

# read dataset txt files
with open(os.path.join(dataset_path, "ImageSets/Segmentation/train.txt"),
          "r",
          encoding="utf8") as f:
    train_lines = f.readlines()

with open(os.path.join(dataset_path, "ImageSets/Segmentation/val.txt"),
          "r",
          encoding="utf8") as f:
    val_lines = f.readlines()

train_batches = UnetDataset(train_lines, INPUT_SHAPE, BATCH_SIZE, NUM_CLASSES,
                            True, dataset_path)
val_batches = UnetDataset(val_lines, INPUT_SHAPE, BATCH_SIZE, NUM_CLASSES,
                          False, dataset_path)

STEPS_PER_EPOCH = len(train_lines) // BATCH_SIZE
VALIDATION_STEPS = len(val_lines) // BATCH_SIZE // VAL_SUBSPLITS
UnetDataset 类继承自 tf.keras.utils.Sequence 。通过 __getitem__ 方法返回一组 batch_size 的数据,其中包含原图(images)和标签图(targets)。因为模型有固定的 input shape,因此,在 process_data 方法中做了 resize 操作;在训练过程中,还可以加入数据增强,这里使用了一个简单的 flip ;
1
2
3
4
5
6
7
8
9
10
11
12
13
14
15
16
17
18
19
20
21
22
23
24
25
26
27
28
29
30
31
32
33
34
35
36
37
38
39
40
41
42
43
44
45
46
47
48
49
50
51
52
53
54
55
56
57
58
59
60
61
62
63
64
65
66
67
68
class UnetDataset(tf.keras.utils.Sequence):

    def __init__(self, annotation_lines, input_shape, batch_size, num_classes,
                 train, dataset_path):
        self.annotation_lines = annotation_lines
        self.length = len(self.annotation_lines)
        self.input_shape = input_shape
        self.batch_size = batch_size
        self.num_classes = num_classes
        self.train = train
        self.dataset_path = dataset_path

    def __len__(self):
        return math.ceil(len(self.annotation_lines) / float(self.batch_size))

    def __getitem__(self, index):
        images = []
        targets = []
        for i in range(index * self.batch_size, (index + 1) * self.batch_size):
            i = i % self.length
            name = self.annotation_lines[i].split()[0]
            jpg = Image.open(
                os.path.join(os.path.join(self.dataset_path, "JPEGImages"),
                             name + ".jpg"))
            png = Image.open(
                os.path.join(
                    os.path.join(self.dataset_path, "SegmentationClassPNG"),
                    name + ".png"))

            jpg, png = self.process_data(jpg,
                                         png,
                                         self.input_shape,
                                         random=self.train)

            images.append(jpg)
            targets.append(png)

        images = np.array(images)
        targets = np.array(targets)
        return images, targets

    def rand(self, a=0, b=1):
        return np.random.rand() * (b - a) + a

    def process_data(self, image, label, input_shape, random=True):
        image = cvtColor(image)
        label = Image.fromarray(np.array(label))
        h, w, _ = input_shape

        # resize
        image, _, _ = resize_image(image, (w, h))
        label, _, _ = resize_label(label, (w, h))

        if random:
            # flip
            flip = self.rand() < .5
            if flip:
                image = image.transpose(Image.FLIP_LEFT_RIGHT)
                label = label.transpose(Image.FLIP_LEFT_RIGHT)

        # np
        image = np.array(image, np.float32)
        image = normalize(image)

        label = np.array(label)
        label[label >= self.num_classes] = self.num_classes

        return image, label
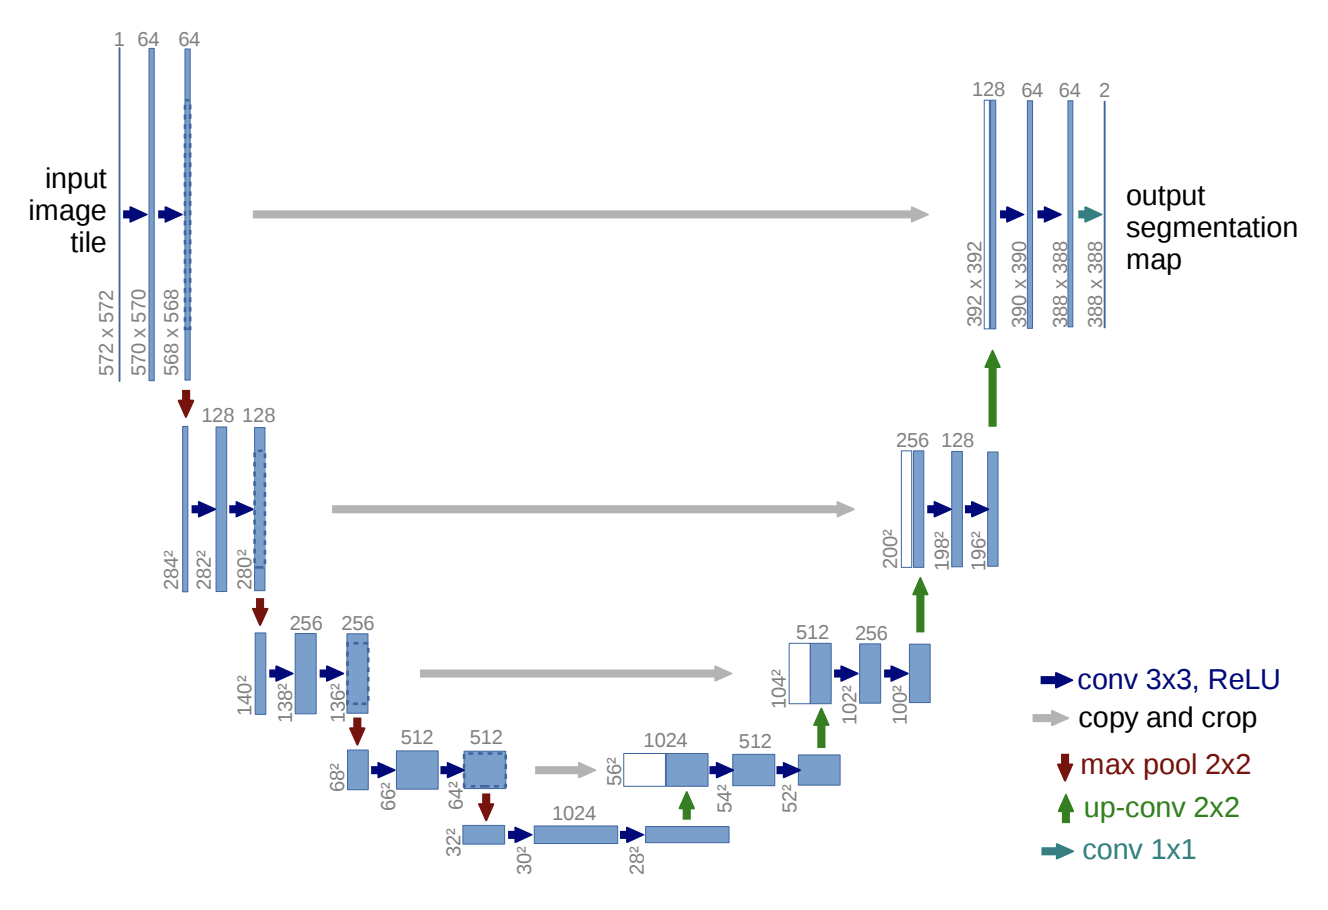
模型定义部分,比较简单,跟论文中一样,主要为下采样,上采样,和 concat

这里,笔者参考了 https://www.tensorflow.org/tutorials/images/segmentation ,详细的解析大家可以查看。
1
2
3
4
5
6
7
8
9
10
11
12
13
14
15
16
17
18
19
20
21
22
23
def unet_model(output_channels: int):
    inputs = tf.keras.layers.Input(shape=INPUT_SHAPE)

    # Downsampling through the model
    skips = down_stack(inputs)
    x = skips[-1]
    skips = reversed(skips[:-1])

    # Upsampling and establishing the skip connections
    for up, skip in zip(up_stack, skips):
        x = up(x)
        concat = tf.keras.layers.Concatenate()
        x = concat([x, skip])

    # This is the last layer of the model
    last = tf.keras.layers.Conv2DTranspose(filters=output_channels,
                                           kernel_size=3,
                                           strides=2,
                                           padding='same')  #64x64 -> 128x128

    x = last(x)

    return tf.keras.Model(inputs=inputs, outputs=x)
Callback 部分,笔者主要使用了 DisplayCallback 和 ModelCheckpointCallback。
DisplayCallback 用于训练完一个 epoch 后,显示预测的结果,便于观测模型的效果。

ModelCheckpointCallback 用于训练完一个 epoch 后,在 logs 文件夹下 保存权值(模型),并且记录每个 epoch 后的准确率和损失率。这样,用户在训练完后,可以挑选效果比较好的模型。
1
2
3
4
5
6
7
8
9
10
11
12
13
14
15
16
17
18
19
20
21
22
23
24
25
26
27
28
29
30
31
32
33
34
35
36
37
38
39
40
41
42
43
44
45
46
47
48
49
50
51
52
53
54
55
56
57
58
59
60
61
62
63
64
65
66
67
68
69
70
71
72
73
74
75
76
77
78
79
80
81
82
83
84
class DisplayCallback(tf.keras.callbacks.Callback):

    def on_epoch_end(self, epoch, logs=None):
        clear_output(wait=True)
        show_predictions()
        print('\nSample Prediction after epoch {}\n'.format(epoch + 1))


class ModelCheckpointCallback(tf.keras.callbacks.Callback):

    def __init__(self,
                 filepath,
                 monitor='val_loss',
                 verbose=0,
                 save_best_only=False,
                 save_weights_only=False,
                 mode='auto',
                 period=1):
        super(ModelCheckpointCallback, self).__init__()
        self.monitor = monitor
        self.verbose = verbose
        self.filepath = filepath
        self.save_best_only = save_best_only
        self.save_weights_only = save_weights_only
        self.period = period
        self.epochs_since_last_save = 0

        if mode not in ['auto', 'min', 'max']:
            warnings.warn(
                'ModelCheckpoint mode %s is unknown, '
                'fallback to auto mode.' % (mode), RuntimeWarning)
            mode = 'auto'

        if mode == 'min':
            self.monitor_op = np.less
            self.best = np.Inf
        elif mode == 'max':
            self.monitor_op = np.greater
            self.best = -np.Inf
        else:
            if 'acc' in self.monitor or self.monitor.startswith('fmeasure'):
                self.monitor_op = np.greater
                self.best = -np.Inf
            else:
                self.monitor_op = np.less
                self.best = np.Inf

    def on_epoch_end(self, epoch, logs=None):
        logs = logs or {}
        self.epochs_since_last_save += 1
        if self.epochs_since_last_save >= self.period:
            self.epochs_since_last_save = 0
            filepath = self.filepath.format(epoch=epoch + 1, **logs)
            if self.save_best_only:
                current = logs.get(self.monitor)
                if current is None:
                    warnings.warn(
                        'Can save best model only with %s available, '
                        'skipping.' % (self.monitor), RuntimeWarning)
                else:
                    if self.monitor_op(current, self.best):
                        if self.verbose > 0:
                            print(
                                '\nEpoch %05d: %s improved from %0.5f to %0.5f,'
                                ' saving model to %s' %
                                (epoch + 1, self.monitor, self.best, current,
                                 filepath))
                        self.best = current
                        if self.save_weights_only:
                            self.model.save_weights(filepath, overwrite=True)
                        else:
                            self.model.save(filepath, overwrite=True)
                    else:
                        if self.verbose > 0:
                            print('\nEpoch %05d: %s did not improve' %
                                  (epoch + 1, self.monitor))
            else:
                if self.verbose > 0:
                    print('\nEpoch %05d: saving model to %s' %
                          (epoch + 1, filepath))
                if self.save_weights_only:
                    self.model.save_weights(filepath, overwrite=True)
                else:
                    self.model.save(filepath, overwrite=True)
预测模型部分,先将文件 resize 到模型的 INPUT_SHAPE 大小。这里需要注意的是,预测的图不一定是与 INPUT_SHAPE 比例相等的。为了不因为比例问题,导致预测结果不准确,笔者这里在 resize 的时候为图片不在比例的地方,添加了灰色占位边,如下图所示。

然后再预测完之后,再去掉灰边。

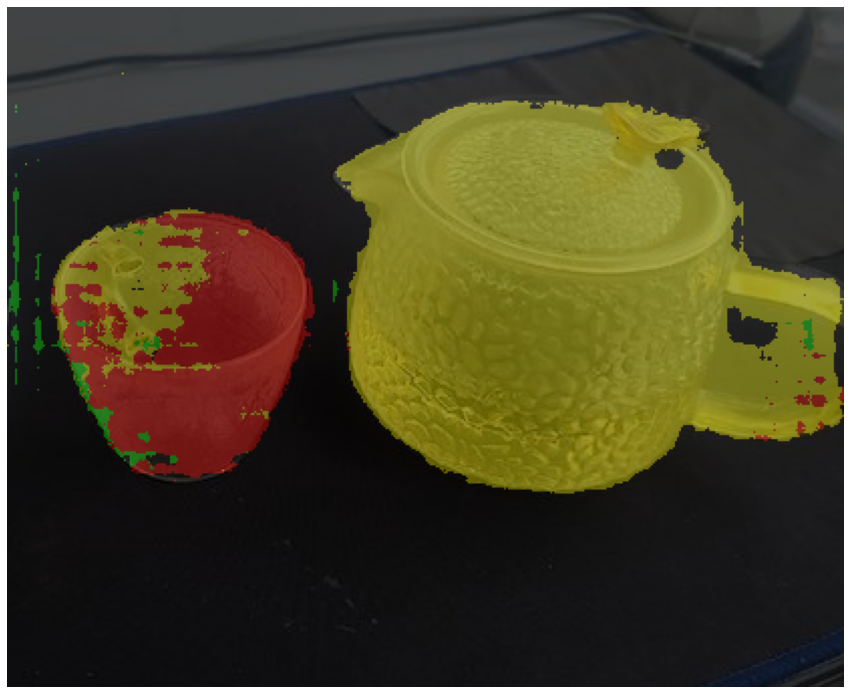
注:本案例效果图因为是 Demo,所以只是训练了 20 几个 epoch,准确度是一般的,大家在实际应用中,可以多训练下,提高准确度。
1
2
3
4
5
6
7
8
9
10
11
12
13
14
15
16
17
18
19
20
21
22
23
24
25
26
27
28
29
30
31
32
33
34
35
36
37
def detect_image(image_path):
    image = Image.open(image_path)
    image = cvtColor(image)

    old_img = copy.deepcopy(image)
    ori_h = np.array(image).shape[0]
    ori_w = np.array(image).shape[1]

   # resize 并添加灰边
    image_data, nw, nh = resize_image(image, (INPUT_SHAPE[1], INPUT_SHAPE[0]))

    image_data = normalize(np.array(image_data, np.float32))

    image_data = np.expand_dims(image_data, 0)

    pr = model.predict(image_data)[0]

   ## 去掉灰边
    pr = pr[int((INPUT_SHAPE[0] - nh) // 2) : int((INPUT_SHAPE[0] - nh) // 2 + nh), \
            int((INPUT_SHAPE[1] - nw) // 2) : int((INPUT_SHAPE[1] - nw) // 2 + nw)]

    pr = cv2.resize(pr, (ori_w, ori_h), interpolation=cv2.INTER_LINEAR)

    pr = pr.argmax(axis=-1)

    # seg_img = np.zeros((np.shape(pr)[0], np.shape(pr)[1], 3))
    # for c in range(NUM_CLASSES):
    #     seg_img[:, :, 0] += ((pr[:, :] == c ) * colors[c][0]).astype('uint8')
    #     seg_img[:, :, 1] += ((pr[:, :] == c ) * colors[c][1]).astype('uint8')
    #     seg_img[:, :, 2] += ((pr[:, :] == c ) * colors[c][2]).astype('uint8')
    seg_img = np.reshape(
        np.array(colors, np.uint8)[np.reshape(pr, [-1])], [ori_h, ori_w, -1])

    image = Image.fromarray(seg_img)
    image = Image.blend(old_img, image, 0.7)

    return image
小结
本文,通过一个 Demo 介绍了,如何从制作数据集到训练 U-NET 模型并预测图片整个流程。大家可以自己找一个场景,制作一个自定义的数据集,然后实践一遍,以便更好地掌握。本文就到这里了,咱们下一篇见。

 The easiest way to train a U-NET Image Segmentation model using TensorFlow and labelme