Foreword
Earlier, I covered how to use Train a Custom Image Segmentation Model Using TensorFlow Object Detection API Mask R-CNN. However, the Mask R-CNN network is more complex and has high-performance consumption. In practical applications, if it is not a very complex segmentation task, there is a more suitable choice, which is U-NET to be explained in this article.
There are many articles about U-NET, but very few articles on custom datasets to model definition, training, and prediction. Therefore, this article aims to cover each step through a Demo, so that everyone can quickly master U-NET.
Installation
Download the source code https://github.com/CatchZeng/tensorflow-unet-labelme to your local and enter this directory.
If you are using macOS, you need to execute the following command before installation.
1
❯ brew install pyqt
Execute the following command to install the virtual environment named unet.
1
❯ conda create -n unet -y python=3.9 && conda activate unet && pip install -r requirements.txt
Dataset
The article is still used as an example of the cup, teapot, and humidifier in The easiest way to Train a Custom Image Segmentation Model Using TensorFlow Object Detection API Mask R-CNN.
Annotate images
Data annotation has already been explained in The easiest way to Train a Custom Image Segmentation Model Using TensorFlow Object Detection API Mask R-CNN, so I won’t repeat it here.
Generate VOC format dataset
U-NET dataset consists of raw images (jpg) and label (mask) images (png), usually using the VOC format to organize the dataset.
Store the labeled data in datasets/train of tensorflow-unet-labelme, and create a new datasets/labels.txt with the category names, see https://github.com/wkentaro/labelme/tree/main/examples/semantic_segmentation.
1
2
3
4
5
6
7
8
9
10
11
12
13
14
15
16
17
❯ tree -L 3
.
├── Makefile
├── README.md
├── datasets
│   ├── README.md
│   ├── labels.txt
│   ├── train
│   │   ├── 1.jpg
│   │   ├── 1.json
......
│   │   ├── 9.jpg
│   │   └── 9.json
├── labelme2voc.py
├── train.gif
├── unet.ipynb
└── voc_annotation.py
Note: You can refer to https://github.com/CatchZeng/tensorflow-unet-labelme/tree/master/datasets.
Execute the following command to generate a VOC format dataset.
1
2
3
4
5
6
7
8
9
10
11
12
13
14
15
16
17
18
19
20
21
22
23
24
25
26
27
28
29
30
31
32
33
34
35
36
37
38
39
40
41
42
43
44
❯ make voc
❯ tree -L 5
.
├── Makefile
├── README.md
├── datasets
│   ├── README.md
│   ├── labels.txt
│   ├── test
│   │   └── 1.jpg
│   ├── train
│   │   ├── 1.jpg
│   │   ├── 1.json
......
│   │   ├── 9.jpg
│   │   └── 9.json
│   └── train_voc
│       ├── ImageSets
│       │   └── Segmentation
│       │       ├── test.txt
│       │       ├── train.txt   # List of training set image names
│       │       ├── trainval.txt
│       │       └── val.txt  # list of validation set image names
│       ├── JPEGImages # raw images
│       │   ├── 1.jpg
......
│       │   └── 9.jpg
│       ├── SegmentationClass
│       │   ├── 1.npy
......
│       │   └── 9.npy
│       ├── SegmentationClassPNG # mask images
│       │   ├── 1.png
......
│       │   └── 9.png
│       ├── SegmentationClassVisualization
│       │   ├── 1.jpg
......
│       │   └── 9.jpg
│       └── class_names.txt
├── labelme2voc.py
├── train.gif
├── unet.ipynb
└── voc_annotation.py
The generated datasets/train_voc is the dataset used for training.
Training
Open unet.ipynb and select the Python interpreter as unet to start training.
Detailed code
The dataset is divided into the training set and validation set, and files are read from ImageSets/Segmentation/train.txt and ImageSets/Segmentation/val.txt respectively. Then, it is constructed as a tf.keras.utils.Sequence object through the UnetDataset class, which is convenient for direct training through model.fit later.
1
2
3
4
5
6
7
8
9
10
11
12
13
14
15
16
dataset_path = 'datasets/train_voc'
# read dataset txt files
with open(os.path.join(dataset_path, "ImageSets/Segmentation/train.txt"),
          "r",
          encoding="utf8") as f:
    train_lines = f.readlines()
with open(os.path.join(dataset_path, "ImageSets/Segmentation/val.txt"),
          "r",
          encoding="utf8") as f:
    val_lines = f.readlines()
train_batches = UnetDataset(train_lines, INPUT_SHAPE, BATCH_SIZE, NUM_CLASSES,
                            True, dataset_path)
val_batches = UnetDataset(val_lines, INPUT_SHAPE, BATCH_SIZE, NUM_CLASSES,
                          False, dataset_path)
STEPS_PER_EPOCH = len(train_lines) // BATCH_SIZE
VALIDATION_STEPS = len(val_lines) // BATCH_SIZE // VAL_SUBSPLITS
The UnetDataset class inherits from tf.keras.utils.Sequence. Return a set of batch_size data through the __getitem__ method, which includes the original image (images) and the label image (targets). Because the model has a fixed input shape, the resize operation is performed in the process_data method; during the training process, data enhancement can also be added, and a simple flip is used here.
1
2
3
4
5
6
7
8
9
10
11
12
13
14
15
16
17
18
19
20
21
22
23
24
25
26
27
28
29
30
31
32
33
34
35
36
37
38
39
40
41
42
43
44
45
46
47
48
49
50
51
52
53
54
55
class UnetDataset(tf.keras.utils.Sequence):
def __init__(self, annotation_lines, input_shape, batch_size, num_classes,
                 train, dataset_path):
        self.annotation_lines = annotation_lines
        self.length = len(self.annotation_lines)
        self.input_shape = input_shape
        self.batch_size = batch_size
        self.num_classes = num_classes
        self.train = train
        self.dataset_path = dataset_path
def __len__(self):
        return math.ceil(len(self.annotation_lines) / float(self.batch_size))
def __getitem__(self, index):
        images = []
        targets = []
        for i in range(index * self.batch_size, (index + 1) * self.batch_size):
            i = i % self.length
            name = self.annotation_lines[i].split()[0]
            jpg = Image.open(
                os.path.join(os.path.join(self.dataset_path, "JPEGImages"),
                             name + ".jpg"))
            png = Image.open(
                os.path.join(
                    os.path.join(self.dataset_path, "SegmentationClassPNG"),
                    name + ".png"))
jpg, png = self.process_data(jpg,
                                         png,
                                         self.input_shape,
                                         random=self.train)
images.append(jpg)
            targets.append(png)
images = np.array(images)
        targets = np.array(targets)
        return images, targets
def rand(self, a=0, b=1):
        return np.random.rand() * (b - a) + a
def process_data(self, image, label, input_shape, random=True):
        image = cvtColor(image)
        label = Image.fromarray(np.array(label))
        h, w, _ = input_shape
# resize
        image, _, _ = resize_image(image, (w, h))
        label, _, _ = resize_label(label, (w, h))
if random:
            # flip
            flip = self.rand() < .5
            if flip:
                image = image.transpose(Image.FLIP_LEFT_RIGHT)
                label = label.transpose(Image.FLIP_LEFT_RIGHT)
# np
        image = np.array(image, np.float32)
        image = normalize(image)
label = np.array(label)
        label[label >= self.num_classes] = self.num_classes
return image, label
The model definition part is relatively simple, as in the paper, mainly downsampling, upsampling, and concat.
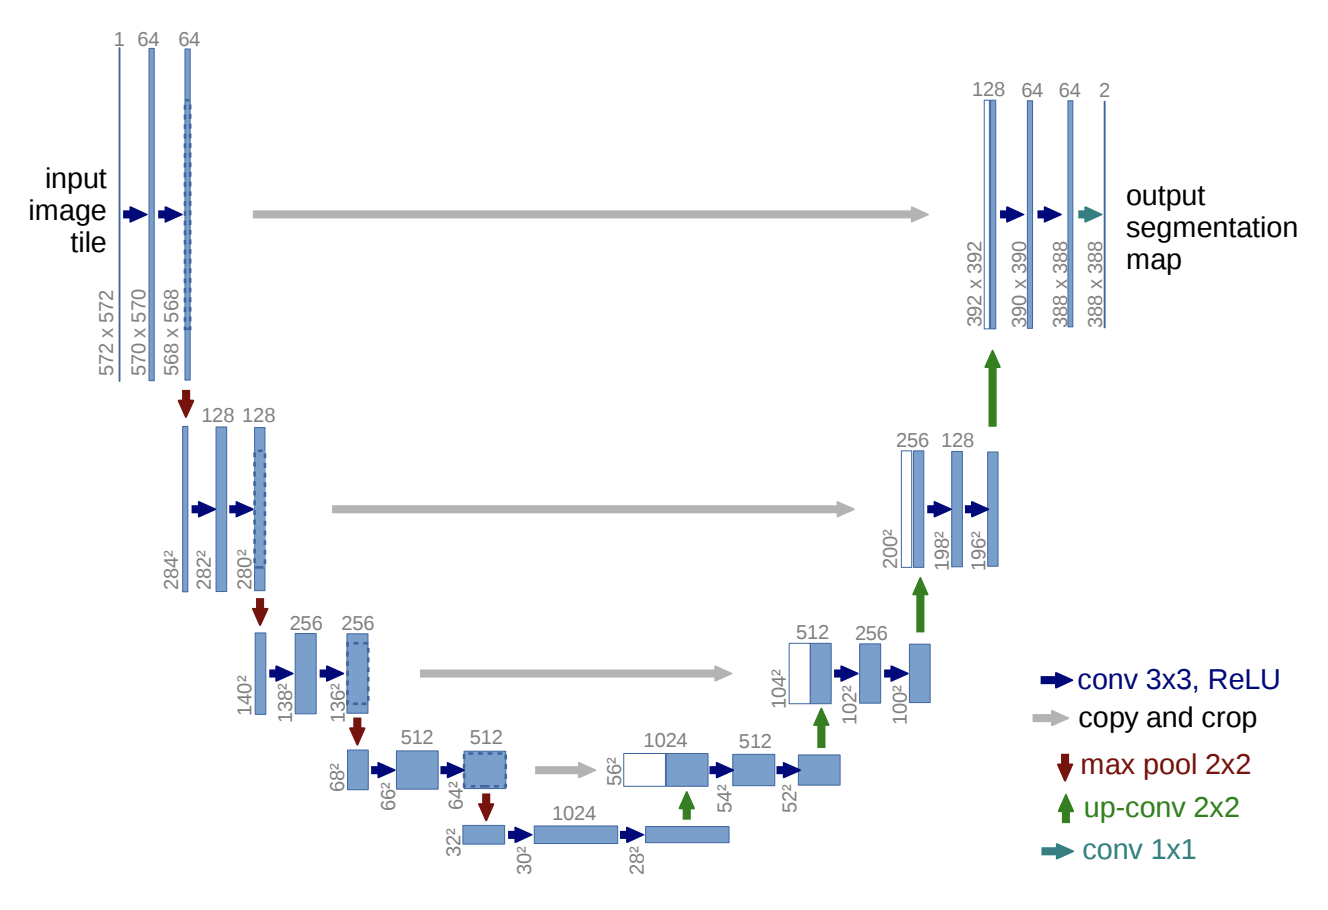
Here, the author refers to https://www.tensorflow.org/tutorials/images/segmentation, you can check the detailed analysis.
1
2
3
4
5
6
7
8
9
10
11
12
13
14
15
16
17
18
def unet_model(output_channels: int):
    inputs = tf.keras.layers.Input(shape=INPUT_SHAPE)
# Downsampling through the model
    skips = down_stack(inputs)
    x = skips[-1]
    skips = reversed(skips[:-1])
# Upsampling and establishing the skip connections
    for up, skip in zip(up_stack, skips):
        x = up(x)
        concat = tf.keras.layers.Concatenate()
        x = concat([x, skip])
# This is the last layer of the model
    last = tf.keras.layers.Conv2DTranspose(filters=output_channels,
                                           kernel_size=3,
                                           strides=2,
                                           padding='same')  #64x64 -> 128x128
x = last(x)
return tf.keras.Model(inputs=inputs, outputs=x)
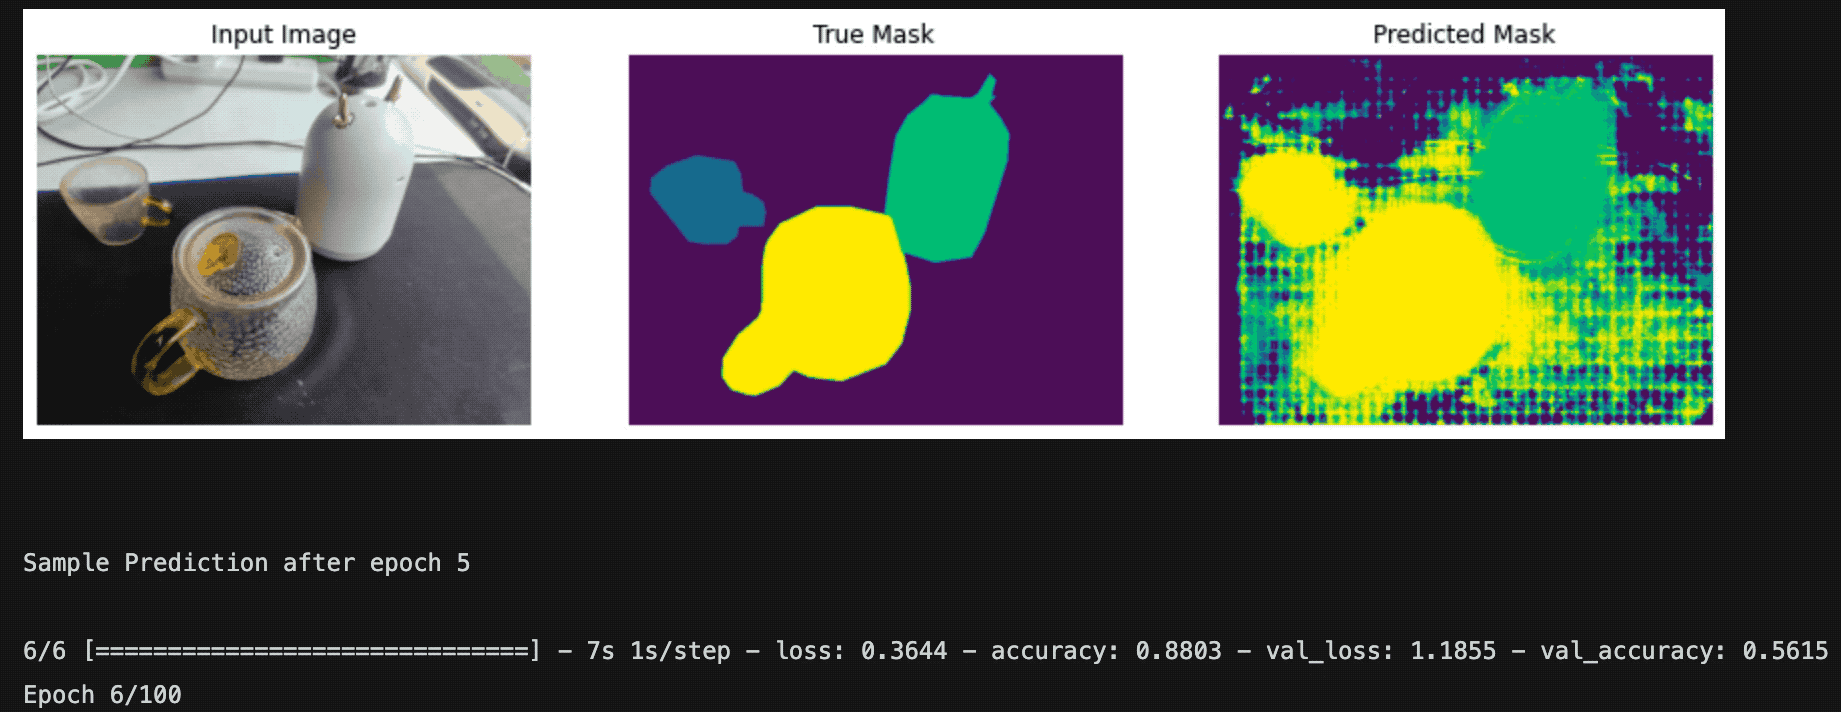
In the Callback part, the author mainly uses DisplayCallback and ModelCheckpointCallback.
DisplayCallback is used to display the predicted results after training an epoch, so as to observe the effect of the model.
ModelCheckpointCallback is used to save the weights (model) in the logs folder after training an epoch, and record the accuracy and loss rate after each epoch. In this way, the user can select a better model after training.
1
2
3
4
5
6
7
8
9
10
11
12
13
14
15
16
17
18
19
20
21
22
23
24
25
26
27
28
29
30
31
32
33
34
35
36
37
38
39
40
41
42
43
44
45
46
47
48
49
50
51
52
53
54
55
56
57
58
59
60
61
62
63
64
65
66
67
68
69
70
71
72
73
74
75
76
def on_epoch_end(self, epoch, logs=None):
        clear_output(wait=True)
        show_predictions()
        print('\nSample Prediction after epoch {}\n'.format(epoch + 1))
class ModelCheckpointCallback(tf.keras.callbacks.Callback):
def __init__(self,
                 filepath,
                 monitor='val_loss',
                 verbose=0,
                 save_best_only=False,
                 save_weights_only=False,
                 mode='auto',
                 period=1):
        super(ModelCheckpointCallback, self).__init__()
        self.monitor = monitor
        self.verbose = verbose
        self.filepath = filepath
        self.save_best_only = save_best_only
        self.save_weights_only = save_weights_only
        self.period = period
        self.epochs_since_last_save = 0
if mode not in ['auto', 'min', 'max']:
            warnings.warn(
                'ModelCheckpoint mode %s is unknown, '
                'fallback to auto mode.' % (mode), RuntimeWarning)
            mode = 'auto'
if mode == 'min':
            self.monitor_op = np.less
            self.best = np.Inf
        elif mode == 'max':
            self.monitor_op = np.greater
            self.best = -np.Inf
        else:
            if 'acc' in self.monitor or self.monitor.startswith('fmeasure'):
                self.monitor_op = np.greater
                self.best = -np.Inf
            else:
                self.monitor_op = np.less
                self.best = np.Inf
def on_epoch_end(self, epoch, logs=None):
        logs = logs or {}
        self.epochs_since_last_save += 1
        if self.epochs_since_last_save >= self.period:
            self.epochs_since_last_save = 0
            filepath = self.filepath.format(epoch=epoch + 1, **logs)
            if self.save_best_only:
                current = logs.get(self.monitor)
                if current is None:
                    warnings.warn(
                        'Can save best model only with %s available, '
                        'skipping.' % (self.monitor), RuntimeWarning)
                else:
                    if self.monitor_op(current, self.best):
                        if self.verbose > 0:
                            print(
                                '\nEpoch %05d: %s improved from %0.5f to %0.5f,'
                                ' saving model to %s' %
                                (epoch + 1, self.monitor, self.best, current,
                                 filepath))
                        self.best = current
                        if self.save_weights_only:
                            self.model.save_weights(filepath, overwrite=True)
                        else:
                            self.model.save(filepath, overwrite=True)
                    else:
                        if self.verbose > 0:
                            print('\nEpoch %05d: %s did not improve' %
                                  (epoch + 1, self.monitor))
            else:
                if self.verbose > 0:
                    print('\nEpoch %05d: saving model to %s' %
                          (epoch + 1, filepath))
                if self.save_weights_only:
                    self.model.save_weights(filepath, overwrite=True)
                else:
                    self.model.save(filepath, overwrite=True)
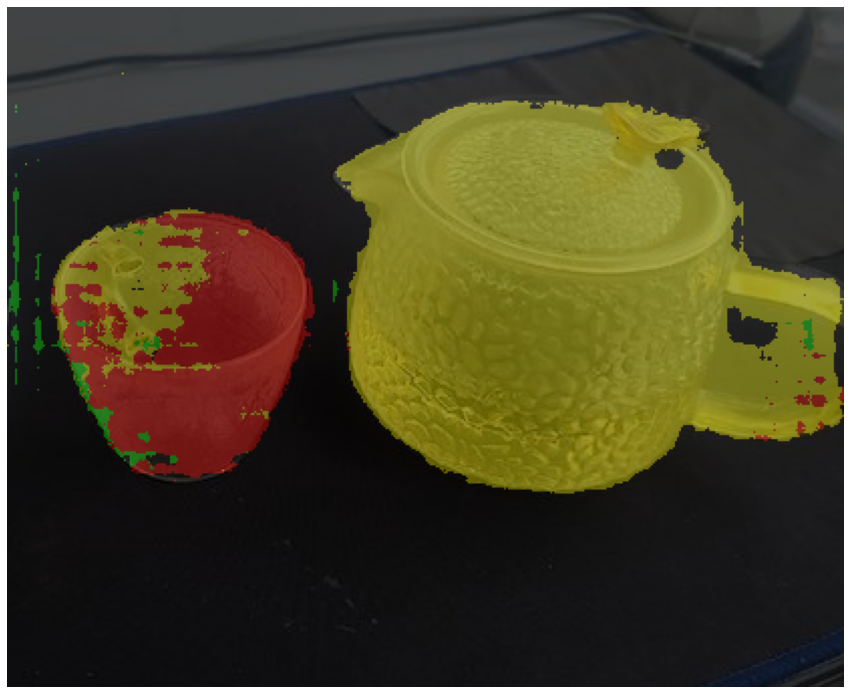
In the prediction model part, first, resize the file to the INPUT_SHAPE size of the model. It should be noted here that the predicted graph is not necessarily the same scale as INPUT_SHAPE. In order not to cause inaccurate prediction results due to the scale problem, the author adds **gray placeholders for the place where the image is not proportional** when resize, as shown in the following figure.

Then after the prediction is finished, the gray placeholders is removed.
Note: Because the rendering of this case is a Demo, only 20 epochs are trained, and the accuracy is general. In practical applications, you can train more to improve the accuracy.
1
2
3
4
5
6
7
8
9
10
11
12
13
14
15
16
17
18
19
20
21
22
23
24
25
26
def detect_image(image_path):
    image = Image.open(image_path)
    image = cvtColor(image)
old_img = copy.deepcopy(image)
    ori_h = np.array(image).shape[0]
    ori_w = np.array(image).shape[1]
# resize and add gray placeholders
    image_data, nw, nh = resize_image(image, (INPUT_SHAPE[1], INPUT_SHAPE[0]))
image_data = normalize(np.array(image_data, np.float32))
image_data = np.expand_dims(image_data, 0)
pr = model.predict(image_data)[0]
## remove gray placeholders
    pr = pr[int((INPUT_SHAPE[0] - nh) // 2) : int((INPUT_SHAPE[0] - nh) // 2 + nh), \
            int((INPUT_SHAPE[1] - nw) // 2) : int((INPUT_SHAPE[1] - nw) // 2 + nw)]
pr = cv2.resize(pr, (ori_w, ori_h), interpolation=cv2.INTER_LINEAR)
pr = pr.argmax(axis=-1)
# seg_img = np.zeros((np.shape(pr)[0], np.shape(pr)[1], 3))
    # for c in range(NUM_CLASSES):
    #     seg_img[:, :, 0] += ((pr[:, :] == c ) * colors[c][0]).astype('uint8')
    #     seg_img[:, :, 1] += ((pr[:, :] == c ) * colors[c][1]).astype('uint8')
    #     seg_img[:, :, 2] += ((pr[:, :] == c ) * colors[c][2]).astype('uint8')
    seg_img = np.reshape(
        np.array(colors, np.uint8)[np.reshape(pr, [-1])], [ori_h, ori_w, -1])
image = Image.fromarray(seg_img)
    image = Image.blend(old_img, image, 0.7)
return image
Summary
This article, through a demo, introduces how to create a data set to train a U-NET model and predict the picture, the entire process. You can find a scene by yourself, make a custom dataset, and practice it again to get a better grasp. That’s it for this article, see you in the next one.
Further reading
- The easiest way to Train a Custom Image Segmentation Model Using TensorFlow Object Detection API Mask R-CNN
- The easiest way to Train a Custom Object Detection Model Using TensorFlow Object Detection API
- How to deploy an image segmentation model service
- The easiest way to train a U-NET Image Segmentation model using TensorFlow and labelme
 golang 1.18 泛型教程