
- Foreword
- Image Segmentation
- TensorFlow Object Detection API
- Create workspace
- Dataset
- Model training
- Summary
- Further reading
- Reference
Foreword
The Previous article introduces Object Detection. This article will introduce the concept of Image Segmentation, and explain how to train a custom image segmentation model using TensorFlow Object Detection API through cases, including data set collection and processing, TensorFlow Object Detection API installation, and model training.
The case effect is shown in the figure below:
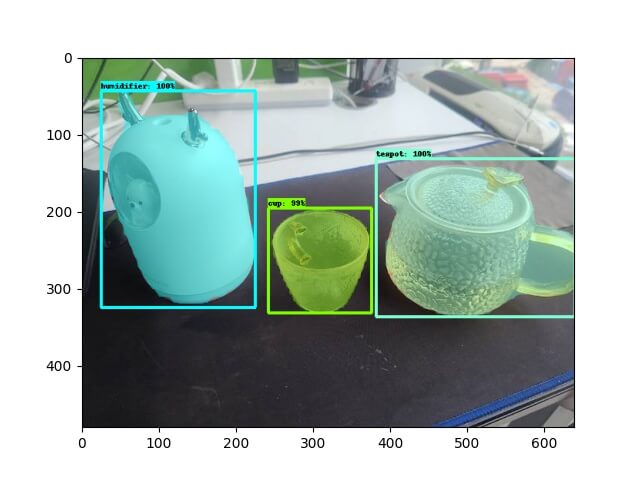
Image Segmentation

As shown in the figure above, Object Detection recognizes Objects in the image and detects their location, and Image Segmentation is divided into the following three types:
-
Semantic Segmentation: Tag each pixel in the image with a category label. As shown above, the image is divided into people (red), trees (dark green), grass (light green), and sky (blue) labels.
-
Instance Segmentation: The combination of Object Detection and Semantic Segmentation, the object is detected in the image (Object Detection), and then each pixel is labeled (Semantic Segmentation). As shown in the figure above, people are the object, Semantic Segmentation does not distinguish different instances belonging to the same category (all are marked in red), Instance Segmentation distinguishes different instances of the same type (use different colors to distinguish different people) .
-
Panoptic Segmentation: The combination of Semantic Segmentation and Instance Segmentation means that all objects must be detected and different instances in the same category must be distinguished. As shown in the above figure, Instance Segmentation only detects the target in the image (such as the person in the image above) and segmentation by pixel to distinguish different instances (using different colors), while Panoptic Segmentation is for all objects in the image The background must be detected and segmented to distinguish between different instances (using different colors).
Mask R-CNN to be used in this article is an Instance Segmentation model.
TensorFlow Object Detection API
The installation of TensorFlow Object Detection API is consistent with the Object Detection, please refer to Previous, so I won’t repeat it here.
Create workspace
Note: !!! From here, please make sure to execute under the environment of
conda od.
Go to the oda repo directory and execute the following command to create the workspace directory structure.
Note:
SAVE_DIRis the directory to save the workspace, andNAMEis the name of the workspace.
1
$ make workspace-mask SAVE_DIR=workspace NAME=test-mask
1
2
3
4
5
6
7
8
9
10
11
12
13
14
15
16
17
18
19
20
└── workspace
    └── test-mask
        ├── COCO_Image_Viewer.ipynb: Used to verify the successful conversion to COCO format
        ├── Makefile
        ├── annotations: Store the labeled data set, including val.record, train.record, label_map.pbtxt
        ├── create_coco_tf_record.py: Convert COCO format files to TFRecord
        ├── deployments: deploy model service
        │   ├── flask:Flask ingress service
        │   └── serving: Tensorflow Serving
        ├── exported-models: Store the exported model after training
        ├── exporter_main_v2.py: the script to export model
        ├── images: Data set images and json annotations
        │   ├── test: Store manual verification images
        │   ├── train: Training set images and json annotations
        │   └── val: Evaluation set images and json annotations
        ├── labelme2coco.py: Convert labelme json file to COCO format
        ├── model_main_tf2.py: the script to train model
        ├── models: Custom model
        ├── pre-trained-models: pre-trained models
        └── test_images.py: the script to verify the image manually
Dataset
Images
Here we still use a cup, teapot, and humidifier as examples.
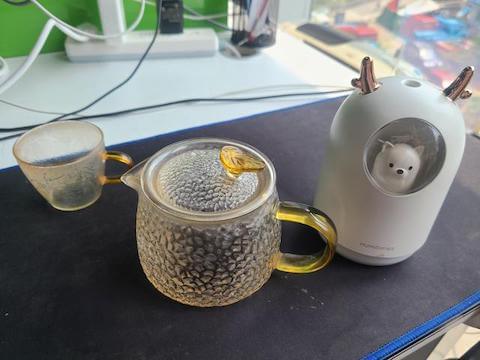
Put the collected pictures into the three subdirectories of images in the project directory.
Note: This case is just to show how to train the Object Detection model, so the dataset is relatively small. In the production, remember to collect as many datasets as possible.
Annotation
After collecting the pictures, you need to annotate the images in the training and evaluation sets.
We choose labelme as the annotation tool.
Install labelme according to the instructions of installation, then execute labelme to select the train and val folders for annotation.
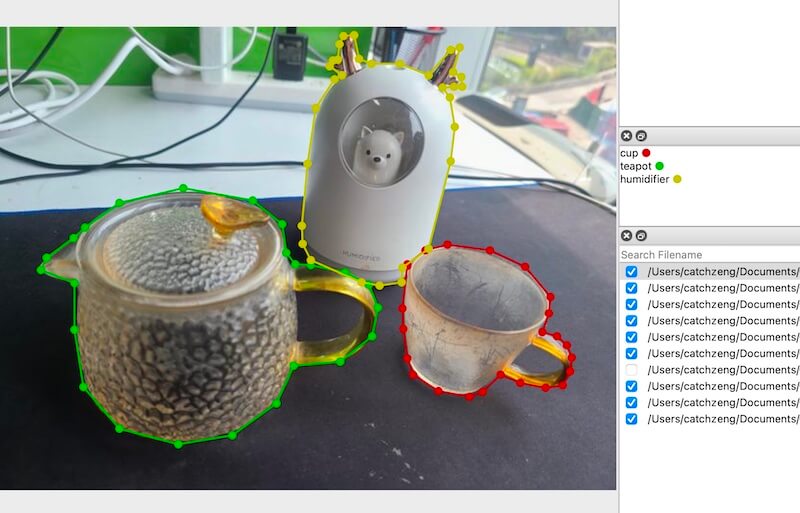
After the annotation is completed, the json annotation file corresponding to the image will be generated, as shown below:
1
2
3
4
5
6
7
8
9
10
11
12
13
14
15
16
17
18
19
20
21
22
23
24
25
26
27
28
29
30
31
32
33
34
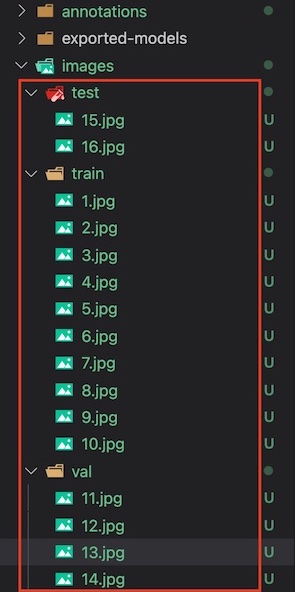
workspace/test-mask/images
├── test
│ ├── 15.jpg
│ └── 16.jpg
├── train
│ ├── 1.jpg
│ ├── 1.json
│ ├── 10.jpg
│ ├── 10.json
│ ├── 2.jpg
│ ├── 2.json
│ ├── 3.jpg
│ ├── 3.json
│ ├── 4.jpg
│ ├── 4.json
│ ├── 5.jpg
│ ├── 5.json
│ ├── 6.jpg
│ ├── 6.json
│ ├── 7.jpg
│ ├── 7.json
│ ├── 8.jpg
│ ├── 8.json
│ ├── 9.jpg
│ └── 9.json
└── val
├── 11.jpg
├── 11.json
├── 12.jpg
├── 12.json
├── 13.jpg
├── 13.json
├── 14.jpg
└── 14.json
Generate TFRecord and label_map
TensorFlow Object Detection API only supports TFRecord format, therefore, the dataset needs to be converted.
Go to the workspace directory (cd workspace/test-mask), and then execute make gen-tfrecord, it will generate TFRecord format dataset and label_map.pbtxt in the annotations folder.
1
2
3
4
5
6
7
8
9
10
11
12
13
14
15
16
17
18
19
20
21
22
23
24
25
26
27
28
29
30
$ make gen-tfrecord
python labelme2coco.py images/train --output images/train.json
save coco json
images/train.json
python labelme2coco.py images/val --output images/val.json
save coco json
images/val.json
python create_coco_tf_record.py --logtostderr \
        --train_image_dir=images/train \
        --val_image_dir=images/val \
        --train_annotations_file=images/train.json \
        --val_annotations_file=images/val.json \
        --include_masks=True \
        --output_dir=./annotations
......
python gen_label_map.py
item {
  id: 1
  name: 'cup'
}

item {
  id: 2
  name: 'humidifier'
}

item {
  id: 3
  name: 'teapot'
}
1
2
3
4
annotations
├── label_map.pbtxt
├── train.record
└── val.record
Note: If you want to verify whether labelme json is successfully converted to COCO format, you can run
COCO_Image_Viewer.ipynbto view the result.
Model training
Note: !!! From here, please make sure you have go to the workspace directory (
cd workspace/test-mask).
Download the pre-trained model
Select the appropriate model from Model Zoo, download and unzip it, and put it in workspace/test/pre-trained-models.
The default selection here is mask_rcnn_inception_resnet_v2_1024x1024_coco17_gpu-8 You can execute the following commands to automatically download and decompress
1
$ make dl-model
The directory structure is as follows:
1
2
3
4
5
6
└── test-mask
    └── pre-trained-models
        └── mask_rcnn_inception_resnet_v2_1024x1024_coco17_gpu-8
            ├── checkpoint
            ├── pipeline.config
            └── saved_model
Configure training pipeline
Create a corresponding model folder in the models directory, such as: mask_rcnn_inception_resnet_v2_1024x1024_coco17_gpu-8, and copy pre-trained-models/mask_rcnn_inception_resnet_v2_1024x1024_coco17_gpu-8/pipeline.config.
1
2
3
4
5
└── test-mask
    ├── models
    │   └── mask_rcnn_inception_resnet_v2_1024x1024_coco17_gpu-8
    │       └── pipeline.config
    └── pre-trained-models
Among them, pipeline.config needs to be modified according to the project as follows
1
2
3
4
5
6
7
8
9
10
11
12
13
14
15
16
17
18
19
20
21
22
23
24
25
26
27
28
29
30
31
32
33
34
35
36
37
38
39
40
41
42
43
44
45
46
47
48
49
50
51
52
53
54
55
56
57
58
59
60
61
62
63
64
65
66
67
68
model {
  faster_rcnn {
    num_classes: 3 # Modify to the number of objects that need to be identified.
    ......
    first_stage_max_proposals: 100 # Faster R-CNN has two networks, the first proposes regions where objects may be found and the second tries to detect objects in those. Increasing the number of proposals by the first network increases the accuracy but implies more computational work, because the second network has to search in more potential areas.
    second_stage_post_processing {
      batch_non_max_suppression {
        score_threshold: 0.0
        iou_threshold: 0.6
        max_detections_per_class: 2 # The maximum number of detections for each class, this can be adjusted according to your own model.
        max_total_detections: 6 # The maximum number of detections returned in total, this can be adjusted according to your own model.
      }
      score_converter: SOFTMAX
    }
    ......
}
train_config {
  batch_size: 8 # Here you need to adjust the size according to your own computer performance
  num_steps: 10000 # Modify to the total number of steps you want to train
  optimizer {
    momentum_optimizer {
      learning_rate {
        cosine_decay_learning_rate {
          learning_rate_base: 0.008
          total_steps: 10000 # Modify to the total number of steps you want to train
          warmup_learning_rate: 0.0
          warmup_steps: 50
        }
      }
      momentum_optimizer_value: 0.8999999761581421
    }
    use_moving_average: false
  }
  gradient_clipping_by_norm: 10.0
  fine_tune_checkpoint_version: V2 # Add this item and specify it as the V2 version
  fine_tune_checkpoint: "pre-trained-models/mask_rcnn_inception_resnet_v2_1024x1024_coco17_gpu-8/checkpoint/ckpt-0" # Modify the path to the pre-trained model
  fine_tune_checkpoint_type: "detection" # Add this item and set it to detection, because we are doing object detection
  data_augmentation_options {
    random_horizontal_flip {
    }
  }
}
train_input_reader {
  label_map_path: "annotations/label_map.pbtxt" # Add this item
  tf_record_input_reader {
    input_path: "annotations/train.record" # Modify the path to the training set
  }
  load_instance_masks: true
  mask_type: PNG_MASKS
}
eval_config {
  metrics_set: "coco_detection_metrics"
  metrics_set: "coco_mask_metrics"
  eval_instance_masks: true
  use_moving_averages: false
  batch_size: 1
  include_metrics_per_category: true
}
eval_input_reader {
  label_map_path: "annotations/label_map.pbtxt" # Modify to the annotations path
  shuffle: false
  num_epochs: 1
  tf_record_input_reader {
    input_path: "annotations/val.record" # Modify the path to the evaluation set
  }
  load_instance_masks: true
  mask_type: PNG_MASKS
}
Training model
1
$ make train
Note: If the following problems occur
Problem 1
ValueError: numpy.ndarray size changed, may indicate binary incompatibility. Expected 88 from C header, got 80 from PyObject
You can execute the following command to solve it
pip uninstall numpy pip install numpyProblem 2
ImportError: cannot import name '_registerMatType' from 'cv2.cv2'You can execute the following command to solve it
Model export
1
$ make export
Testing
After executing make export to export the model, and put the test image in the images/test folder, and then execute python test_images.py to output the annotated image to images/test_annotated.
Summary
This article has gone through the entire process of Image Segmentation through a case study, hoping to help you quickly master the ability to train a custom Image Segmentation model.
The code and dataset of the case have been placed in https://github.com/CatchZeng/object-detection-api.
The following articles will bring you:
- How to deploy an image segmentation model service
- the principle of image segmentation
- common networks
That’s it for this article, see you next.
Further reading
- The easiest way to Train a Custom Image Segmentation Model Using TensorFlow Object Detection API Mask R-CNN
- The easiest way to Train a Custom Object Detection Model Using TensorFlow Object Detection API
- How to deploy an image segmentation model service
- The easiest way to train a U-NET Image Segmentation model using TensorFlow and labelme
Reference
- https://github.com/tensorflow/models/tree/master/research/object_detection
- https://tensorflow-object-detection-api-tutorial.readthedocs.io/en/latest/index.html
- https://github.com/eric-erki/How-To-Train-an-Object-Detection-Classifier-for-Multiple-Objects-Using-TensorFlow-GPU-on-Windows-1
- https://my.oschina.net/u/876354/blog/3055850
- https://stackoverflow.com/questions/53382383/makefile-cant-use-conda-activate
- https://stackoverflow.com/questions/66060487/valueerror-numpy-ndarray-size-changed-may-indicate-binary-incompatibility-exp
- https://stackoverflow.com/questions/70537488/cannot-import-name-registermattype-from-cv2-cv2
 易 AI - 使用 TensorFlow Object Detection API Mask R-CNN 训练自定义图像分割模型