- 假设
- 安装前
- 每个节点安装 Docker
- 每个节点安装 kubeadm, kubelet, kubectl
- 在 master 节点
- 在节点上
- Metric Server
- Dashboard
- Istio
- MetalLB
- 实例
- 参考
假设
| Role | IP | OS | RAM | CPU |
|---|---|---|---|---|
| Master | 172.16.50.146 | Ubuntu 20.04 | 4G | 2 |
| Node1 | 172.16.50.147 | Ubuntu 20.04 | 4G | 2 |
| Node2 | 172.16.50.148 | Ubuntu 20.04 | 4G | 2 |
安装前
更改 hostname
-
Master
1
2
3
$ sudo vim hostname
$ cat /etc/hostname
master
-
Node1
1
2
3
$ sudo vim hostname
$ cat /etc/hostname
node1
-
Node2
1
2
3
$ sudo vim hostname
$ cat /etc/hostname
node2
注:直接使用
sudo hostname xxx只能临时改变hostname,重启机器后还是会变成旧的hostname。因此,这里推荐大家直接修改/etc/hostname,永久改变hostname。
如果因为机器重启改变
hostname,而导致kubelet.go:2268] node "xxx" not found,可以修改完hostname后使用systemctl restart kubelet重启解决问题。
验证每个节点的 MAC 地址和 product_uuid 是唯一的
1
2
$ ip link
$ sudo cat /sys/class/dmi/id/product_uuid
关闭每个节点的防火墙
1
$ sudo ufw disable
关闭每个节点的 swap
1
$ sudo swapoff -a; sudo sed -i '/swap/d' /etc/fstab
提示: 如果需要在多台计算机上同时执行命令,则可以使用 iTerm
⌘+ Shift + i跨所有选项卡输入。

让 iptables 查看每个节点的桥接流量
加载 br_netfilter
1
2
3
4
5
6
7
8
$ sudo modprobe br_netfilter
$ lsmod | grep br_netfilter
br_netfilter           28672  0
bridge                176128  1 br_netfilter
$ cat <<EOF | sudo tee /etc/modules-load.d/k8s.conf
> br_netfilter
> EOF
br_netfilter
设置 net.bridge.bridge-nf-call-iptables
1
2
3
4
5
6
7
8
9
10
11
12
$ cat <<EOF | sudo tee /etc/sysctl.d/k8s.conf
> net.bridge.bridge-nf-call-ip6tables = 1
> net.bridge.bridge-nf-call-iptables = 1
> EOF
net.bridge.bridge-nf-call-ip6tables = 1
net.bridge.bridge-nf-call-iptables = 1

$ sudo sysctl --system
* Applying /etc/sysctl.d/10-console-messages.conf ...
kernel.printk = 4 4 1 7
......
* Applying /etc/sysctl.conf ...
每个节点安装 Docker
根据 https://docs.docker.com/engine/install/ubuntu/ 和 https://docs.docker.com/engine/install/linux-postinstall/ 指导安装 Docker。
配置
配置 Docker 守护程序,尤其是使用 systemd 来管理容器的 cgroup。
1
2
3
4
5
6
7
8
9
10
11
sudo mkdir /etc/docker
cat <<EOF | sudo tee /etc/docker/daemon.json
{
  "exec-opts": ["native.cgroupdriver=systemd"],
  "log-driver": "json-file",
  "log-opts": {
    "max-size": "100m"
  },
  "storage-driver": "overlay2"
}
EOF
重启 Docker 并在启动时启用:
1
2
3
sudo systemctl enable docker
sudo systemctl daemon-reload
sudo systemctl restart docker
每个节点安装 kubeadm, kubelet, kubectl
更新 apt 软件包索引并安装使用 Kubernetes apt 存储库所需的软件包:
1
2
sudo apt-get update
sudo apt-get install -y apt-transport-https ca-certificates curl
下载 Google Cloud 公共签名密钥:
1
sudo curl -fsSLo /usr/share/keyrings/kubernetes-archive-keyring.gpg https://packages.cloud.google.com/apt/doc/apt-key.gpg
添加 Kubernetes apt 存储库:
1
echo "deb [signed-by=/usr/share/keyrings/kubernetes-archive-keyring.gpg] https://apt.kubernetes.io/ kubernetes-xenial main" | sudo tee /etc/apt/sources.list.d/kubernetes.list
更新 apt 软件包索引,安装 kubelet,kubeadm 和 kubectl,并固定其版本:
1
2
3
sudo apt-get update
sudo apt-get install -y kubelet kubeadm kubectl
sudo apt-mark hold kubelet kubeadm kubectl
在 master 节点
初始化 kubernetes 集群
使用 master 的 IP 地址替换以下命令中的 172.16.50.146。
1
2
3
4
5
6
7
8
9
10
11
12
13
14
15
16
17
18
19
20
21
22
23
24
25
26
27
28
29
30
31
32
33
34
35
36
37
38
39
40
41
42
43
44
45
46
47
48
49
50
51
52
53
54
55
56
57
58
59
60
61
62
63
64
65
66
67
68
69
70
71
72
73
74
$ sudo kubeadm init --apiserver-advertise-address=172.16.50.146 --pod-network-cidr=192.168.0.0/16  --ignore-preflight-errors=all
[init] Using Kubernetes version: v1.20.5
[preflight] Running pre-flight checks
	[WARNING SystemVerification]: this Docker version is not on the list of validated versions: 20.10.5. Latest validated version: 19.03
[preflight] Pulling images required for setting up a Kubernetes cluster
[preflight] This might take a minute or two, depending on the speed of your internet connection
[preflight] You can also perform this action in beforehand using 'kubeadm config images pull'
[certs] Using certificateDir folder "/etc/kubernetes/pki"
[certs] Generating "ca" certificate and key
[certs] Generating "apiserver" certificate and key
[certs] apiserver serving cert is signed for DNS names [kubernetes kubernetes.default kubernetes.default.svc kubernetes.default.svc.cluster.local master] and IPs [10.96.0.1 172.16.50.146]
[certs] Generating "apiserver-kubelet-client" certificate and key
[certs] Generating "front-proxy-ca" certificate and key
[certs] Generating "front-proxy-client" certificate and key
[certs] Generating "etcd/ca" certificate and key
[certs] Generating "etcd/server" certificate and key
[certs] etcd/server serving cert is signed for DNS names [localhost master] and IPs [172.16.50.146 127.0.0.1 ::1]
[certs] Generating "etcd/peer" certificate and key
[certs] etcd/peer serving cert is signed for DNS names [localhost master] and IPs [172.16.50.146 127.0.0.1 ::1]
[certs] Generating "etcd/healthcheck-client" certificate and key
[certs] Generating "apiserver-etcd-client" certificate and key
[certs] Generating "sa" key and public key
[kubeconfig] Using kubeconfig folder "/etc/kubernetes"
[kubeconfig] Writing "admin.conf" kubeconfig file
[kubeconfig] Writing "kubelet.conf" kubeconfig file
[kubeconfig] Writing "controller-manager.conf" kubeconfig file
[kubeconfig] Writing "scheduler.conf" kubeconfig file
[kubelet-start] Writing kubelet environment file with flags to file "/var/lib/kubelet/kubeadm-flags.env"
[kubelet-start] Writing kubelet configuration to file "/var/lib/kubelet/config.yaml"
[kubelet-start] Starting the kubelet
[control-plane] Using manifest folder "/etc/kubernetes/manifests"
[control-plane] Creating static Pod manifest for "kube-apiserver"
[control-plane] Creating static Pod manifest for "kube-controller-manager"
[control-plane] Creating static Pod manifest for "kube-scheduler"
[etcd] Creating static Pod manifest for local etcd in "/etc/kubernetes/manifests"
[wait-control-plane] Waiting for the kubelet to boot up the control plane as static Pods from directory "/etc/kubernetes/manifests". This can take up to 4m0s
[kubelet-check] Initial timeout of 40s passed.
[apiclient] All control plane components are healthy after 82.502493 seconds
[upload-config] Storing the configuration used in ConfigMap "kubeadm-config" in the "kube-system" Namespace
[kubelet] Creating a ConfigMap "kubelet-config-1.20" in namespace kube-system with the configuration for the kubelets in the cluster
[upload-certs] Skipping phase. Please see --upload-certs
[mark-control-plane] Marking the node master as control-plane by adding the labels "node-role.kubernetes.io/master=''" and "node-role.kubernetes.io/control-plane='' (deprecated)"
[mark-control-plane] Marking the node master as control-plane by adding the taints [node-role.kubernetes.io/master:NoSchedule]
[bootstrap-token] Using token: en2kq9.2basuxxemkuv1yvu
[bootstrap-token] Configuring bootstrap tokens, cluster-info ConfigMap, RBAC Roles
[bootstrap-token] configured RBAC rules to allow Node Bootstrap tokens to get nodes
[bootstrap-token] configured RBAC rules to allow Node Bootstrap tokens to post CSRs in order for nodes to get long term certificate credentials
[bootstrap-token] configured RBAC rules to allow the csrapprover controller automatically approve CSRs from a Node Bootstrap Token
[bootstrap-token] configured RBAC rules to allow certificate rotation for all node client certificates in the cluster
[bootstrap-token] Creating the "cluster-info" ConfigMap in the "kube-public" namespace
[kubelet-finalize] Updating "/etc/kubernetes/kubelet.conf" to point to a rotatable kubelet client certificate and key
[addons] Applied essential addon: CoreDNS
[addons] Applied essential addon: kube-proxy

Your Kubernetes control-plane has initialized successfully!

To start using your cluster, you need to run the following as a regular user:

  mkdir -p $HOME/.kube
  sudo cp -i /etc/kubernetes/admin.conf $HOME/.kube/config
  sudo chown $(id -u):$(id -g) $HOME/.kube/config

Alternatively, if you are the root user, you can run:

  export KUBECONFIG=/etc/kubernetes/admin.conf

You should now deploy a pod network to the cluster.
Run "kubectl apply -f [podnetwork].yaml" with one of the options listed at:
  https://kubernetes.io/docs/concepts/cluster-administration/addons/

Then you can join any number of worker nodes by running the following on each as root:

kubeadm join 172.16.50.146:6443 --token en2kq9.2basuxxemkuv1yvu \
    --discovery-token-ca-cert-hash sha256:97e84ca61b5d888476f5cdfd36fa141eaf2631e78e7d32c8c3d209e54be72870
配置 kubectl
1
2
3
mkdir -p $HOME/.kube
sudo cp -i /etc/kubernetes/admin.conf $HOME/.kube/config
sudo chown $(id -u):$(id -g) $HOME/.kube/config
部署 calico 网络
安装 Tigera Calico operator 和自定义资源定义。
1
kubectl create -f https://docs.projectcalico.org/manifests/tigera-operator.yaml
通过创建必要的自定义资源来安装 Calico。有关此清单中可用配置选项的更多信息,请参见安装参考。
1
kubectl create -f https://docs.projectcalico.org/manifests/custom-resources.yaml
注: 在创建此清单之前,请阅读其内容并确保其设置适合你的环境。例如,你可能需要更改默认
IP池CIDR以匹配你的Pod网络CIDR。
使用以下命令确认所有 Pod 都在运行。
1
kubectl get pods -n calico-system -w
等到每个 Pod 都正常运行。
注:
Tigera operator将资源安装在calico-system名称空间中。其他安装方法可以改用kube-system命名空间。
移除 master 节点上的 taints,以便可以在其上安排 pod。
1
kubectl taint nodes --all node-role.kubernetes.io/master-
应该返回以下内容。
1
node/master untainted
确认集群中现在有一个节点。 它应该返回类似以下的内容。
1
2
3
$ kubectl get nodes -o wide
NAME     STATUS   ROLES                  AGE     VERSION   INTERNAL-IP     EXTERNAL-IP   OS-IMAGE             KERNEL-VERSION     CONTAINER-RUNTIME
master   Ready    control-plane,master   8m57s   v1.20.5   172.16.50.146   <none>        Ubuntu 20.04.2 LTS   5.4.0-70-generic   docker://20.10.5
在节点上
加入集群
在每个节点中运行 join 命令(初始化 Kubernetes 集群输出中可以找到)。
1
2
3
4
5
6
7
8
9
10
11
12
13
14
15
16
$ sudo kubeadm join 172.16.50.146:6443 --token en2kq9.2basuxxemkuv1yvu \
>     --discovery-token-ca-cert-hash sha256:97e84ca61b5d888476f5cdfd36fa141eaf2631e78e7d32c8c3d209e54be72870
[preflight] Running pre-flight checks
	[WARNING SystemVerification]: this Docker version is not on the list of validated versions: 20.10.5. Latest validated version: 19.03
[preflight] Reading configuration from the cluster...
[preflight] FYI: You can look at this config file with 'kubectl -n kube-system get cm kubeadm-config -o yaml'
[kubelet-start] Writing kubelet configuration to file "/var/lib/kubelet/config.yaml"
[kubelet-start] Writing kubelet environment file with flags to file "/var/lib/kubelet/kubeadm-flags.env"
[kubelet-start] Starting the kubelet
[kubelet-start] Waiting for the kubelet to perform the TLS Bootstrap...

This node has joined the cluster:
* Certificate signing request was sent to apiserver and a response was received.
* The Kubelet was informed of the new secure connection details.

Run 'kubectl get nodes' on the control-plane to see this node join the cluster.
如果 token 已过期,则可以从 master 节点创建新的 token。
1
kubeadm token create --print-join-command
验证集群
1
2
3
4
5
$ kubectl get node
NAME     STATUS   ROLES                  AGE     VERSION
master   Ready    control-plane,master   19m     v1.20.5
node1    Ready    <none>                 5m48s   v1.20.5
node2    Ready    <none>                 4m57s   v1.20.5
使用其他机器控制集群
在 master 节点上复制 admin.conf 到 $HOME 目录下。
1
2
$ sudo cp /etc/kubernetes/admin.conf $HOME
$ sudo chown {user} /home/{user}/admin.conf
Scp $HOME/admin.conf 到其他机器。
1
2
3
4
5
6
7
$ scp {user}@172.16.50.146:/home/{user}/admin.conf .

$ kubectl --kubeconfig ./admin.conf get nodes
NAME     STATUS   ROLES                  AGE   VERSION
master   Ready    control-plane,master   45m   v1.20.5
node1    Ready    <none>                 31m   v1.20.5
node2    Ready    <none>                 31m   v1.20.5
Metric Server
部署 Metric Server 的目的是使用 top 命令查看简单的指标。
在没有 Metric server 的情况下,使用 top 命令将会返回错误。
1
2
$ kubectl top node
error: Metrics API not available
安装
1
2
3
4
5
6
7
8
9
10
$ kubectl apply -f https://github.com/kubernetes-sigs/metrics-server/releases/latest/download/components.yaml
serviceaccount/metrics-server created
clusterrole.rbac.authorization.k8s.io/system:aggregated-metrics-reader created
clusterrole.rbac.authorization.k8s.io/system:metrics-server created
rolebinding.rbac.authorization.k8s.io/metrics-server-auth-reader created
clusterrolebinding.rbac.authorization.k8s.io/metrics-server:system:auth-delegator created
clusterrolebinding.rbac.authorization.k8s.io/system:metrics-server created
service/metrics-server created
deployment.apps/metrics-server created
apiservice.apiregistration.k8s.io/v1beta1.metrics.k8s.io created
配置
1
$ kubectl edit deploy -n kube-system metrics-server
这将打开一个部署文件的文本编辑器,你需要做以下修改。
在 spec.template.spec.containers 增加如下参数:
1
- --kubelet-insecure-tls
修改后,部署文件应该大致如下:
1
2
3
4
5
6
7
8
9
containers:
  - args:
      - --cert-dir=/tmp
      - --secure-port=4443
      # Add this line
      - --kubelet-insecure-tls
      - --kubelet-preferred-address-types=InternalIP,ExternalIP,Hostname
      - --kubelet-use-node-status-port
    image: k8s.gcr.io/metrics-server/metrics-server:v0.4.2
等待 metrics-server 状态更新为 Running。
1
2
3
4
5
$ kubectl get pod -n kube-system -w
NAME                              READY   STATUS              RESTARTS   AGE
...
metrics-server-76f8d9fc69-jb94v   0/1     ContainerCreating   0          43s
metrics-server-76f8d9fc69-jb94v   1/1     Running             0          81s
再次使用 top 命令查看。
1
2
3
4
5
❯ kubectl top node
NAME     CPU(cores)   CPU%   MEMORY(bytes)   MEMORY%
master   242m         12%    2153Mi          56%
node1    143m         7%     2158Mi          56%
node2    99m          4%     1665Mi          43%
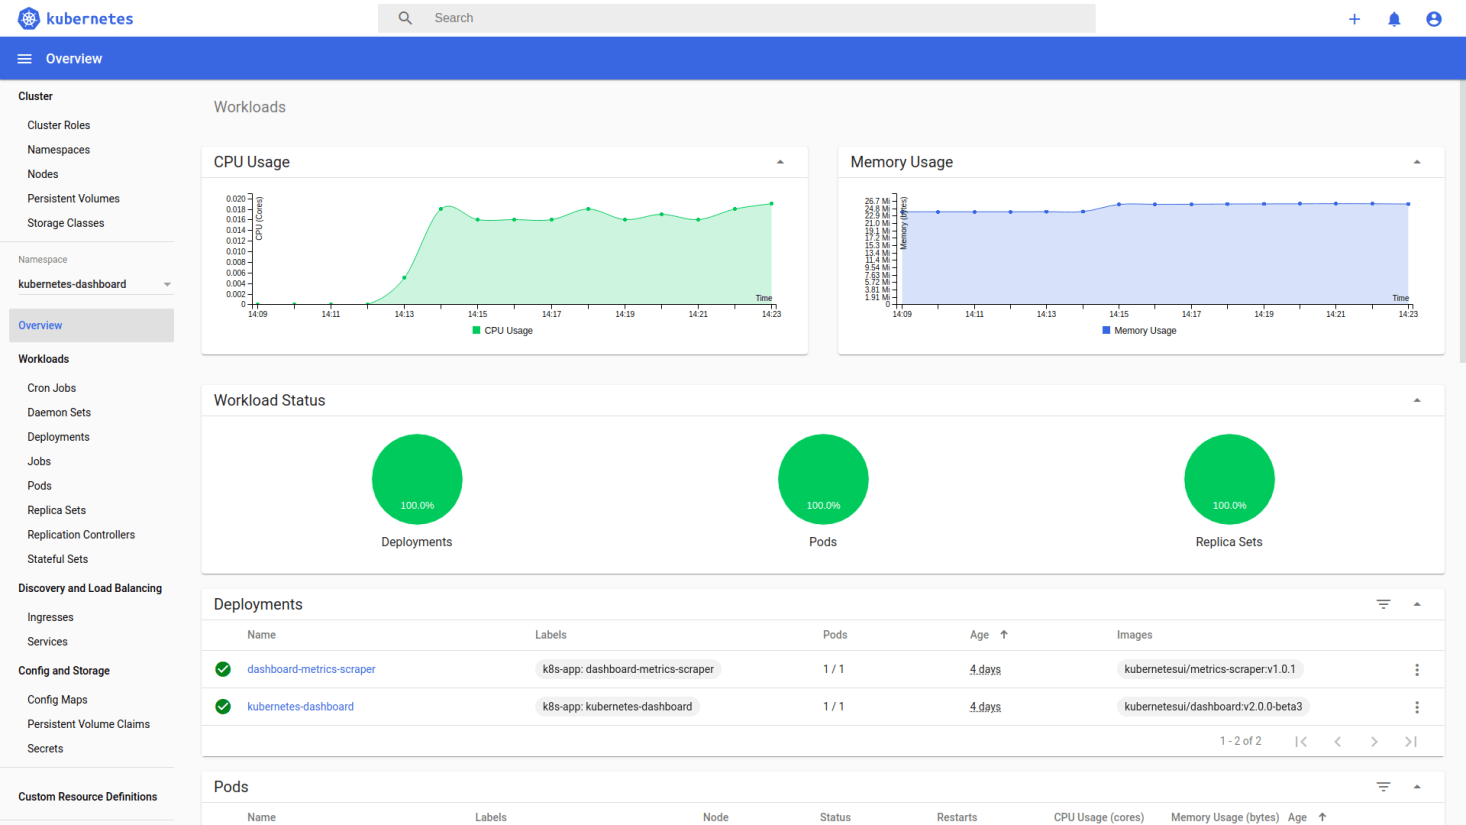
Dashboard
安装
1
kubectl apply -f https://raw.githubusercontent.com/kubernetes/dashboard/v2.2.0/aio/deploy/recommended.yaml
使用以下命令确认所有 Pod 都在运行。
1
2
3
4
❯ kubectl get pod -n kubernetes-dashboard -w
NAME                                         READY   STATUS    RESTARTS   AGE
dashboard-metrics-scraper-79c5968bdc-w2gmc   1/1     Running   0          8m
kubernetes-dashboard-9f9799597-w9fbz         1/1     Running   0          8m
访问
要从本地站访问 Dashboard,必须创建一个通往 Kubernetes 集群的安全通道。运行以下命令:
1
kubectl proxy
然后通过 http://localhost:8001/api/v1/namespaces/kubernetes-dashboard/services/https:kubernetes-dashboard:/proxy/ 访问 Dashboard。
创建示例用户
创建 Service Account
1
2
3
4
5
6
7
cat <<EOF | kubectl apply -f -
apiVersion: v1
kind: ServiceAccount
metadata:
  name: admin-user
  namespace: kubernetes-dashboard
EOF
创建 ClusterRoleBinding
1
2
3
4
5
6
7
8
9
10
11
12
13
14
cat <<EOF | kubectl apply -f -
apiVersion: rbac.authorization.k8s.io/v1
kind: ClusterRoleBinding
metadata:
  name: admin-user
roleRef:
  apiGroup: rbac.authorization.k8s.io
  kind: ClusterRole
  name: cluster-admin
subjects:
- kind: ServiceAccount
  name: admin-user
  namespace: kubernetes-dashboard
EOF
创建 Bearer Token
1
$ kubectl -n kubernetes-dashboard get secret $(kubectl -n kubernetes-dashboard get sa/admin-user -o jsonpath="{.secrets[0].name}") -o go-template=""
现在,复制 token 并将其粘贴到登录屏幕上的输入 Token 字段中。

单击登录按钮,仅此而已。你现在已以管理员身份登录。
Istio
安装 istioctl
1
2
3
curl -L https://istio.io/downloadIstio | sh -
cd istio-1.9.2
export PATH=$PWD/bin:$PATH
部署 Istio operator
1
2
3
4
5
$ istioctl operator init
Installing operator controller in namespace: istio-operator using image: docker.io/istio/operator:1.9.2
Operator controller will watch namespaces: istio-system
✔ Istio operator installed
✔ Installation complete
安装 Istio
1
2
3
4
5
6
7
8
9
10
11
12
13
$ kubectl create ns istio-system
namespace/istio-system created

$ kubectl apply -f - <<EOF
apiVersion: install.istio.io/v1alpha1
kind: IstioOperator
metadata:
  namespace: istio-system
  name: example-istiocontrolplane
spec:
  profile: default
EOF
istiooperator.install.istio.io/example-istiocontrolplane created
使用以下命令确认所有 Pod 都在运行。
1
2
3
4
$ kubectl get pod -n istio-system -w
NAME                                    READY   STATUS    RESTARTS   AGE
istio-ingressgateway-7cc49dcd99-c4mtf   1/1     Running   0          94s
istiod-687f965684-n8rkv                 1/1     Running   0          3m26s
MetalLB
Kubernetes不为裸机集群提供网络负载均衡器的实现(LoadBalancer 类型的服务)。Kubernetes附带的Network LB的实现都是调用各种IaaS平台(GCP,AWS,Azure 等)的粘合代码。 如果你未在受支持的IaaS平台(GCP,AWS,Azure 等)上运行,则LoadBalancers在创建后将无限期保持“pending”状态。
MetalLB 可以解决 istio ingress gateway EXTERNAL-IP “pending” 的问题.
安装
1
2
3
4
kubectl apply -f https://raw.githubusercontent.com/metallb/metallb/v0.9.6/manifests/namespace.yaml
kubectl apply -f https://raw.githubusercontent.com/metallb/metallb/v0.9.6/manifests/metallb.yaml
# On first install only
kubectl create secret generic -n metallb-system memberlist --from-literal=secretkey="$(openssl rand -base64 128)"
配置
1
2
3
4
5
6
7
8
9
10
11
12
13
14
$ kubectl apply -f - <<EOF
apiVersion: v1
kind: ConfigMap
metadata:
  namespace: metallb-system
  name: config
data:
  config: |
    address-pools:
    - name: default
      protocol: layer2
      addresses:
      - 172.16.50.147-172.16.50.148 #Update this with your Nodes IP range
EOF
实例
启用 istio 自动注入。
1
2
$ kubectl label namespace default istio-injection=enabled
namespace/default labeled
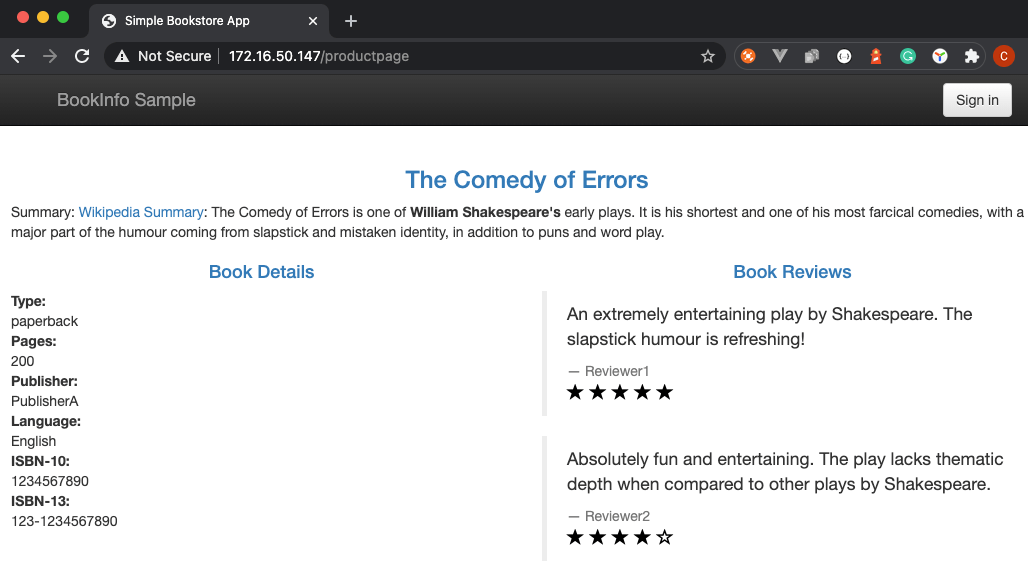
部署 book info 实例。
1
2
3
4
5
6
7
8
9
10
11
12
13
14
15
16
$ cd istio-1.9.2
$ kubectl apply -f samples/bookinfo/platform/kube/bookinfo.yaml
service/details created
serviceaccount/bookinfo-details created
deployment.apps/details-v1 created
service/ratings created
serviceaccount/bookinfo-ratings created
deployment.apps/ratings-v1 created
service/reviews created
serviceaccount/bookinfo-reviews created
deployment.apps/reviews-v1 created
deployment.apps/reviews-v2 created
deployment.apps/reviews-v3 created
service/productpage created
serviceaccount/bookinfo-productpage created
deployment.apps/productpage-v1 created
部署 book info gateway。
1
2
3
$ kubectl apply -f samples/bookinfo/networking/bookinfo-gateway.yaml
gateway.networking.istio.io/bookinfo-gateway created
virtualservice.networking.istio.io/bookinfo created
使用以下命令确认所有 Pod 都在运行。
1
2
3
4
5
6
7
8
$ kubectl get pod
NAME                              READY   STATUS    RESTARTS   AGE
details-v1-79f774bdb9-62x6b       2/2     Running   0          19m
productpage-v1-6b746f74dc-4g4hk   2/2     Running   0          19m
ratings-v1-b6994bb9-rz6pq         2/2     Running   0          19m
reviews-v1-545db77b95-bcnd8       2/2     Running   0          19m
reviews-v2-7bf8c9648f-zcgfx       2/2     Running   0          19m
reviews-v3-84779c7bbc-78bk7       2/2     Running   0          19m
获取 istio ingress gateway 的 EXTERNAL-IP。
1
2
3
4
$ kubectl get service -n istio-system
NAME                   TYPE           CLUSTER-IP      EXTERNAL-IP     PORT(S)                                                                      AGE
istio-ingressgateway   LoadBalancer   10.99.204.213   172.16.50.147   15021:32373/TCP,80:30588/TCP,443:31095/TCP,15012:31281/TCP,15443:32738/TCP   73m
istiod                 ClusterIP      10.103.238.79   <none>          15010/TCP,15012/TCP,443/TCP,15014/TCP                                        75m
从 http://EXTERNAL-IP/productpage 访问 productpage。
参考
- https://kubernetes.io/docs/setup/production-environment/tools/kubeadm/
- https://github.com/justmeandopensource/kubernetes/blob/master/docs/install-cluster-ubuntu-20.md
- https://docs.docker.com/engine/install/ubuntu/
- https://docs.projectcalico.org/getting-started/kubernetes/quickstart
- https://github.com/kubernetes/dashboard
- https://stackoverflow.com/questions/57137683/how-to-troubleshoot-metrics-server-on-kubeadm
 易 AI 专栏