- Assumptions
- Before you begin
- Install Docker for every node
- Installing kubeadm, kubelet and kubectl for every node
- On master
- On nodes
- Metric Server
- Dashboard
- Istio
- MetalLB
- Demo
- Reference
Assumptions
| Role | IP | OS | RAM | CPU |
|---|---|---|---|---|
| Master | 172.16.50.146 | Ubuntu 20.04 | 4G | 2 |
| Node1 | 172.16.50.147 | Ubuntu 20.04 | 4G | 2 |
| Node2 | 172.16.50.148 | Ubuntu 20.04 | 4G | 2 |
Before you begin
Change hostname
-
Master
1
2
3
$ sudo vim hostname
$ cat /etc/hostname
master
-
Node1
1
2
3
$ sudo vim hostname
$ cat /etc/hostname
node1
-
Node2
1
2
3
$ sudo vim hostname
$ cat /etc/hostname
node2
Note: Directly using
sudo hostname xxxcan only temporarily changehostname, and it will still become the oldhostnameafter restarting the machine. Therefore, it is recommended that you modify/etc/hostnamedirectly, and permanently changehostname.
If
kubelet.go:2268] node "xxx" not foundis caused by changing thehostnamebecause of the machine restart, you can usesystemctl restart kubeletafter modifying thehostnameto solve the problem.
Verify the MAC address and product_uuid are unique for every node
1
2
$ ip link
$ sudo cat /sys/class/dmi/id/product_uuid
Disable Firewall for every node
1
$ sudo ufw disable
Disable swap for every node
1
$ sudo swapoff -a; sudo sed -i '/swap/d' /etc/fstab
Tips: If commands need to be executed simultaneously on multiple machines, you can use iTerm
⌘ + Shift + ito input across all tabs.

Letting iptables see bridged traffic for every node
Load br_netfilter
1
2
3
4
5
6
7
8
$ sudo modprobe br_netfilter
$ lsmod | grep br_netfilter
br_netfilter           28672  0
bridge                176128  1 br_netfilter
$ cat <<EOF | sudo tee /etc/modules-load.d/k8s.conf
> br_netfilter
> EOF
br_netfilter
Set net.bridge.bridge-nf-call-iptables
1
2
3
4
5
6
7
8
9
10
11
12
$ cat <<EOF | sudo tee /etc/sysctl.d/k8s.conf
> net.bridge.bridge-nf-call-ip6tables = 1
> net.bridge.bridge-nf-call-iptables = 1
> EOF
net.bridge.bridge-nf-call-ip6tables = 1
net.bridge.bridge-nf-call-iptables = 1

$ sudo sysctl --system
* Applying /etc/sysctl.d/10-console-messages.conf ...
kernel.printk = 4 4 1 7
......
* Applying /etc/sysctl.conf ...
Install Docker for every node
Install docker according to the instructions of https://docs.docker.com/engine/install/ubuntu/ and https://docs.docker.com/engine/install/linux-postinstall/.
Configure
Configure the Docker daemon, in particular to use systemd for the management of the container’s cgroups.
1
2
3
4
5
6
7
8
9
10
11
sudo mkdir /etc/docker
cat <<EOF | sudo tee /etc/docker/daemon.json
{
  "exec-opts": ["native.cgroupdriver=systemd"],
  "log-driver": "json-file",
  "log-opts": {
    "max-size": "100m"
  },
  "storage-driver": "overlay2"
}
EOF
Restart Docker and enable on boot:
1
2
3
sudo systemctl enable docker
sudo systemctl daemon-reload
sudo systemctl restart docker
Installing kubeadm, kubelet and kubectl for every node
Update the apt package index and install packages needed to use the Kubernetes apt repository:
1
2
sudo apt-get update
sudo apt-get install -y apt-transport-https ca-certificates curl
Download the Google Cloud public signing key:
1
sudo curl -fsSLo /usr/share/keyrings/kubernetes-archive-keyring.gpg https://packages.cloud.google.com/apt/doc/apt-key.gpg
Add the Kubernetes apt repository:
1
echo "deb [signed-by=/usr/share/keyrings/kubernetes-archive-keyring.gpg] https://apt.kubernetes.io/ kubernetes-xenial main" | sudo tee /etc/apt/sources.list.d/kubernetes.list
Update apt package index, install kubelet, kubeadm and kubectl, and pin their version:
1
2
3
sudo apt-get update
sudo apt-get install -y kubelet kubeadm kubectl
sudo apt-mark hold kubelet kubeadm kubectl
On master
Initialize kubernetes cluster
Update the below command with the ip address of master
1
2
3
4
5
6
7
8
9
10
11
12
13
14
15
16
17
18
19
20
21
22
23
24
25
26
27
28
29
30
31
32
33
34
35
36
37
38
39
40
41
42
43
44
45
46
47
48
49
50
51
52
53
54
55
56
57
58
59
60
61
62
63
64
65
66
67
68
69
70
71
72
73
74
$ sudo kubeadm init --apiserver-advertise-address=172.16.50.146 --pod-network-cidr=192.168.0.0/16  --ignore-preflight-errors=all
[init] Using Kubernetes version: v1.20.5
[preflight] Running pre-flight checks
	[WARNING SystemVerification]: this Docker version is not on the list of validated versions: 20.10.5. Latest validated version: 19.03
[preflight] Pulling images required for setting up a Kubernetes cluster
[preflight] This might take a minute or two, depending on the speed of your internet connection
[preflight] You can also perform this action in beforehand using 'kubeadm config images pull'
[certs] Using certificateDir folder "/etc/kubernetes/pki"
[certs] Generating "ca" certificate and key
[certs] Generating "apiserver" certificate and key
[certs] apiserver serving cert is signed for DNS names [kubernetes kubernetes.default kubernetes.default.svc kubernetes.default.svc.cluster.local master] and IPs [10.96.0.1 172.16.50.146]
[certs] Generating "apiserver-kubelet-client" certificate and key
[certs] Generating "front-proxy-ca" certificate and key
[certs] Generating "front-proxy-client" certificate and key
[certs] Generating "etcd/ca" certificate and key
[certs] Generating "etcd/server" certificate and key
[certs] etcd/server serving cert is signed for DNS names [localhost master] and IPs [172.16.50.146 127.0.0.1 ::1]
[certs] Generating "etcd/peer" certificate and key
[certs] etcd/peer serving cert is signed for DNS names [localhost master] and IPs [172.16.50.146 127.0.0.1 ::1]
[certs] Generating "etcd/healthcheck-client" certificate and key
[certs] Generating "apiserver-etcd-client" certificate and key
[certs] Generating "sa" key and public key
[kubeconfig] Using kubeconfig folder "/etc/kubernetes"
[kubeconfig] Writing "admin.conf" kubeconfig file
[kubeconfig] Writing "kubelet.conf" kubeconfig file
[kubeconfig] Writing "controller-manager.conf" kubeconfig file
[kubeconfig] Writing "scheduler.conf" kubeconfig file
[kubelet-start] Writing kubelet environment file with flags to file "/var/lib/kubelet/kubeadm-flags.env"
[kubelet-start] Writing kubelet configuration to file "/var/lib/kubelet/config.yaml"
[kubelet-start] Starting the kubelet
[control-plane] Using manifest folder "/etc/kubernetes/manifests"
[control-plane] Creating static Pod manifest for "kube-apiserver"
[control-plane] Creating static Pod manifest for "kube-controller-manager"
[control-plane] Creating static Pod manifest for "kube-scheduler"
[etcd] Creating static Pod manifest for local etcd in "/etc/kubernetes/manifests"
[wait-control-plane] Waiting for the kubelet to boot up the control plane as static Pods from directory "/etc/kubernetes/manifests". This can take up to 4m0s
[kubelet-check] Initial timeout of 40s passed.
[apiclient] All control plane components are healthy after 82.502493 seconds
[upload-config] Storing the configuration used in ConfigMap "kubeadm-config" in the "kube-system" Namespace
[kubelet] Creating a ConfigMap "kubelet-config-1.20" in namespace kube-system with the configuration for the kubelets in the cluster
[upload-certs] Skipping phase. Please see --upload-certs
[mark-control-plane] Marking the node master as control-plane by adding the labels "node-role.kubernetes.io/master=''" and "node-role.kubernetes.io/control-plane='' (deprecated)"
[mark-control-plane] Marking the node master as control-plane by adding the taints [node-role.kubernetes.io/master:NoSchedule]
[bootstrap-token] Using token: en2kq9.2basuxxemkuv1yvu
[bootstrap-token] Configuring bootstrap tokens, cluster-info ConfigMap, RBAC Roles
[bootstrap-token] configured RBAC rules to allow Node Bootstrap tokens to get nodes
[bootstrap-token] configured RBAC rules to allow Node Bootstrap tokens to post CSRs in order for nodes to get long term certificate credentials
[bootstrap-token] configured RBAC rules to allow the csrapprover controller automatically approve CSRs from a Node Bootstrap Token
[bootstrap-token] configured RBAC rules to allow certificate rotation for all node client certificates in the cluster
[bootstrap-token] Creating the "cluster-info" ConfigMap in the "kube-public" namespace
[kubelet-finalize] Updating "/etc/kubernetes/kubelet.conf" to point to a rotatable kubelet client certificate and key
[addons] Applied essential addon: CoreDNS
[addons] Applied essential addon: kube-proxy

Your Kubernetes control-plane has initialized successfully!

To start using your cluster, you need to run the following as a regular user:

  mkdir -p $HOME/.kube
  sudo cp -i /etc/kubernetes/admin.conf $HOME/.kube/config
  sudo chown $(id -u):$(id -g) $HOME/.kube/config

Alternatively, if you are the root user, you can run:

  export KUBECONFIG=/etc/kubernetes/admin.conf

You should now deploy a pod network to the cluster.
Run "kubectl apply -f [podnetwork].yaml" with one of the options listed at:
  https://kubernetes.io/docs/concepts/cluster-administration/addons/

Then you can join any number of worker nodes by running the following on each as root:

kubeadm join 172.16.50.146:6443 --token en2kq9.2basuxxemkuv1yvu \
    --discovery-token-ca-cert-hash sha256:97e84ca61b5d888476f5cdfd36fa141eaf2631e78e7d32c8c3d209e54be72870
Configure kubectl
1
2
3
mkdir -p $HOME/.kube
sudo cp -i /etc/kubernetes/admin.conf $HOME/.kube/config
sudo chown $(id -u):$(id -g) $HOME/.kube/config
Deploy calico network
Install the Tigera Calico operator and custom resource definitions.
1
kubectl create -f https://docs.projectcalico.org/manifests/tigera-operator.yaml
Install Calico by creating the necessary custom resource. For more information on configuration options available in this manifest, see the installation reference.
1
kubectl create -f https://docs.projectcalico.org/manifests/custom-resources.yaml
Note: Before creating this manifest, read its contents and make sure its settings are correct for your environment. For example, you may need to change the default IP pool CIDR to match your pod network CIDR.
Confirm that all of the pods are running with the following command.
1
kubectl get pods -n calico-system -w
Wait until each pod has the STATUS of Running.
Note: The Tigera operator installs resources in the
calico-systemnamespace. Other install methods may use thekube-systemnamespace instead.
Remove the taints on the master so that you can schedule pods on it.
1
kubectl taint nodes --all node-role.kubernetes.io/master-
It should return the following.
1
node/master untainted
Confirm that you now have a node in your cluster. It should return something like the following.
1
2
3
$ kubectl get nodes -o wide
NAME     STATUS   ROLES                  AGE     VERSION   INTERNAL-IP     EXTERNAL-IP   OS-IMAGE             KERNEL-VERSION     CONTAINER-RUNTIME
master   Ready    control-plane,master   8m57s   v1.20.5   172.16.50.146   <none>        Ubuntu 20.04.2 LTS   5.4.0-70-generic   docker://20.10.5
On nodes
Join the cluster
Running with the following join command from Initialize Kubernetes Cluster output for every node.
1
2
3
4
5
6
7
8
9
10
11
12
13
14
15
16
$ sudo kubeadm join 172.16.50.146:6443 --token en2kq9.2basuxxemkuv1yvu \
>     --discovery-token-ca-cert-hash sha256:97e84ca61b5d888476f5cdfd36fa141eaf2631e78e7d32c8c3d209e54be72870
[preflight] Running pre-flight checks
	[WARNING SystemVerification]: this Docker version is not on the list of validated versions: 20.10.5. Latest validated version: 19.03
[preflight] Reading configuration from the cluster...
[preflight] FYI: You can look at this config file with 'kubectl -n kube-system get cm kubeadm-config -o yaml'
[kubelet-start] Writing kubelet configuration to file "/var/lib/kubelet/config.yaml"
[kubelet-start] Writing kubelet environment file with flags to file "/var/lib/kubelet/kubeadm-flags.env"
[kubelet-start] Starting the kubelet
[kubelet-start] Waiting for the kubelet to perform the TLS Bootstrap...

This node has joined the cluster:
* Certificate signing request was sent to apiserver and a response was received.
* The Kubelet was informed of the new secure connection details.

Run 'kubectl get nodes' on the control-plane to see this node join the cluster.
If the token is expired, you can create new one from master.
1
kubeadm token create --print-join-command
Verifying the cluster
1
2
3
4
5
$ kubectl get node
NAME     STATUS   ROLES                  AGE     VERSION
master   Ready    control-plane,master   19m     v1.20.5
node1    Ready    <none>                 5m48s   v1.20.5
node2    Ready    <none>                 4m57s   v1.20.5
Controlling your cluster from machines
Copy admin.conf to $HOME on master.
1
2
$ sudo cp /etc/kubernetes/admin.conf $HOME
$ sudo chown {user} /home/{user}/admin.conf
Scp $HOME/admin.conf to the other machine.
1
2
3
4
5
6
7
$ scp {user}@172.16.50.146:/home/{user}/admin.conf .

$ kubectl --kubeconfig ./admin.conf get nodes
NAME     STATUS   ROLES                  AGE   VERSION
master   Ready    control-plane,master   45m   v1.20.5
node1    Ready    <none>                 31m   v1.20.5
node2    Ready    <none>                 31m   v1.20.5
Metric Server
The purpose of deploying Metric Server is to view simple metrics through the top command.
Using the top command will return an error without the Metric server.
1
2
$ kubectl top node
error: Metrics API not available
Installation
1
2
3
4
5
6
7
8
9
10
$ kubectl apply -f https://github.com/kubernetes-sigs/metrics-server/releases/latest/download/components.yaml
serviceaccount/metrics-server created
clusterrole.rbac.authorization.k8s.io/system:aggregated-metrics-reader created
clusterrole.rbac.authorization.k8s.io/system:metrics-server created
rolebinding.rbac.authorization.k8s.io/metrics-server-auth-reader created
clusterrolebinding.rbac.authorization.k8s.io/metrics-server:system:auth-delegator created
clusterrolebinding.rbac.authorization.k8s.io/system:metrics-server created
service/metrics-server created
deployment.apps/metrics-server created
apiservice.apiregistration.k8s.io/v1beta1.metrics.k8s.io created
Configuration
1
$ kubectl edit deploy -n kube-system metrics-server
That will open a text editor with the deployment yaml-file where you can make the following changes:
Under spec.template.spec.containers, on the same level as name: metrics-server add
1
- --kubelet-insecure-tls
Afterwards your deployment yaml should look something like this:
1
2
3
4
5
6
7
8
9
containers:
  - args:
      - --cert-dir=/tmp
      - --secure-port=4443
      # Add this line
      - --kubelet-insecure-tls
      - --kubelet-preferred-address-types=InternalIP,ExternalIP,Hostname
      - --kubelet-use-node-status-port
    image: k8s.gcr.io/metrics-server/metrics-server:v0.4.2
Wait until metrics server is Running.
1
2
3
4
5
$ kubectl get pod -n kube-system -w
NAME                              READY   STATUS              RESTARTS   AGE
...
metrics-server-76f8d9fc69-jb94v   0/1     ContainerCreating   0          43s
metrics-server-76f8d9fc69-jb94v   1/1     Running             0          81s
Use the top command again.
1
2
3
4
5
❯ kubectl top node
NAME     CPU(cores)   CPU%   MEMORY(bytes)   MEMORY%
master   242m         12%    2153Mi          56%
node1    143m         7%     2158Mi          56%
node2    99m          4%     1665Mi          43%
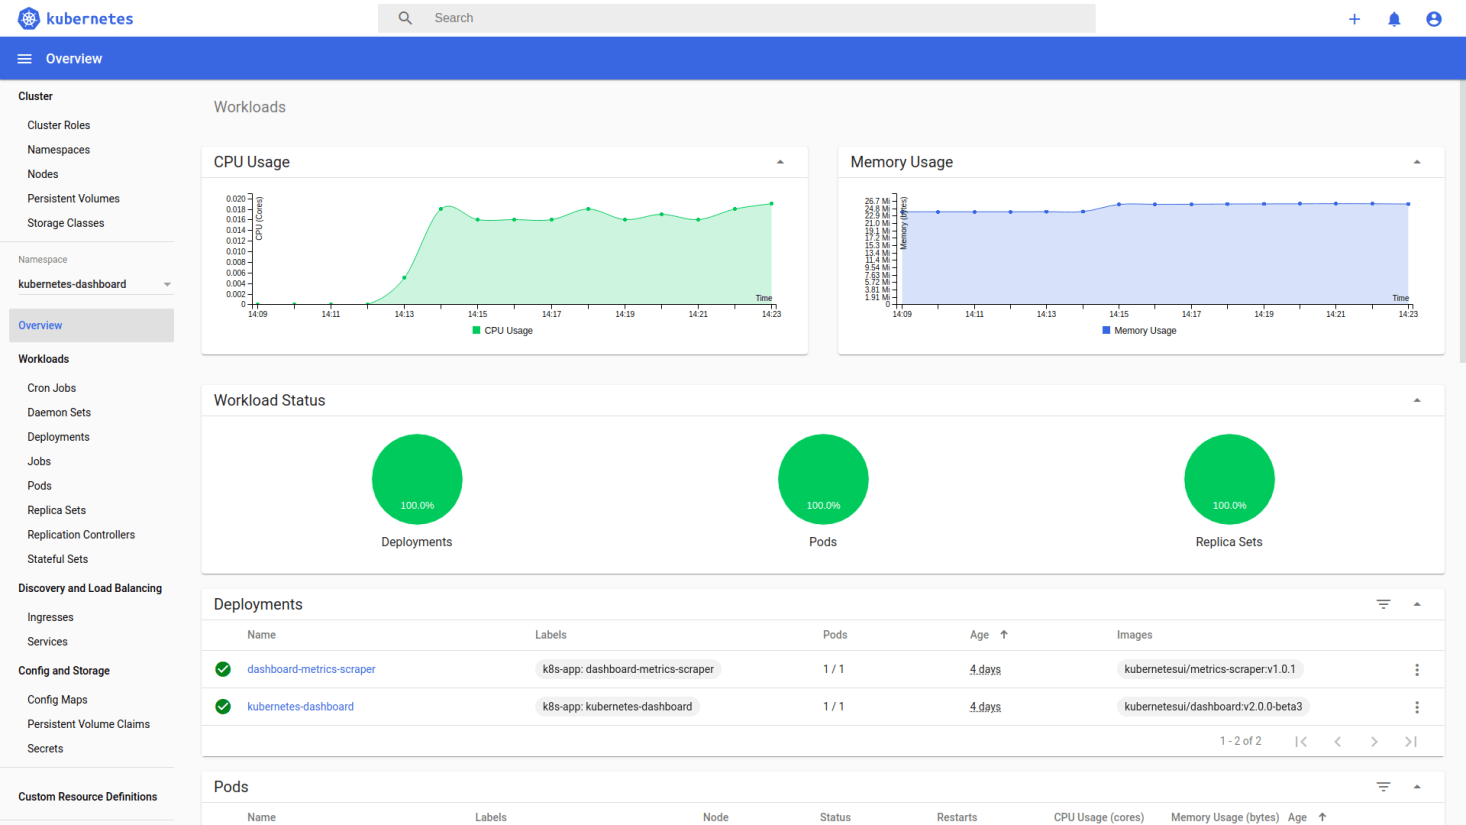
Dashboard
Install
1
kubectl apply -f https://raw.githubusercontent.com/kubernetes/dashboard/v2.2.0/aio/deploy/recommended.yaml
Confirm that all of the pods are running with the following command.
1
2
3
4
❯ kubectl get pod -n kubernetes-dashboard -w
NAME                                         READY   STATUS    RESTARTS   AGE
dashboard-metrics-scraper-79c5968bdc-w2gmc   1/1     Running   0          8m
kubernetes-dashboard-9f9799597-w9fbz         1/1     Running   0          8m
Access
To access Dashboard from your local workstation you must create a secure channel to your Kubernetes cluster. Run the following command:
1
kubectl proxy
Now access Dashboard at http://localhost:8001/api/v1/namespaces/kubernetes-dashboard/services/https:kubernetes-dashboard:/proxy/ .
Creating sample user
Creating a Service Account
1
2
3
4
5
6
7
cat <<EOF | kubectl apply -f -
apiVersion: v1
kind: ServiceAccount
metadata:
  name: admin-user
  namespace: kubernetes-dashboard
EOF
Creating a ClusterRoleBinding
1
2
3
4
5
6
7
8
9
10
11
12
13
14
cat <<EOF | kubectl apply -f -
apiVersion: rbac.authorization.k8s.io/v1
kind: ClusterRoleBinding
metadata:
  name: admin-user
roleRef:
  apiGroup: rbac.authorization.k8s.io
  kind: ClusterRole
  name: cluster-admin
subjects:
- kind: ServiceAccount
  name: admin-user
  namespace: kubernetes-dashboard
EOF
Getting a Bearer Token
1
$ kubectl -n kubernetes-dashboard get secret $(kubectl -n kubernetes-dashboard get sa/admin-user -o jsonpath="{.secrets[0].name}") -o go-template=""
Now copy the token and paste it into Enter token field on the login screen.

Click Sign in button and that’s it. You are now logged in as an admin.
Istio
Install istioctl
1
2
3
curl -L https://istio.io/downloadIstio | sh -
cd istio-1.9.2
export PATH=$PWD/bin:$PATH
Deploy the Istio operator
1
2
3
4
5
$ istioctl operator init
Installing operator controller in namespace: istio-operator using image: docker.io/istio/operator:1.9.2
Operator controller will watch namespaces: istio-system
✔ Istio operator installed
✔ Installation complete
Install Istio
1
2
3
4
5
6
7
8
9
10
11
12
13
$ kubectl create ns istio-system
namespace/istio-system created

$ kubectl apply -f - <<EOF
apiVersion: install.istio.io/v1alpha1
kind: IstioOperator
metadata:
  namespace: istio-system
  name: example-istiocontrolplane
spec:
  profile: default
EOF
istiooperator.install.istio.io/example-istiocontrolplane created
Confirm that all of the pods are running with the following command.
1
2
3
4
$ kubectl get pod -n istio-system -w
NAME                                    READY   STATUS    RESTARTS   AGE
istio-ingressgateway-7cc49dcd99-c4mtf   1/1     Running   0          94s
istiod-687f965684-n8rkv                 1/1     Running   0          3m26s
MetalLB
Kubernetes does not offer an implementation of network load-balancers (Services of type LoadBalancer) for bare metal clusters. The implementations of Network LB that Kubernetes does ship with are all glue code that calls out to various IaaS platforms (GCP, AWS, Azure…). If you’re not running on a supported IaaS platform (GCP, AWS, Azure…), LoadBalancers will remain in the
“pending”state indefinitely when created.
MetalLB can solve the istio ingress gateway EXTERNAL-IP “pending” problem.
Install
1
2
3
4
kubectl apply -f https://raw.githubusercontent.com/metallb/metallb/v0.9.6/manifests/namespace.yaml
kubectl apply -f https://raw.githubusercontent.com/metallb/metallb/v0.9.6/manifests/metallb.yaml
# On first install only
kubectl create secret generic -n metallb-system memberlist --from-literal=secretkey="$(openssl rand -base64 128)"
Config
1
2
3
4
5
6
7
8
9
10
11
12
13
14
$ kubectl apply -f - <<EOF
apiVersion: v1
kind: ConfigMap
metadata:
  namespace: metallb-system
  name: config
data:
  config: |
    address-pools:
    - name: default
      protocol: layer2
      addresses:
      - 172.16.50.147-172.16.50.148 #Update this with your Nodes IP range
EOF
Demo
Enable istio injection.
1
2
$ kubectl label namespace default istio-injection=enabled
namespace/default labeled
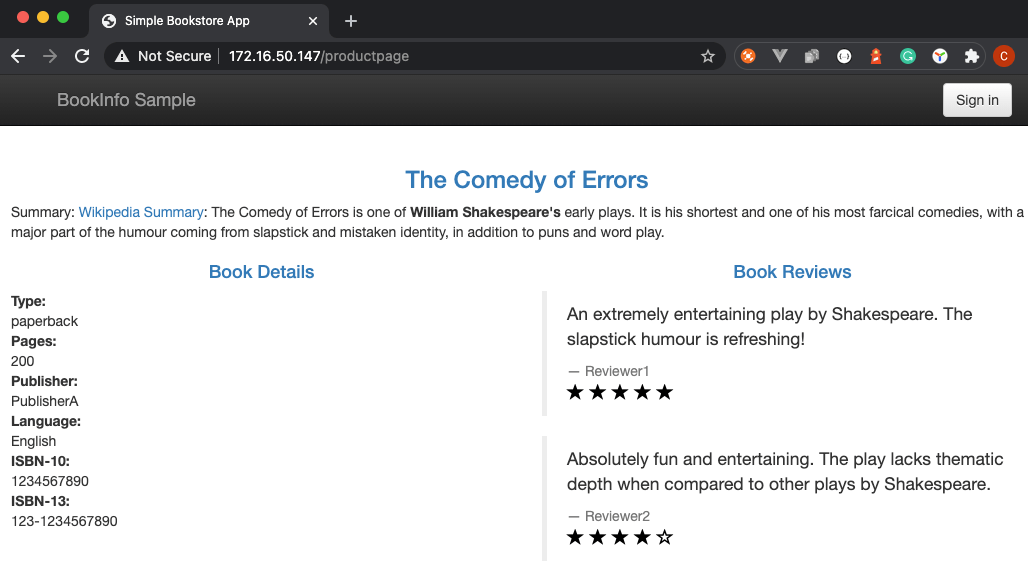
Deploy book info demo.
1
2
3
4
5
6
7
8
9
10
11
12
13
14
15
16
$ cd istio-1.9.2
$ kubectl apply -f samples/bookinfo/platform/kube/bookinfo.yaml
service/details created
serviceaccount/bookinfo-details created
deployment.apps/details-v1 created
service/ratings created
serviceaccount/bookinfo-ratings created
deployment.apps/ratings-v1 created
service/reviews created
serviceaccount/bookinfo-reviews created
deployment.apps/reviews-v1 created
deployment.apps/reviews-v2 created
deployment.apps/reviews-v3 created
service/productpage created
serviceaccount/bookinfo-productpage created
deployment.apps/productpage-v1 created
Deploy book info gateway.
1
2
3
$ kubectl apply -f samples/bookinfo/networking/bookinfo-gateway.yaml
gateway.networking.istio.io/bookinfo-gateway created
virtualservice.networking.istio.io/bookinfo created
Confirm that all of the pods are running with the following command.
1
2
3
4
5
6
7
8
$ kubectl get pod
NAME                              READY   STATUS    RESTARTS   AGE
details-v1-79f774bdb9-62x6b       2/2     Running   0          19m
productpage-v1-6b746f74dc-4g4hk   2/2     Running   0          19m
ratings-v1-b6994bb9-rz6pq         2/2     Running   0          19m
reviews-v1-545db77b95-bcnd8       2/2     Running   0          19m
reviews-v2-7bf8c9648f-zcgfx       2/2     Running   0          19m
reviews-v3-84779c7bbc-78bk7       2/2     Running   0          19m
Get istio ingress gateway EXTERNAL-IP.
1
2
3
4
$ kubectl get service -n istio-system
NAME                   TYPE           CLUSTER-IP      EXTERNAL-IP     PORT(S)                                                                      AGE
istio-ingressgateway   LoadBalancer   10.99.204.213   172.16.50.147   15021:32373/TCP,80:30588/TCP,443:31095/TCP,15012:31281/TCP,15443:32738/TCP   73m
istiod                 ClusterIP      10.103.238.79   <none>          15010/TCP,15012/TCP,443/TCP,15014/TCP                                        75m
Access productpage via http://EXTERNAL-IP/productpage
Reference
- https://kubernetes.io/docs/setup/production-environment/tools/kubeadm/
- https://github.com/justmeandopensource/kubernetes/blob/master/docs/install-cluster-ubuntu-20.md
- https://docs.docker.com/engine/install/ubuntu/
- https://docs.projectcalico.org/getting-started/kubernetes/quickstart
- https://github.com/kubernetes/dashboard
- https://stackoverflow.com/questions/57137683/how-to-troubleshoot-metrics-server-on-kubeadm
 Service Mesh - 使用 kubeadm 和 MetalLB 搭建 Kubernetes & Istio 环境