前言
上一篇笔者使用如何阅读深度学习论文的方法阅读了 ResNet。为了加深理解,本文带大家使用 TensorFlow 2 Keras 实现 ResNet 网络。
网络结构
从论文了解到,可以根据网络的深度开发不同类型的 ResNet,如:ResNet-34、ResNet-50、ResNet-152,甚至可以自定义网络的深度,来满足需求。因此,ResNet 更像是一种范式,可能叫 ResNets 会更合适些。
ResNet 可以看做是 VGG 的升级版,区别在于 ResNet 中使用的快捷连接(shortcuts)。在下图中,我们可以看到 VGG 的架构以及 34 层 ResNet。
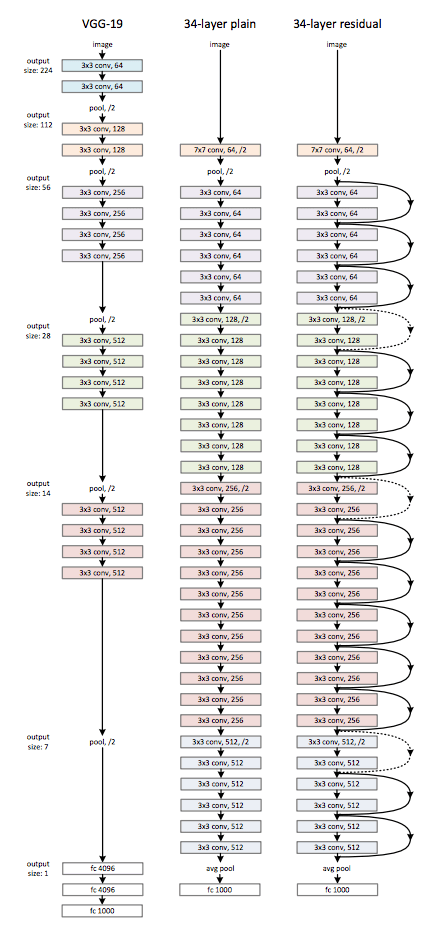
图 3.
ImageNet的网络架构例子。左:作为参考的VGG-19模型[41]。中:具有34个参数层的简单网络(36亿FLOPs)。右:具有34个参数层的残差网络(36亿FLOPs)。带点的快捷连接增加了维度。表 1 显示了更多细节和其它变种。
而对于不同的网络类型,其中的构建块(building block)也不一样,如下图所示:
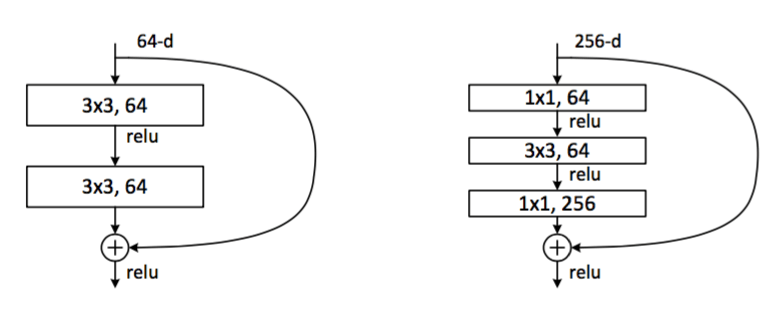
图 5.
ImageNet的深度残差函数 F。左:ResNet-34的构建块(在56×56的特征图上),如图 3。右:ResNet-50/101/152的 “bottleneck”构建块。
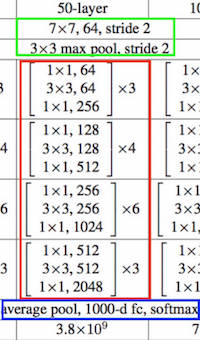
论文也提供了不同深度的 ResNet 的架构图,如下所示:

表 1.
ImageNet架构。构建块显示在括号中(也可看图 5),以及构建块的堆叠数量。下采样通过步长为2的conv3_1,conv4_1和conv5_1执行。
实现
下面以 ResNet-50 为例,其他的类型都是类似的。
注:源码已经上传 https://github.com/CatchZeng/YiAI-examples/blob/master/papers/ResNet/ResNet.py,需要的同学可以参考。
首先,先实现下堆叠的残差结构(上图红色框部分)。
1
2
3
4
5
6
7
8
9
10
11
12
13
14
15
16
17
18
19
20
21
22
23
24
25
26
27
28
29
30
31
32
33
34
35
36
37
38
39
40
41
42
43
44
45
46
47
48
49
50
51
52
53
54
55
56
57
58
59
60
61
62
63
64
65
66
67
68
69
70
71
72
73
74
75
76
77
78
79
80
81
82
83
def ResNet50(include_top=True,
             input_shape=None,
             pooling=None,
             classes=1000):
    """Instantiates the ResNet50 architecture."""

    # 堆叠的残差结构
    def stack_fn(x):
        x = stack(x, 64, 3, stride1=1, name='conv2')
        x = stack(x, 128, 4, name='conv3')
        x = stack(x, 256, 6, name='conv4')
        return stack(x, 512, 3, name='conv5')

    return ResNet(stack_fn, 'resnet50', include_top, input_shape, pooling, classes)

def stack(x, filters, blocks, stride1=2, name=None):
    """A set of stacked residual blocks.

    Args:
      x: input tensor.
      filters: integer, filters of the bottleneck layer in a block.
      blocks: integer, blocks in the stacked blocks.
      stride1: default 2, stride of the first layer in the first block.
      name: string, stack label.

    Returns:
      Output tensor for the stacked blocks.
    """
    x = block(x, filters, stride=stride1, name=name + '_block1')
    # 没有增加维度的时候可以做恒等快捷连接,不需要 conv_shortcut,可以参考图 3。
    for i in range(2, blocks + 1):
        x = block(x, filters, conv_shortcut=False,
                  name=name + '_block' + str(i))
    return x

def block(x, filters, kernel_size=3, stride=1, conv_shortcut=True, name=None):
    """A residual block.

    Args:
      x: input tensor.
      filters: integer, filters of the bottleneck layer.
      kernel_size: default 3, kernel size of the bottleneck layer.
      stride: default 1, stride of the first layer.
      conv_shortcut: default True, use convolution shortcut if True,
          otherwise identity shortcut.
      name: string, block label.

    Returns:
      Output tensor for the residual block.
    """
    bn_axis = 3 if backend.image_data_format() == 'channels_last' else 1

    # 当维度增加(图 3 中的虚线快捷连接)时,我们考虑两个选项:(A)快捷连接仍然执行恒等映射,额外填充零输入以增加维度。此选项不会引入额外的参数;(B)方程(2)中的投影快捷连接用于匹配维度(由 1×1 卷积完成)。对于这两个选项,当快捷连接跨越两种尺寸的特征图时,它们执行时步长为 2。
    if conv_shortcut:
        shortcut = layers.Conv2D(
            4 * filters, 1, strides=stride, name=name + '_0_conv')(x)
        shortcut = layers.BatchNormalization(
            axis=bn_axis, epsilon=1.001e-5, name=name + '_0_bn')(shortcut)
    # 当输入和输出具有相同的维度时(图 3 中的实线快捷连接)时,可以直接使用恒等快捷连接
    else:
        shortcut = x

    # 1x1xfilters
    x = layers.Conv2D(filters, 1, strides=stride, name=name + '_1_conv')(x)
    x = layers.BatchNormalization(
        axis=bn_axis, epsilon=1.001e-5, name=name + '_1_bn')(x)
    x = layers.Activation('relu', name=name + '_1_relu')(x)

    # 3x3xfilters
    x = layers.Conv2D(
        filters, kernel_size, padding='SAME', name=name + '_2_conv')(x)
    x = layers.BatchNormalization(
        axis=bn_axis, epsilon=1.001e-5, name=name + '_2_bn')(x)
    x = layers.Activation('relu', name=name + '_2_relu')(x)

    # 1x1x(4倍filters)
    x = layers.Conv2D(4 * filters, 1, name=name + '_3_conv')(x)
    x = layers.BatchNormalization(
        axis=bn_axis, epsilon=1.001e-5, name=name + '_3_bn')(x)

    x = layers.Add(name=name + '_add')([shortcut, x])
    x = layers.Activation('relu', name=name + '_out')(x)
    return x
接着再实现输入和输出部分(上图绿色和蓝色框部分),代码如下:
1
2
3
4
5
6
7
8
9
10
11
12
13
14
15
16
17
18
19
20
21
22
23
24
25
26
27
28
29
30
31
32
33
34
35
36
37
38
39
40
41
42
43
44
45
46
47
48
49
50
51
52
53
54
55
56
57
58
59
60
61
62
63
64
65
66
67
68
69
70
71
72
73
74
75
76
77
78
def ResNet(stack_fn,
           model_name='resnet',
           include_top=True,
           input_shape=None,
           pooling=None,
           classes=1000,
           classifier_activation='softmax'):
    """Instantiates the ResNet, ResNetV2, and ResNeXt architecture.

    Args:
      stack_fn: a function that returns output tensor for the
        stacked residual blocks.
      model_name: string, model name.
      include_top: whether to include the fully-connected
        layer at the top of the network.
      input_shape: optional shape tuple, `(224, 224, 3)` (with `channels_last` data format)
        or `(3, 224, 224)` (with `channels_first` data format).
        It should have exactly 3 inputs channels.
      pooling: optional pooling mode for feature extraction
        when `include_top` is `False`.
        - `None` means that the output of the model will be
            the 4D tensor output of the
            last convolutional layer.
        - `avg` means that global average pooling
            will be applied to the output of the
            last convolutional layer, and thus
            the output of the model will be a 2D tensor.
        - `max` means that global max pooling will
            be applied.
      classes: optional number of classes to classify images
        into, only to be specified if `include_top` is True, and
        if no `weights` argument is specified.
      classifier_activation: A `str` or callable. The activation function to use
        on the "top" layer. Ignored unless `include_top=True`. Set
        `classifier_activation=None` to return the logits of the "top" layer.
        When loading pretrained weights, `classifier_activation` can only
        be `None` or `"softmax"`.

    Returns:
      A `keras.Model` instance.
    """

    img_input = layers.Input(shape=input_shape)

    bn_axis = 3 if backend.image_data_format() == 'channels_last' else 1

    x = layers.ZeroPadding2D(
        padding=((3, 3), (3, 3)), name='conv1_pad')(img_input)
    # conv 1 7x7, 64, stride 2
    x = layers.Conv2D(64, 7, strides=2, use_bias=True,
                      name='conv1_conv')(x)

    x = layers.BatchNormalization(
        axis=bn_axis, epsilon=1.001e-5, name='conv1_bn')(x)
    x = layers.Activation('relu', name='conv1_relu')(x)

    x = layers.ZeroPadding2D(padding=((1, 1), (1, 1)), name='pool1_pad')(x)
    # 3x3 max pool, stride 2
    x = layers.MaxPooling2D(3, strides=2, name='pool1_pool')(x)

    x = stack_fn(x)

    if include_top:
        # average pool, 1000-d fc, softmax
        x = layers.GlobalAveragePooling2D(name='avg_pool')(x)
        x = layers.Dense(classes, activation=classifier_activation,
                         name='predictions')(x)
    else:
        if pooling == 'avg':
            x = layers.GlobalAveragePooling2D(name='avg_pool')(x)
        elif pooling == 'max':
            x = layers.GlobalMaxPooling2D(name='max_pool')(x)

    inputs = img_input

    model = Model(inputs, x, name=model_name)

    return model
测试
通过与 tensorflow 官方的代码对比,可以验证模型编写的准确性。
1
2
3
4
5
6
7
8
9
10
if __name__ == '__main__':
    model = ResNet50(include_top=True, input_shape=(224, 224, 3), classes=10)
    model.summary()

    print("----------------------------------------")

    from tensorflow.keras.applications import resnet
    model2 = resnet.ResNet50(
        include_top=True, weights=None, input_shape=(224, 224, 3), classes=10)
    model2.summary()
小结
实践出真知,从阅读到实践,是一个提升的过程。在实践中,不但可以了解到实现的细节,而且还能熟悉 TensorFlow 的生态。强烈推荐大家,多看论文,并实践。
 易 AI - ResNet 论文深度讲解