许多 App 需要用到 Marquee(跑马灯)。在 UIKit 中我们可以使用 https://github.com/cbpowell/MarqueeLabel,但是目前还没有成熟的 SwiftUI 库。
下面,让我们一起做一个强大的 Marquee。
什么样的 Marquee 才是强大的?
- 必须支持任意内容视图(MarqueeLabel 只支持文本)
- 可以自定义动画的时长、自动回放、方向等
- 可以组合使用
Marquee 动画原理
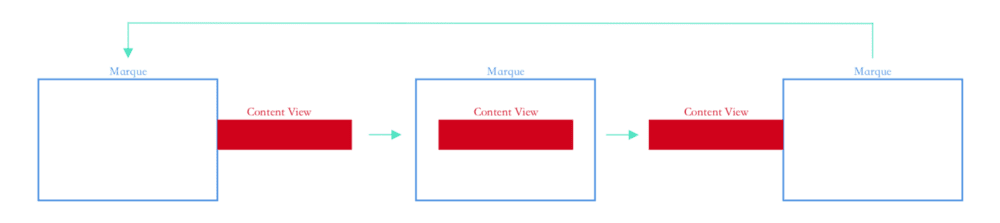
Marquee 的原理是内容视图从 Marquee 的一端移动到另一端,然后一直循环。
步骤
第一步要先获取 Marquee 和内容视图的宽度。关于这一点,你可以使用 GeometryReader and PreferenceKey 来实现。
GeometryReader 为我们提供了一个输入值,告诉我们可用的宽度和高度,然后我们可以将其用于需要的任何计算中。

1
2
3
4
5
6
7
8
9
struct ContentView: View {
    var body: some View {
        GeometryReader { geometry in
            Text("width: \(geometry.size.width)")
                .frame(width: geometry.size.width, height: 50)
                .background(Color.yellow)
        }
    }
}
众所周知,SwiftUI 具有 environment 概念,可用于将数据向下传递到视图层次结构中。父视图与子视图共享其 environment 并订阅更改。但是有时我们需要将数据从子视图传递到父视图,这就是 PreferenceKey 发挥作用的地方。

1
2
3
4
5
6
7
8
9
10
11
12
13
14
15
16
17
18
19
20
21
22
23
24
25
26
27
28
29
30
31
32
33
34
35
36
37
38
39
40
struct ContentView: View {
    @State var text: String = "\(Date())"
    @State var textWidth: CGFloat = 0

    var body: some View {
        GeometryReader { geometry in
            VStack {
                Text(text)
                    .background(GeometryBackground())
                    .background(Color.yellow)

                Text("text width: \(textWidth)")

                Button(action: {
                    self.text = "\(Date())"
                }, label: {
                    Text("change text")
                })
            }
        }
        // Listen content width changes
        .onPreferenceChange(WidthKey.self, perform: { value in
            self.textWidth = value
        })
    }
}
struct GeometryBackground: View {
    var body: some View {
        GeometryReader { geometry in
            return Color.clear.preference(key: WidthKey.self, value: geometry.size.width)
        }
    }
}
struct WidthKey: PreferenceKey {
    static var defaultValue = CGFloat(0)
static func reduce(value: inout CGFloat, nextValue: () -> CGFloat) {
        value = nextValue()
    }
    typealias Value = CGFloat
}
第二步是实现偏移动画(offset animation)。

1
2
3
4
5
6
7
8
9
10
11
12
struct ContentView : View {
    @State private var offset: CGFloat = 0
    var body: some View {
        Text("offset animation")
            .offset(x: offset, y: 0)
            .onAppear {
                withAnimation(Animation.linear(duration: 1).repeatForever(autoreverses: true)) {
                    self.offset = 100
                }
            }.background(Color.yellow)
    }
}
第三步是利用 ViewBuilder 支持任意内容视图。

1
2
3
4
5
6
7
8
9
10
11
12
13
14
15
16
17
18
19
20
21
22
23
24
struct ContentView : View {
    @State private var offset: CGFloat = 0
var body: some View {
        ViewBuilderView {
            Text("content view")
        }
    }
}
struct ViewBuilderView<Content> : View where Content : View {
    private var content: () -> Content

    init(@ViewBuilder content: @escaping () -> Content) {
        self.content = content
    }

    public var body: some View {
        VStack {
            Text("---")
            content()
                .background(Color.yellow)
            Text("---")
        }.background(Color.blue)
    }
}
根据以上步骤,你可以实现 Marquee 视图。详细的代码请参见 https://github.com/SwiftUIKit/Marquee。再见!
 微服务监控 - Jaeger 简介