- 前言
- 创建项目
- 指定库名称
- 创建 pyproject.toml
- 配置元数据
- 添加包内容
- 创建 README.md
- 创建许可证
- 生成分发归档
- 上传分发归档
- 安装新上传的软件包
- 发布正式包
- Github Actions
- 小结
- 参考
前言
本教程以 py_pkg 项目为例,讲解如何将一个 Python 项目打包成库并分发到 PyPI,方便他人使用 pip install 安装使用。
创建项目
创建以下文件结构
1
2
3
4
5
6
7
8
9
10
.
└── py_pkg
    ├── LICENSE
    ├── README.md
    ├── py_pkg
    │   ├── __init__.py
    │   └── hello.py
    ├── pyproject.toml
    ├── setup.cfg
    └── tests
指定库名称
在 py_pkg/__init__.py 中指定库的名称
1
name = "py_pkg"
创建 pyproject.toml
pyproject.toml 告诉构建工具(例如 pip10+ 和 build)的文件,你正在使用什么系统以及构建它需要什么。如果缺少此文件,则默认为假定使用经典的 setuptools 构建系统,但最好明确一些。如果您有 pyproject.toml 文件,你将可以依赖 wheel 和存在其他软件包。
对于大多数 setuptools 项目,可参考以下配置:
1
2
3
4
5
6
[build-system]
requires = [
"setuptools>=42",
"wheel"
]
build-backend = "setuptools.build_meta"
build-system.requires 提供构建软件包所需的软件包列表。在此处列出某些内容只会使其在构建期间可用,而在安装之后不可用。
build-system.build-backend 在技术上是可选的,但是如果你忘记包含 setuptools.build_meta:__legacy__ ,则会被替代,因此请始终包含它。如果要使用 flit 或 poetry 之类的其他构建系统, 将在此处使用,并且配置详细信息将与下面描述的 setuptools 配置完全不同。请查看 PEP 517 和 PEP 518 了解背景和详细信息。
配置元数据
元数据分为以下两种类型:
- 静态元数据(
setup.cfg):保证每次都相同。这更简单,更易于阅读,并且避免了许多常见错误,例如编码错误。 - 动态元数据(
setup.py):可能不确定。任何动态的或在安装时确定的项目,以及扩展模块或 setuptools 的扩展,都需要输入setup.py。
首选静态元数据,动态元数据仅在绝对必要时才使用。
setup.cfg
setup.cfg 是 setuptools 的配置文件。它告诉 setuptools 有关你的软件包(例如名称和版本)以及要包括的代码文件的信息。最终,此配置中的大部分都可以移至 pyproject.toml。
打开 setup.cfg 并输入以下内容。确保软件包名称具有唯一性,可以到 https://pypi.org/ 搜索你的软件包名,如果没有出现那就表明没有被占用。
1
2
3
4
5
6
7
8
9
10
11
12
13
14
15
16
17
[metadata]
name = py_pkg
version = 0.0.1
author = CatchZeng
author_email = catchzenghh@gmail.com
description = A small example package
long_description = file: README.md
long_description_content_type = text/markdown
url = https://github.com/catchzeng/py_pkg
classifiers =
    Programming Language :: Python :: 3
    License :: OSI Approved :: MIT License
    Operating System :: OS Independent

[options]
packages = find:
python_requires = >=3.6
支持的各种元数据和选项。这是 configparser 格式;不要在值两边加上引号。
-
name软件包的分发名称。该名称可以是任何名称,只可包含字母,数字,_和-。 -
version包的版本。有关版本的更多详细信息,请参见 PEP 440。你可以使用file:或attr:指令从文件或包属性中读取(简单属性不需要导入)。 -
author和author_email用于标识软件包的作者。 -
description是该软件包的简短,一句话摘要。 -
long_description是包装的详细说明。这在Python软件包索引的软件包详细信息页面上显示。在这种情况下,将README.md使用file:指令加载详细描述,这是一种常见的模式。 -
long_description_content_type告诉索引用于长描述的标记类型。 -
url是项目主页的 URL。对于许多项目,这仅是指向GitHub,GitLab,Bitbucket或类似代码托管服务的链接。 -
classifiers给index和 pip 提供包的一些额外元数据。比如,该软件包仅与Python 3兼容,已获得MIT许可,并且与操作系统无关。你应始终至少包括软件包所使用的Python 版本,软件包所使用的许可证以及软件包所使用的操作系统。有关classifiers的完整列表,请参见 https://pypi.org/classifiers/。
在 options 中:
-
packages是应该包含在分发包中的所有 Python 导入包的列表。无需手动列出每个软件包,我们可以使用指令自动发现所有软件包和子软件包。在这种情况下,软件包列表(py_pkg)将是唯一存在的软件包。 -
python_requires提供项目支持的 Python 版本。像pip这样的安装程序将回溯旧版软件包,直到找到具有匹配 Python 版本的软件包为止。
除了这里提到的以外,还有很多其他内容。有关更多详细信息,请参见打包和分发项目。
如果创建 setup.py 文件,则将启用与文件的直接交互 setup.py(通常应避免这种交互)和可编辑的安装。该文件以前是必需的,但在现在的 setuptools 中可以省略。
你设置的所有内容 setup.cfg 都可以通过关键字参数设置为 setup(); 这样就可以使用计算值。你还需要 setup() 设置扩展模块进行编译。
1
2
3
import setuptools

setuptools.setup()
配置依赖项
如果你的包在用 pip 安装的时候,依赖其他包(比如 requests),可以在 setup.cfg 的 install_requires 添加。
1
2
3
4
5
[options]
packages = find:
python_requires = >=3
install_requires =
    requests>=2.24.0
setup.py
注:
setup.py是非必须的,所以在py_pkg实例中已省略。
setup.py 是 setuptools 的构建脚本。它告诉 setuptools 有关软件包(例如名称和版本)以及要包括的代码文件的信息。
打开 setup.py 并输入以下内容。
1
2
3
4
5
6
7
8
9
10
11
12
13
14
15
16
17
18
19
20
21
22
import setuptools

with open("README.md", "r", encoding="utf-8") as fh:
    long_description = fh.read()

setuptools.setup(
    name="py-pkg",
    version="0.0.1",
    author="catchzeng",
    author_email="catchzenghh@gmail.com",
    description="A small example package",
    long_description=long_description,
    long_description_content_type="text/markdown",
    url="https://github.com/catchzeng/py_pkg",
    classifiers=[
        "Programming Language :: Python :: 3",
        "License :: OSI Approved :: MIT License",
        "Operating System :: OS Independent",
    ],
    packages=setuptools.find_packages(),
    python_requires='>=3.6',
)
setup() 的参数与 setup.cfg 中的类似,这里不再赘述。
添加包内容
这里以 hello.py 为例
1
2
def hello():
    print("hello")
创建 README.md
这里编写项目的介绍,可以根据需要自定义。
1
2
3
# py_pkg

> 如何打包并发布 Python 库到 PyPI demo
创建许可证
每个上传到 PyPI 的软件包都必须包含许可证。这会告诉安装软件包的用户使用条款。有关选择许可证的帮助,请参阅 https://choosealicense.com/。选择许可证后,打开 LICENSE 并输入许可证文本。例如,如果您选择了 MIT 许可证:
1
2
3
4
5
6
7
8
9
10
11
12
13
14
15
16
17
18
19
20
21
MIT License

Copyright (c) 2021 The Python Packaging Authority

Permission is hereby granted, free of charge, to any person obtaining a copy
of this software and associated documentation files (the "Software"), to deal
in the Software without restriction, including without limitation the rights
to use, copy, modify, merge, publish, distribute, sublicense, and/or sell
copies of the Software, and to permit persons to whom the Software is
furnished to do so, subject to the following conditions:

The above copyright notice and this permission notice shall be included in all
copies or substantial portions of the Software.

THE SOFTWARE IS PROVIDED "AS IS", WITHOUT WARRANTY OF ANY KIND, EXPRESS OR
IMPLIED, INCLUDING BUT NOT LIMITED TO THE WARRANTIES OF MERCHANTABILITY,
FITNESS FOR A PARTICULAR PURPOSE AND NONINFRINGEMENT. IN NO EVENT SHALL THE
AUTHORS OR COPYRIGHT HOLDERS BE LIABLE FOR ANY CLAIM, DAMAGES OR OTHER
LIABILITY, WHETHER IN AN ACTION OF CONTRACT, TORT OR OTHERWISE, ARISING FROM,
OUT OF OR IN CONNECTION WITH THE SOFTWARE OR THE USE OR OTHER DEALINGS IN THE
SOFTWARE.
生成分发归档
安装 PyPA’s build。
1
2
3
4
5
6
7
8
9
10
11
❯ python3 -m pip install --upgrade build
Collecting build
  Downloading build-0.3.0-py2.py3-none-any.whl (13 kB)
Collecting pep517>=0.9
  Downloading pep517-0.9.1-py2.py3-none-any.whl (18 kB)
Requirement already satisfied, skipping upgrade: toml in /Users/catchzeng/opt/anaconda3/lib/python3.8/site-packages (from build) (0.10.1)
Requirement already satisfied, skipping upgrade: packaging in /Users/catchzeng/opt/anaconda3/lib/python3.8/site-packages (from build) (20.4)
Requirement already satisfied, skipping upgrade: pyparsing>=2.0.2 in /Users/catchzeng/opt/anaconda3/lib/python3.8/site-packages (from packaging->build) (2.4.7)
Requirement already satisfied, skipping upgrade: six in /Users/catchzeng/opt/anaconda3/lib/python3.8/site-packages (from packaging->build) (1.15.0)
Installing collected packages: pep517, build
Successfully installed build-0.3.0 pep517-0.9.1
在 pyproject.toml 所在目录下,执行以下命令生成分法包。
1
❯ python3 -m build
完成后会生成许多文件,其中 dist 目录中生成两个文件:
1
2
3
4
5
6
7
8
9
10
11
12
13
14
15
16
17
18
19
20
21
22
23
.
├── LICENSE
├── README.md
├── build
│   ├── bdist.macosx-10.9-x86_64
│   └── lib
│       └── py_pkg
│           ├── __init__.py
│           └── hello.py
├── dist
│   ├── py_pkg-0.0.1-py3-none-any.whl
│   └── py_pkg-0.0.1.tar.gz
├── py_pkg
│   ├── __init__.py
│   └── hello.py
├── py_pkg.egg-info
│   ├── PKG-INFO
│   ├── SOURCES.txt
│   ├── dependency_links.txt
│   └── top_level.txt
├── pyproject.toml
├── setup.cfg
└── tests
该 tar.gz 文件是源归档,而 .whl 文件是内置分发。较新的 pip 版本优先安装内置发行版,但如果需要,将回落到源归档文件中。你应该始终上传源档案,并为项目兼容的平台提供内置档案。在这种情况下,示例包在任何平台上都与 Python 兼容,因此仅需要一个内置发行版。
上传分发归档
第一件事是在 Test PyPI 上注册一个帐户。Test PyPI 是用于测试和实验的包索引的单独实例。对于像本教程这样的事情非常有用,我们不必一定要上传到真实索引。要注册帐户,请访问 https://test.pypi.org/account/register/ 并完成该页面上的步骤。你还需要先验证电子邮件地址,然后才能上传任何软件包。有关 Test PyPI 的更多详细信息,请参阅使用 TestPyPI。
现在,需要创建一个 PyPI API 令牌,以便能够安全地上传你的项目。
访问 https://test.pypi.org/manage/account/#api-tokens 并创建一个新的 API 令牌。不要将其范围限制为特定项目,因为你正在创建一个新项目。
注:在复制并保存令牌之前,请不要关闭页面-您不会再看到该令牌。
现在你已经注册,可以使用 twine 上传分发包。需要安装 Twine:
1
❯ python3 -m pip install --user --upgrade twine
安装完成后,运行 Twine 上传所有归档 dist:
1
2
3
4
5
6
7
8
9
10
11
❯ python3 -m twine upload --repository testpypi dist/*
Uploading distributions to https://test.pypi.org/legacy/
Enter your username: __token__
Enter your password:
Uploading py_pkg-0.0.1-py3-none-any.whl
100%|██████████████████████████████████████████████████████████████████████████████████████████████████████████████| 5.43k/5.43k [00:04<00:00, 1.17kB/s]
Uploading py_pkg-0.0.1.tar.gz
100%|██████████████████████████████████████████████████████████████████████████████████████████████████████████████| 4.46k/4.46k [00:00<00:00, 4.89kB/s]
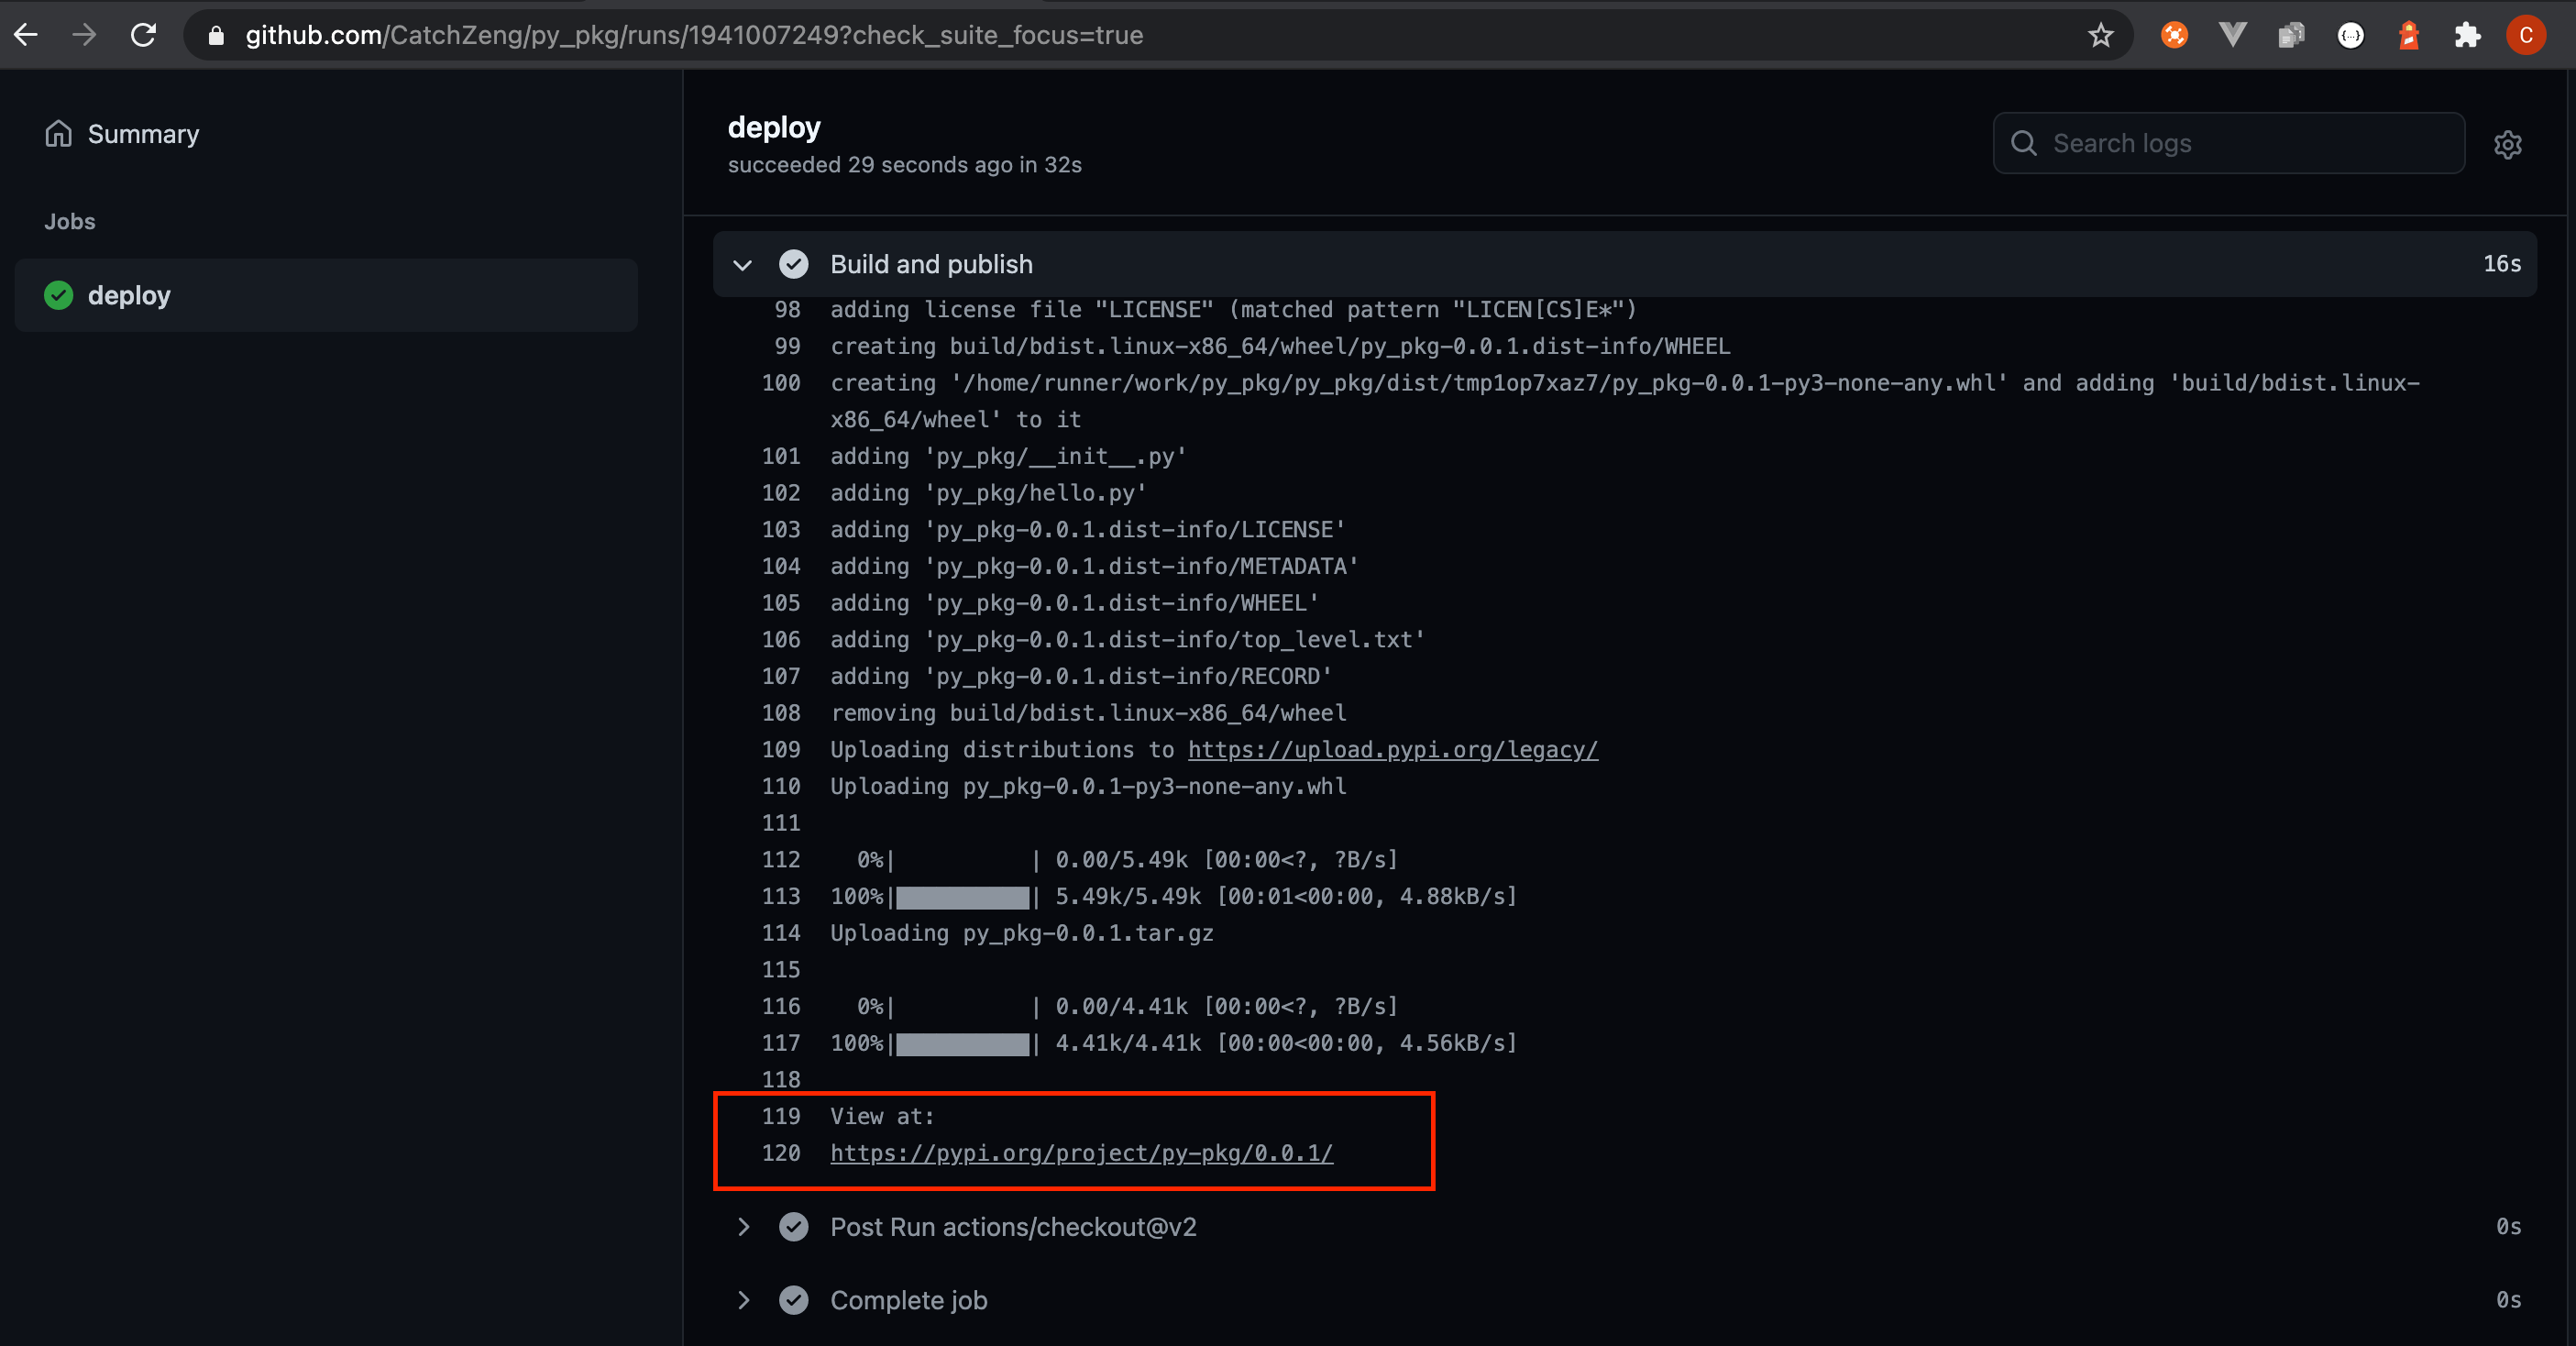
View at:
https://test.pypi.org/project/py-pkg/0.0.1/
系统将提示您输入用户名和密码。对于用户名,请使用 __token__。对于密码,请使用令牌值,包括 pypi- 前缀。
安装新上传的软件包
你可以使用 pip 来安装软件包并验证其是否有效。创建一个新的 virtualenv,然后从 TestPyPI 安装软件包:
1
2
3
4
5
6
❯ python3 -m pip install --index-url https://test.pypi.org/simple/ --no-deps py-pkg
Looking in indexes: https://test.pypi.org/simple/
Collecting py-pkg
  Downloading https://test-files.pythonhosted.org/packages/86/8e/44313ae67863815e0a9afd5e8972e5eb8c9dae5f9ff80d94d3fcfad6310b/py_pkg-0.0.1-py3-none-any.whl (2.4 kB)
Installing collected packages: py-pkg
Successfully installed py-pkg-0.0.1
注:本示例使用
--index-url标志指定TestPyPI而不是实时PyPI。另外,它指定--no-deps。由于TestPyPI与实时PyPI没有相同的软件包,因此尝试安装依赖项可能会失败或安装意外的东西。尽管我们的示例包没有任何依赖关系,但是最好避免在使用TestPyPI时安装依赖关系。所以,如果你的包有依赖项,只需要去掉--no-deps,然后查看日志输出是否有安装依赖项即可,即使安装不成功也不用担心。
您可以通过导入软件包来测试它是否已正确安装。运行 Python 解释器(确保您仍在 virtualenv 中):
1
2
3
4
5
6
7
❯ python
Python 3.8.5 (default, Sep  4 2020, 02:22:02)
[Clang 10.0.0 ] :: Anaconda, Inc. on darwin
Type "help", "copyright", "credits" or "license" for more information.
>>> from py_pkg import hello
>>> hello.hello()
hello
发布正式包
安装测试完毕后,就可以在 https://pypi.org 注册账号,执行以下发布命令即可。
1
❯ python3 -m twine upload dist/*
Github Actions
上面,我们使用手动的方式分发包。下面介绍使用 Github Actions 的方式将分发包过程自动化。
创建 Secrets
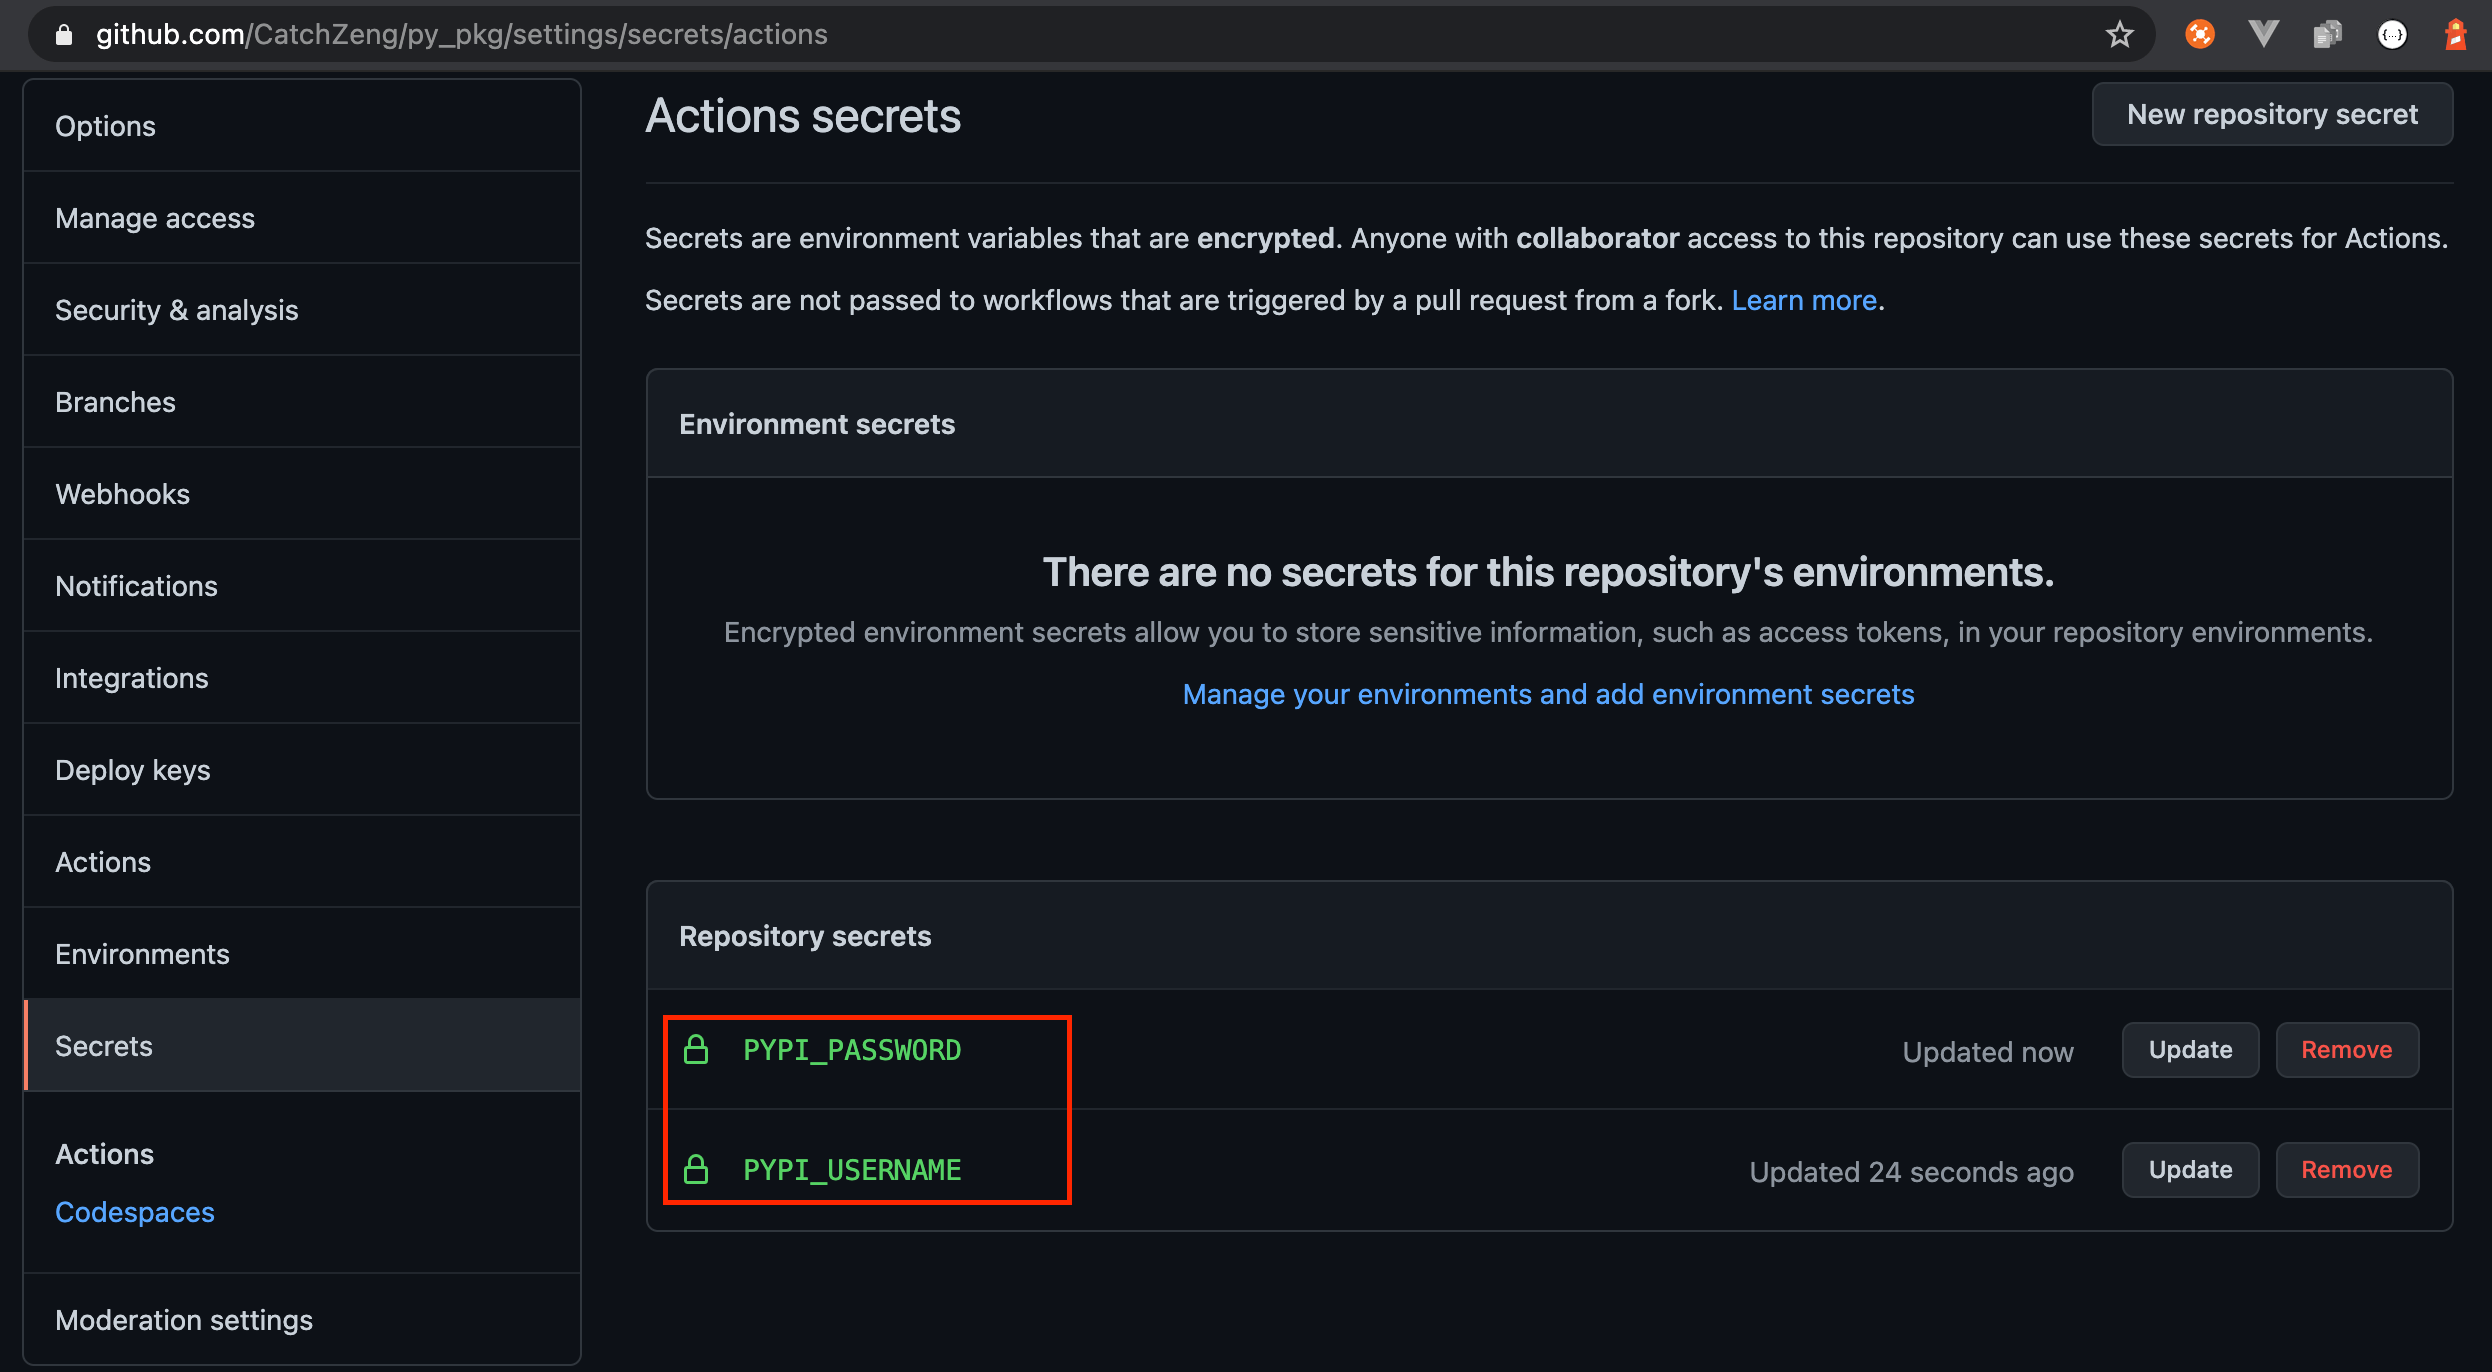
前往项目的设置中,以 py_pkg 为例 https://github.com/CatchZeng/py_pkg/settings/secrets/actions/new,添加名称为 PYPI_USERNAME 和 PYPI_PASSWORD 值为 https://pypi.org 用户名和密码的秘钥,用于上传。
添加 Actions
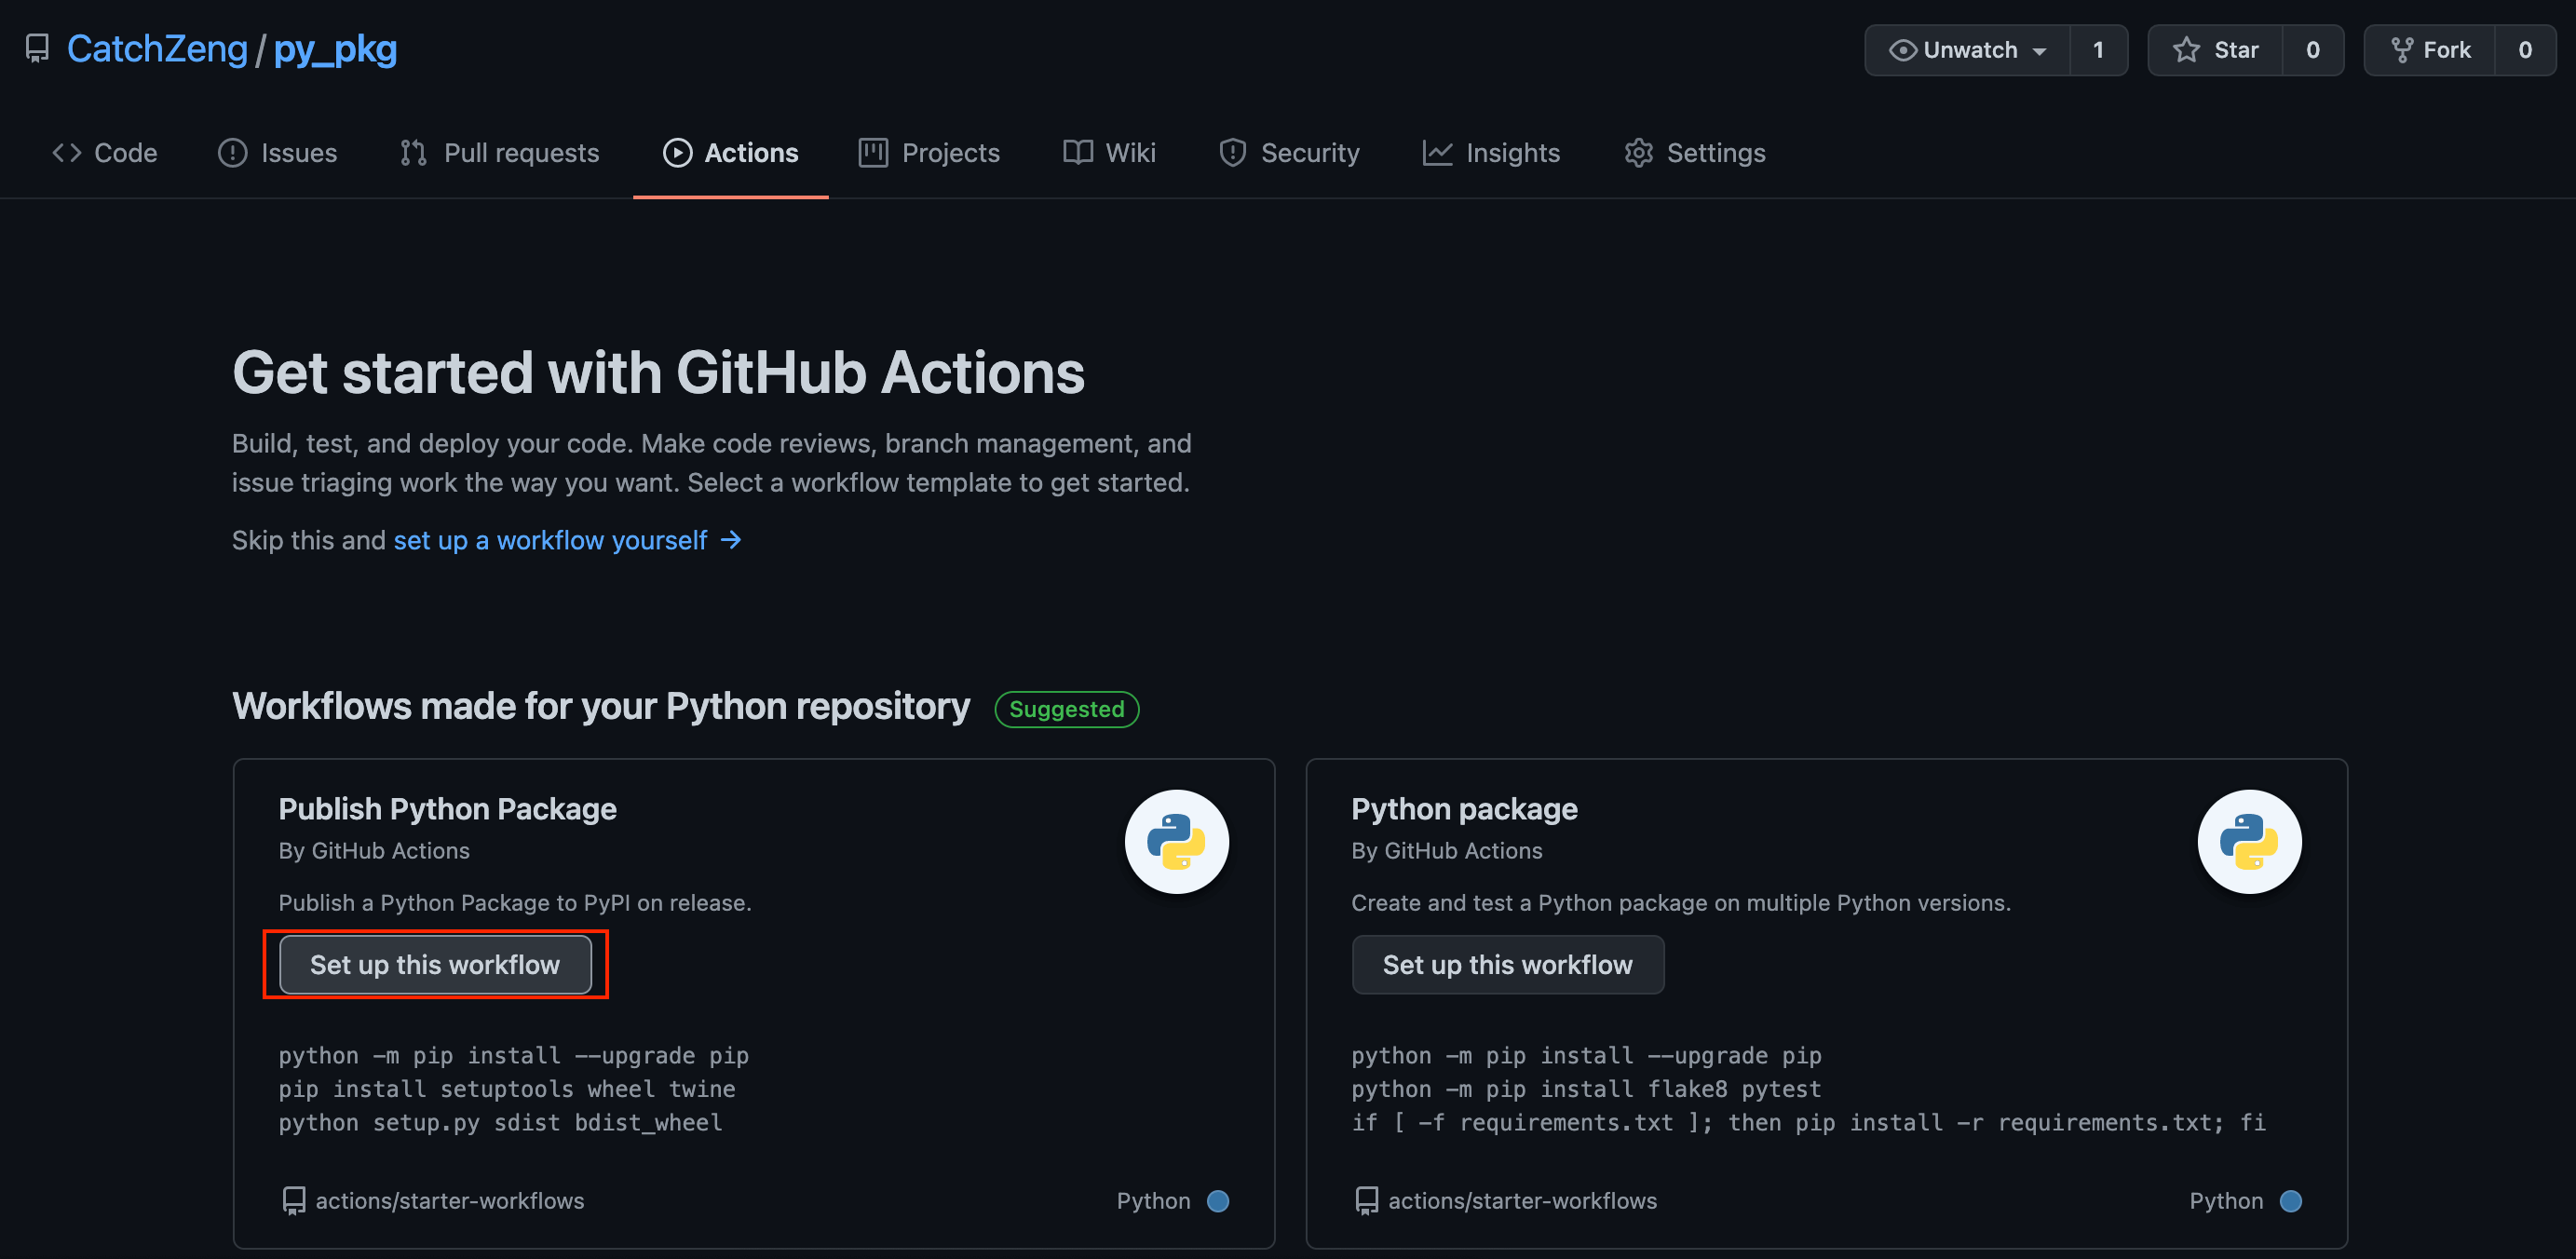
前往 https://github.com/CatchZeng/py_pkg/actions/new,添加 Publish Python Package Action,并提交。
完成后,可以看到项目增加了 .github 目录。
1
2
3
4
5
6
7
.
├── .github
│   └── workflows
│       └── python-publish.yml
├── LICENSE
├── README.md
......
python-publish.yaml 的内容如下:
1
2
3
4
5
6
7
8
9
10
11
12
13
14
15
16
17
18
19
20
21
22
23
24
25
26
27
28
29
30
# This workflow will upload a Python Package using Twine when a release is created
# For more information see: https://help.github.com/en/actions/language-and-framework-guides/using-python-with-github-actions#publishing-to-package-registries

name: Upload Python Package

on:
  release:
    types: [created]

jobs:
  deploy:
    runs-on: ubuntu-latest

    steps:
      - uses: actions/checkout@v2
      - name: Set up Python
        uses: actions/setup-python@v2
        with:
          python-version: "3.x"
      - name: Install dependencies
        run: |
          python -m pip install --upgrade pip
          pip install setuptools wheel twine
      - name: Build and publish
        env:
          TWINE_USERNAME: $
          TWINE_PASSWORD: $
        run: |
          python setup.py sdist bdist_wheel
          twine upload dist/*
由于没有使用 setup.py,因此需要做适当修改。
1
2
3
4
5
6
7
8
9
10
11
12
13
14
15
16
17
18
19
20
21
22
23
24
25
26
27
28
29
30
31
32
# This workflow will upload a Python Package using Twine when a release is created
# For more information see: https://help.github.com/en/actions/language-and-framework-guides/using-python-with-github-actions#publishing-to-package-registries

name: Upload Python Package

on:
  release:
    types: [created]

jobs:
  deploy:
    runs-on: ubuntu-latest

    steps:
      - uses: actions/checkout@v2
      - name: Set up Python
        uses: actions/setup-python@v2
        with:
          python-version: "3.8" # py_pkg 需要大于 3.6
      # 依赖安装换成前面的脚本
      - name: Install dependencies
        run: |
          python3 -m pip install --upgrade build
          python3 -m pip install --user --upgrade twine
      # 构建和发布换成前面的脚本
      - name: Build and publish
        env:
          TWINE_USERNAME: $
          TWINE_PASSWORD: $
        run: |
          python3 -m build
          python3 -m twine upload dist/*
修改完毕后,提交代码。
触发 Actions
由于在 Actions 中指定了 on:
1
2
3
on:
  release:
    types: [created]
所以,创建一个 release 即可触发 Actions。
前往 https://github.com/CatchZeng/py_pkg/releases/new 创建一个新的 release。
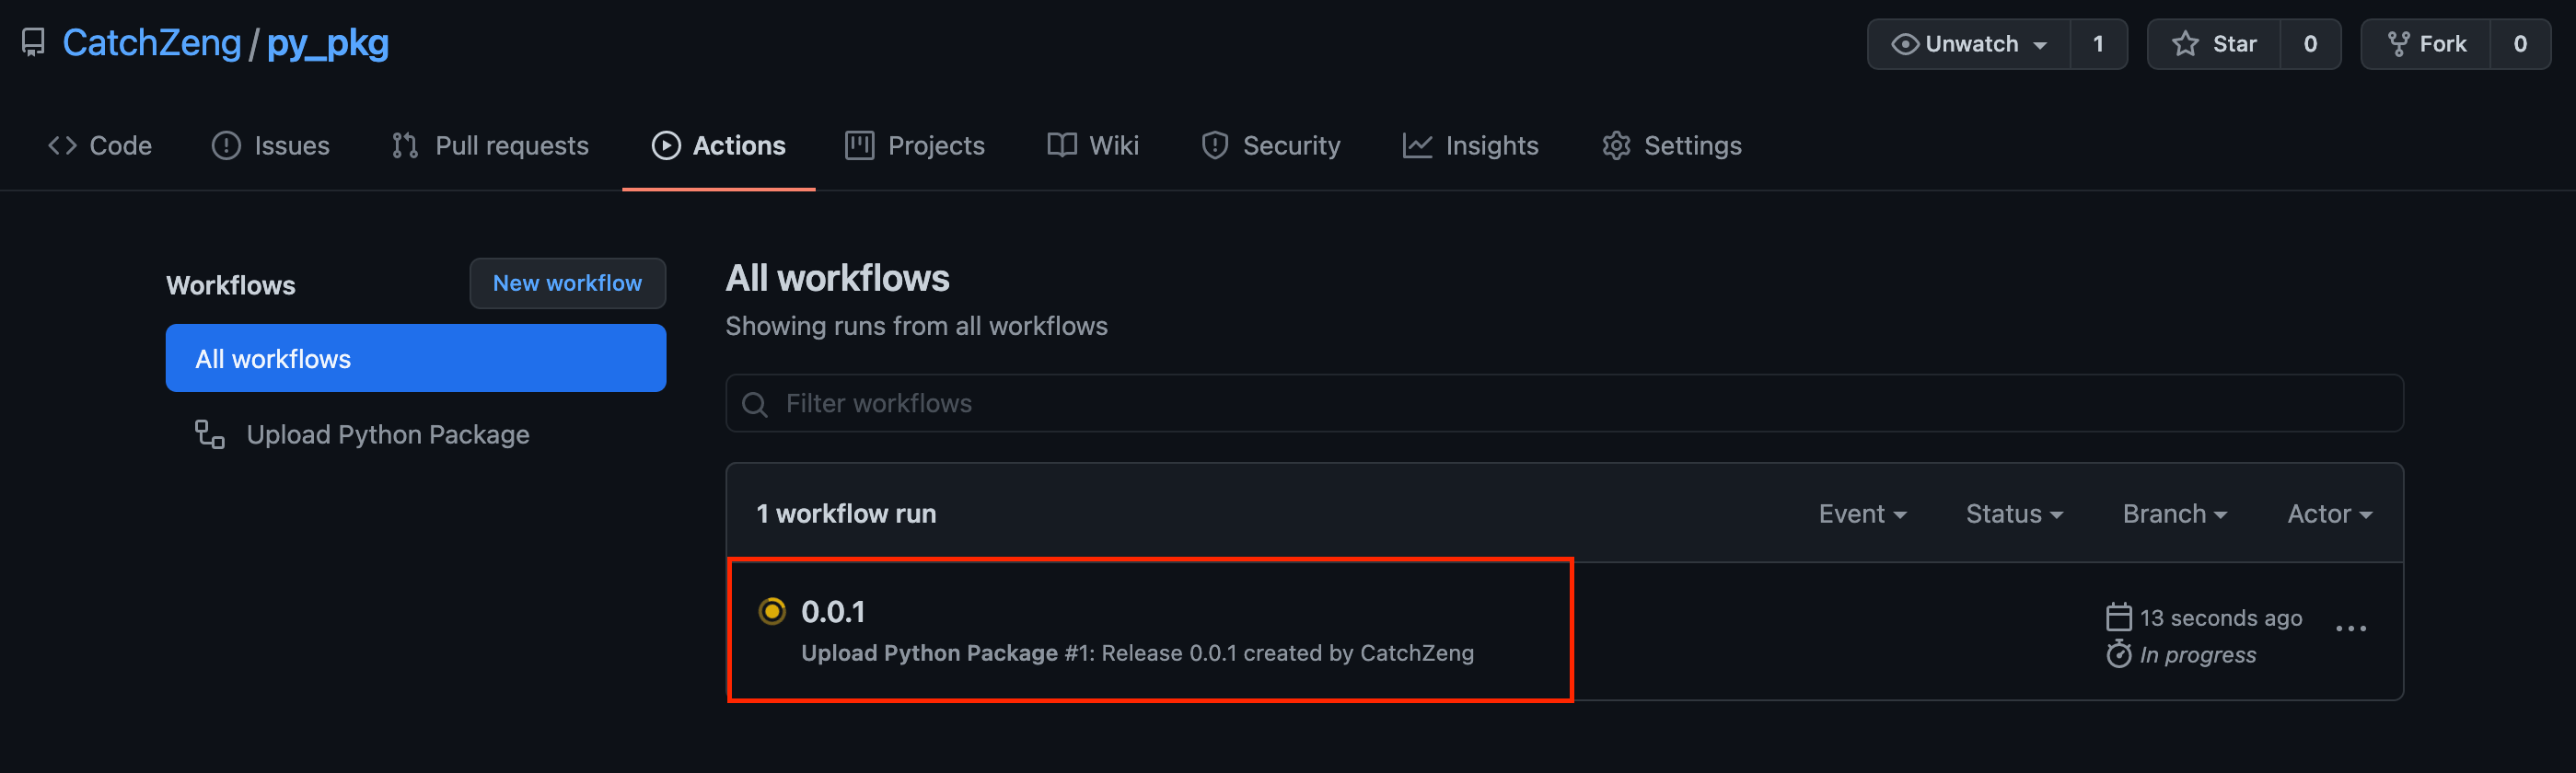
点击 Action 即可查看具体日志
小结
本教程通过一个实例,讲解了如何将一个 Python 项目打包成库并分发到 PyPI,并结合 Github Actions 实现持续集成自动化分发,希望能帮助到大家。
如果需要更新库,也很简单,修改完代码后,增加版本号,然后再创建新的 release 即可触发分发。
这里需要注意的是,版本号的管理尽量要遵循语义化版本。
另外,示例代码仓库 https://github.com/CatchZeng/py_pkg 和真实项目 https://github.com/CatchZeng/bing_images 有需要的可以参考。
 golang 编程规范 - Effective Go 中文